Distributed Projects
Overview
- Folding@Home - Use processing power to assist with disease research
- Tor Relay - Add a node to the Tor network
- YaCy - Decentralized open source search engine
- IPFS Node - Contribute to a decentralized internet
- ADS-B Feeder - track airplanes using SDRs and feed the data to ADS-B aggregators
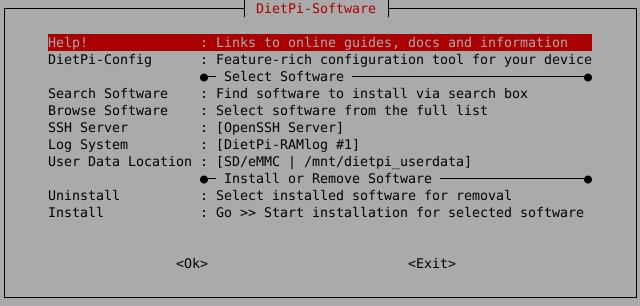
How do I run DietPi-Software and install optimised software items?
To install any of the DietPi optimised software items listed below run from the command line:
dietpi-software
Choose Browse Software and select one or more items. Finally select Install.
DietPi will do all the necessary steps to install and start these software items.
To see all the DietPi configurations options, review the DietPi Tools section.
Return to the Optimised Software list
Folding@Home
Folding@home is a project focused on disease research.
The problems which are solved require so many computer calculations that help from the community is needed to find the cures!
By default, our installation will add you to the DietPi team group, however, you can change this in the web interface at any time.
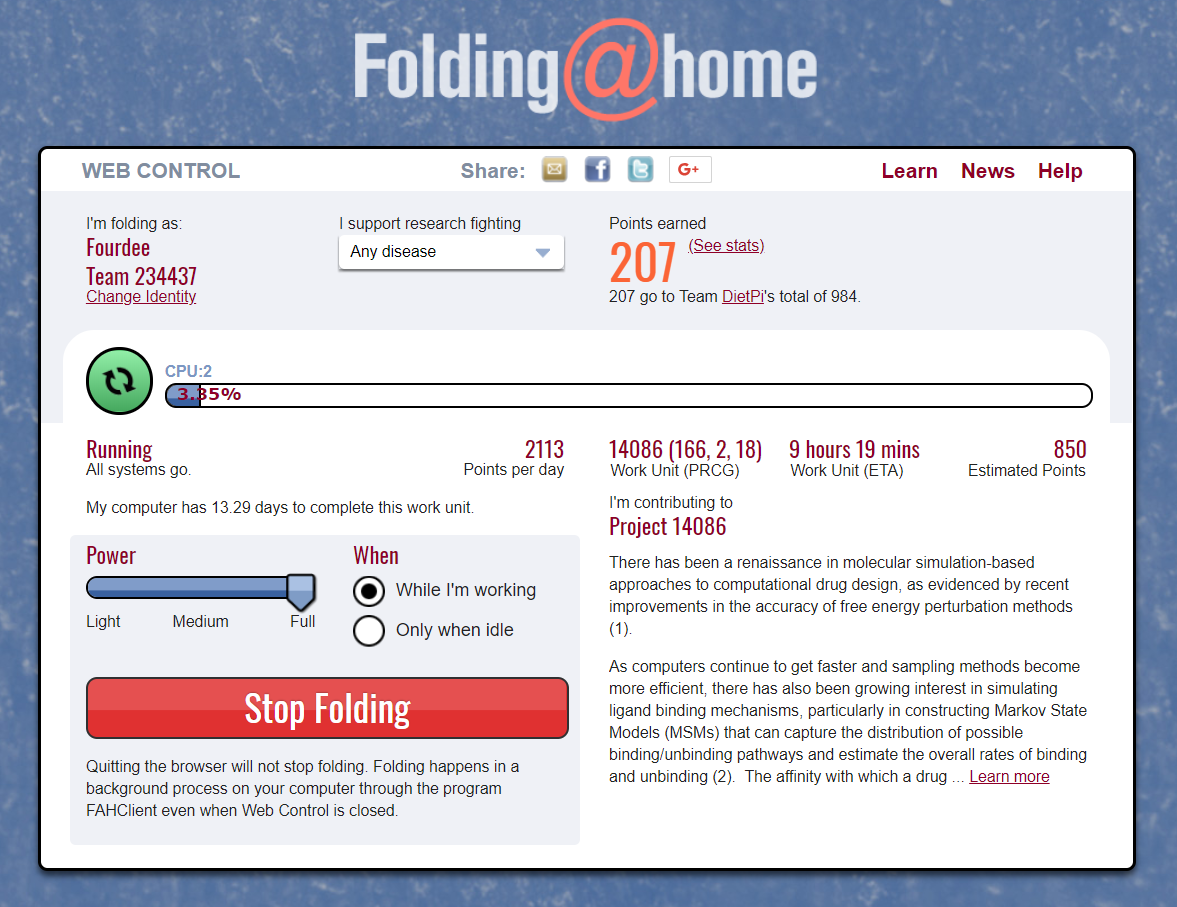
The web interface is accessible via the port 7396, e.g. this could be:
- URL =
http://<your.IP>:7396
The configuration is located in the file /mnt/dietpi_userdata/fahclient/config.xml.
You can change the configuration with the following steps:
- Stop services with
dietpi-services stop - Edit
/mnt/dietpi_userdata/fahclient/config.xml - Save changes and restart services with
dietpi-services start
Folding@Home has a logging feature which outputs into the journal logging system. The logs can be viewed via:
journalctl -u fahclient
In addition to the power slider in the web interface the user can influence the number of jobs that run on the system.
The example config given below has 3 job slots, ideal for a 6 core CPU (allowing 2 CPU cores per job slot):
<config>
  <!-- Slot Control -->
  <power v='FULL'/>

  <!-- User Information -->
  <user v='Fourdee'/>

  <!-- Folding Slots -->
  <slot id='0' type='CPU'/>
  <slot id='1' type='CPU'/>
  <slot id='2' type='CPU'/>
</config>
Tor Relay
![]()
Contribute a node to the Tor network, which allows people to be anonymous on the internet.
You can run many types of relay, each with their own technical requirements and legal implications.
Bridges are the safest relay to run from home, and are relatively easy, low-risk and low bandwidth, but they have a big impact on users, especially in censored countries. Normally, IP addresses and other information of Tor relays is published, making it easy for websites to blacklist the relay, and anything else using that IP address. Since a bridge isn’t listed publicly, it is unlikely to be blocked by websites or receive abuse complaints.
Guard/Middle relays are the first and second relays connected to, respectively. Information about them is listed, but they are unlikely to receive abuse complaints. However, they may be blocked by certain services that don’t understand how Tor works or deliberately want to censor Tor users. If you have one static IP address, consider running a bridge instead.
Exit relays are the final relay connected to, and the one that actually sends traffic to its destination. The website will see the exit relay’s IP address instead of the real IP address of the Tor user. Exit relays have the greatest legal exposure and liability of all the relays, and should not be run from home.
Exit relay preparation
Running exit relays requires some preparation. Before running an exit relay, you should set a reverse DNS (and, if possible, WHOIS) record to make it clearer that your IP address is a Tor exit relay. Also, it is recommended that you run an exit relay on its own server, with its own IP address.
The simplest way to monitor the Tor relay is to use the DietPi-CloudShell scene, for this run dietpi-cloudshell from the command line and select the “Tor Relay” scene. It uses the Tor monitor nyx which can be called in standalone mode by executing nyx from command line.
You can also monitor it with the Tor relay search. Just paste either the fingerprint (found at /var/lib/tor/fingerprint) or nickname of your relay.
Note for bridge operators
The Tor relay search will not always work for bridges, sometimes showing them as down when they are running. In that case, use the specific Tor bridge monitoring URL:https://bridges.torproject.org/status?type=obfs4&id=<FINGERPRINT>
Keeping Tor relays updated is important to the safety of both the users and the operator. Because of this, automated upgrades are recommended and asked about when first installing. Otherwise, regularly run the following commands to keep your system packages up-to-date:
apt update
apt upgrade
Tor service logs can be viewed with the following command:
journalctl -t tor
Official documentation: https://community.torproject.org/relay/setup
YaCy
YaCy is a decentralized open source search engine.
Essentially, it is a “peer-to-peer” Google search engine, not controlled by Google.
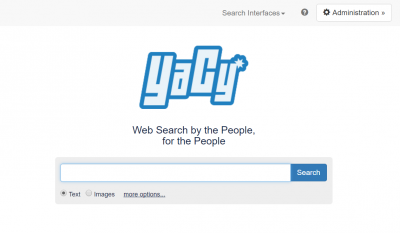
The web interface is accessible via port 8090:
- URL =
http://<your.IP>:8090
Set password with:
/etc/yacy/bin/passwd.sh mypassword
Login details are then:
- Username =
admin - Password =
mypassword
YaCy is extremely CPU intensive, coupled with constant background processing, we highly recommend using dietpi-services to reduce process priority.
Recommended setting: Nice = 19
IPFS Node
IPFS (InterPlanetary File System) is a peer-to-peer hypermedia protocol designed to make the web faster, safer, and more open. This node lets you download files through IPFS and add your own files to the network.
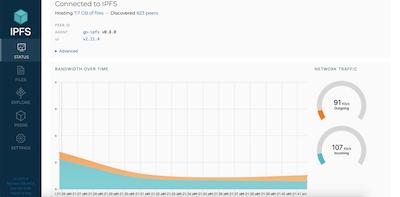
The web interface is accessible via port 5003, and the gateway through 8087:
- WebUI =
http://<your.IP>:5003/webui - Gateway =
http://<your.IP>:8087/ipfs/IPFSHash
You can use your IPFS node with the IPFS Companion browser extension to automatically download IPFS-hosted files through your node. In the settings page of the extension, change “IPFS API URL” to http://<your.IP>:5003, and “Local Gateway” to http://<your.IP>:8087.
Firefox: https://addons.mozilla.org/en-US/firefox/addon/ipfs-companion/
Chromium and derivatives: https://chromewebstore.google.com/detail/ipfs-companion/nibjojkomfdiaoajekhjakgkdhaomnch
Note for using with extension
IPFS content will not load on https:// pages without an SSL certificate. We recommend a free one from LetsEncrypt using DietPi-LetsEncrypt.
You can view the service logs via
journalctl -u ipfs
You can update your IPFS node by running
dietpi-software reinstall 186
IPFS has a built in update command (ipfs update), but this requires the ipfs-update binary found at https://dist.ipfs.io/#ipfs-update.
Official documentation: https://docs.ipfs.io
Do not expose to internet
The IPFS web interface requires no authentication to use. Do not expose it to the internet without taking proper security measures, like an authenticated reverse proxy, VPN or similar.
ADS-B Feeder
ADSB.im is a project to create an easy to manage ADS-B Feeder system.
The images available as GitHub Releases are intended to be run on dedicated Single Board Computers (or VMs) - many of them are actually based on DietPi. But if you already have a DietPi system that you use for other purposes, it might make more sense to simply add the software stack to your existing setup - and this is the purpose of providing ADS-B feeder as an app in the DietPi Optimised Software list.
What is ADS-B? Automatic Dependent Surveillance - Broadcast (ADS-B) is a surveillance technology that uses satellite navigation or other sensors to determine an aircraft’s position and periodically broadcast it, enabling it to be tracked. With a simple (and relatively cheap) Software Defined Radio (SDR) USB stick, anyone can receive the ADS-B signal from planes in their vicinity. There are thousands of people all over the world who are tracking planes around them and then feed that data to sites that aggregate this data and make it available for others to use. Some of them, like ADSB.lol, do so under an open data license, others, like FlightAware are commercial companies that then resell the data to their customers.
The ADS-B Feeder application allows you to feed any (or all) of these aggregators, currently almost two dozen.
The web interface is accessible via the port 1099, e.g. this could be:
- URL =
http://<your.IP>:1099
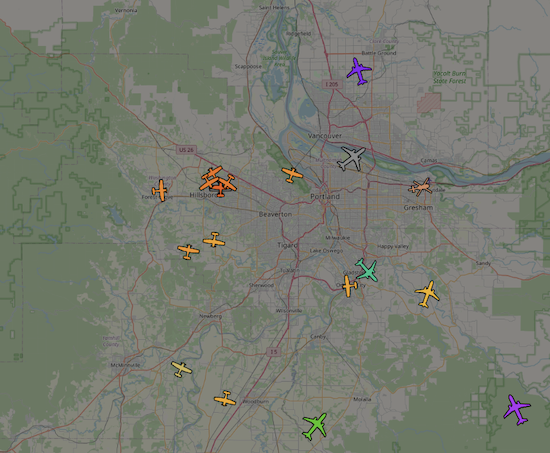
The color of the plane icons is an indication of their altitude, lots more information (like call signs, routes of the planes, etc) are available as well. The system provides you with statistics, graphs, and information about the performance of your feeder, and makes it easy to explore some of the information provided by the aggregators that you are feeding.
First of all, you need to connect an SDR to your system (lots more information at the ADSB.impages - currently these pages are somewhat focused on the full feeder images, but all of the other information applies here as well), add an antenna and set up the software.
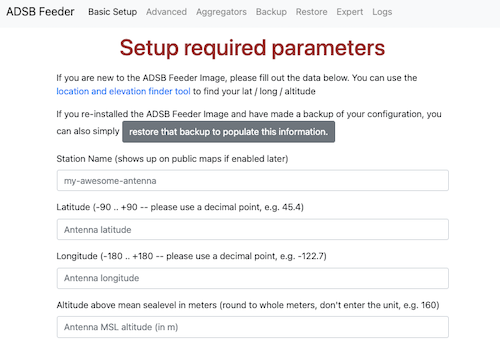
Then simply connect with a browser to your DietPi system on port 1099. On the initial setup page enter a name for your site plus its location and pick how you want to decide which aggregators to feed.
It will take a short while to get started (depending on your system and network speed as it will download a couple Docker containers), and after that you are up and running.
There are additional options for more advanced features, but even with just the information on the first page you’ll already start tracking planes around you. Click on the TAR1090 map link on the feeder home page to see the planes around you.
While this has been tested and works with 512MB of RAM, 1GB is a much more reasonable minimum. There seems to be no real benefit from having more than 2GB of RAM.
Decoding the data streams from the SDR is somewhat CPU intensive. A simple rule of thumb is that you want one more core than you have SDRs. So for a typical setup with one SDR for ADS-B signals (sent at 1090 MHz), two cores are sufficient. If you are in the US and also want to scan for UAT traffic (“Universal Access Transceiver” sent at 978 MHz) and therefore have two SDRs connected, three cores will get you better results.
Official documentation: https://adsb.im/home
Wikipedia page about ADS-B: https://wikipedia.org/wiki/Automatic_Dependent_Surveillance–Broadcast