Cloud & Backup systems
Overview
- ownCloud - Your own personal cloud based backup/data storage system
- Nextcloud - Self-hosted productivity platform
- Nextcloud Talk - Video calls via Nextcloud, including TURN server
- Pydio - Feature-rich backup and sync server with web interface
- UrBackup Server - Full backups for systems on your network
- Gogs - GitHub style server, with web interface
- Gitea - GitHub style server, with web interface
- Syncthing - Backup and sync server with web interface
- MinIO - S3 compatible distributed object server
- vaultwarden - Unofficial Bitwarden password manager server written in Rust
- FuguHub - Your Own Personal Cloud Server
- File Browser - Light web based file manager with sharing features
- Rclone - Utility to sync your files to cloud storages
- Restic - Fast, efficient and secure command-line backup program
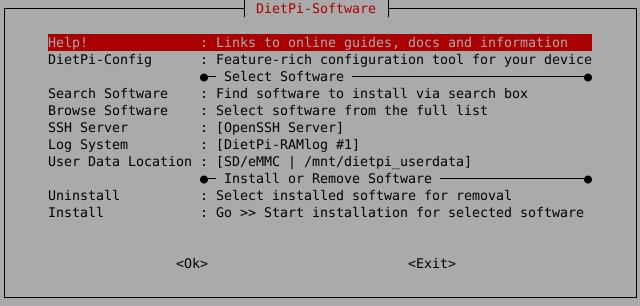
How do I run DietPi-Software and install optimised software items?
To install any of the DietPi optimised software items listed below run from the command line:
dietpi-software
Choose Browse Software and select one or more items. Finally select Install.
DietPi will do all the necessary steps to install and start these software items.
To see all the DietPi configurations options, review the DietPi Tools section.
Return to the Optimised Software list
ownCloud
The ownCloud package turns your DietPi system into your very own personal cloud based backup/data storage system (e.g.: Dropbox).
Also Installs:
- Webserver
- USB dedicated hard drive highly recommended
ownCloud is accessible via regular HTTP/HTTPS TCP ports 80/443 below the /owncloud path:
- URL:
http://<your.IP>/owncloud - Username:
admin(or the one you set indietpi.txt) - Password:
<your global password>(default:dietpi)
You can configure ownCloud via CLI from command line. To simplify this, DietPi has added a shortcut to the otherwise necessary sudo -u www-data php /var/www/owncloud/occ.
Simply run occ from your console:
occ list
More details about available commands can be found in the ownCloud admin manual.
- Option: Use the web-based updater from within the ownCloud web UI settings.
Option: Use the updater script from console (recommended):
sudo -u www-data php /var/www/owncloud/updater/application.php
1
Follow the official documentation for a manual upgrade process: https://doc.owncloud.com/server/next/admin_manual/maintenance/upgrading/manual_upgrade.html
Where is my data stored?
/mnt/dietpi_userdata/owncloud_data (or dietpi.txt choice)
Why am I limited to 2 GiB file size uploads?
DietPi will automatically apply the max supported upload size to the PHP and ownCloud configs.
- 32-bit systems can handle 2 GiB
- 64-bit systems can handle 8796 PiB, yep, in petabyte
echo -e "$(( $(php -r 'print(PHP_INT_MAX);') / 1024 / 1024)) MiB"
Will my data be saved after deinstallation?
Your userdata directory will stay after deinstallation.
As well a database backup will be saved to your userdata directory. Thus you can easily restore your instance by reinstalling ownCloud and restore the database dump.
Official website: https://owncloud.com/
Official documentation: https://doc.owncloud.com/server/next/admin_manual/
Nextcloud
Nextcloud gives you access to all your files wherever you are. Store your documents, calendar, contacts and photos on a server at home, at one of our providers or in a data center you trust.
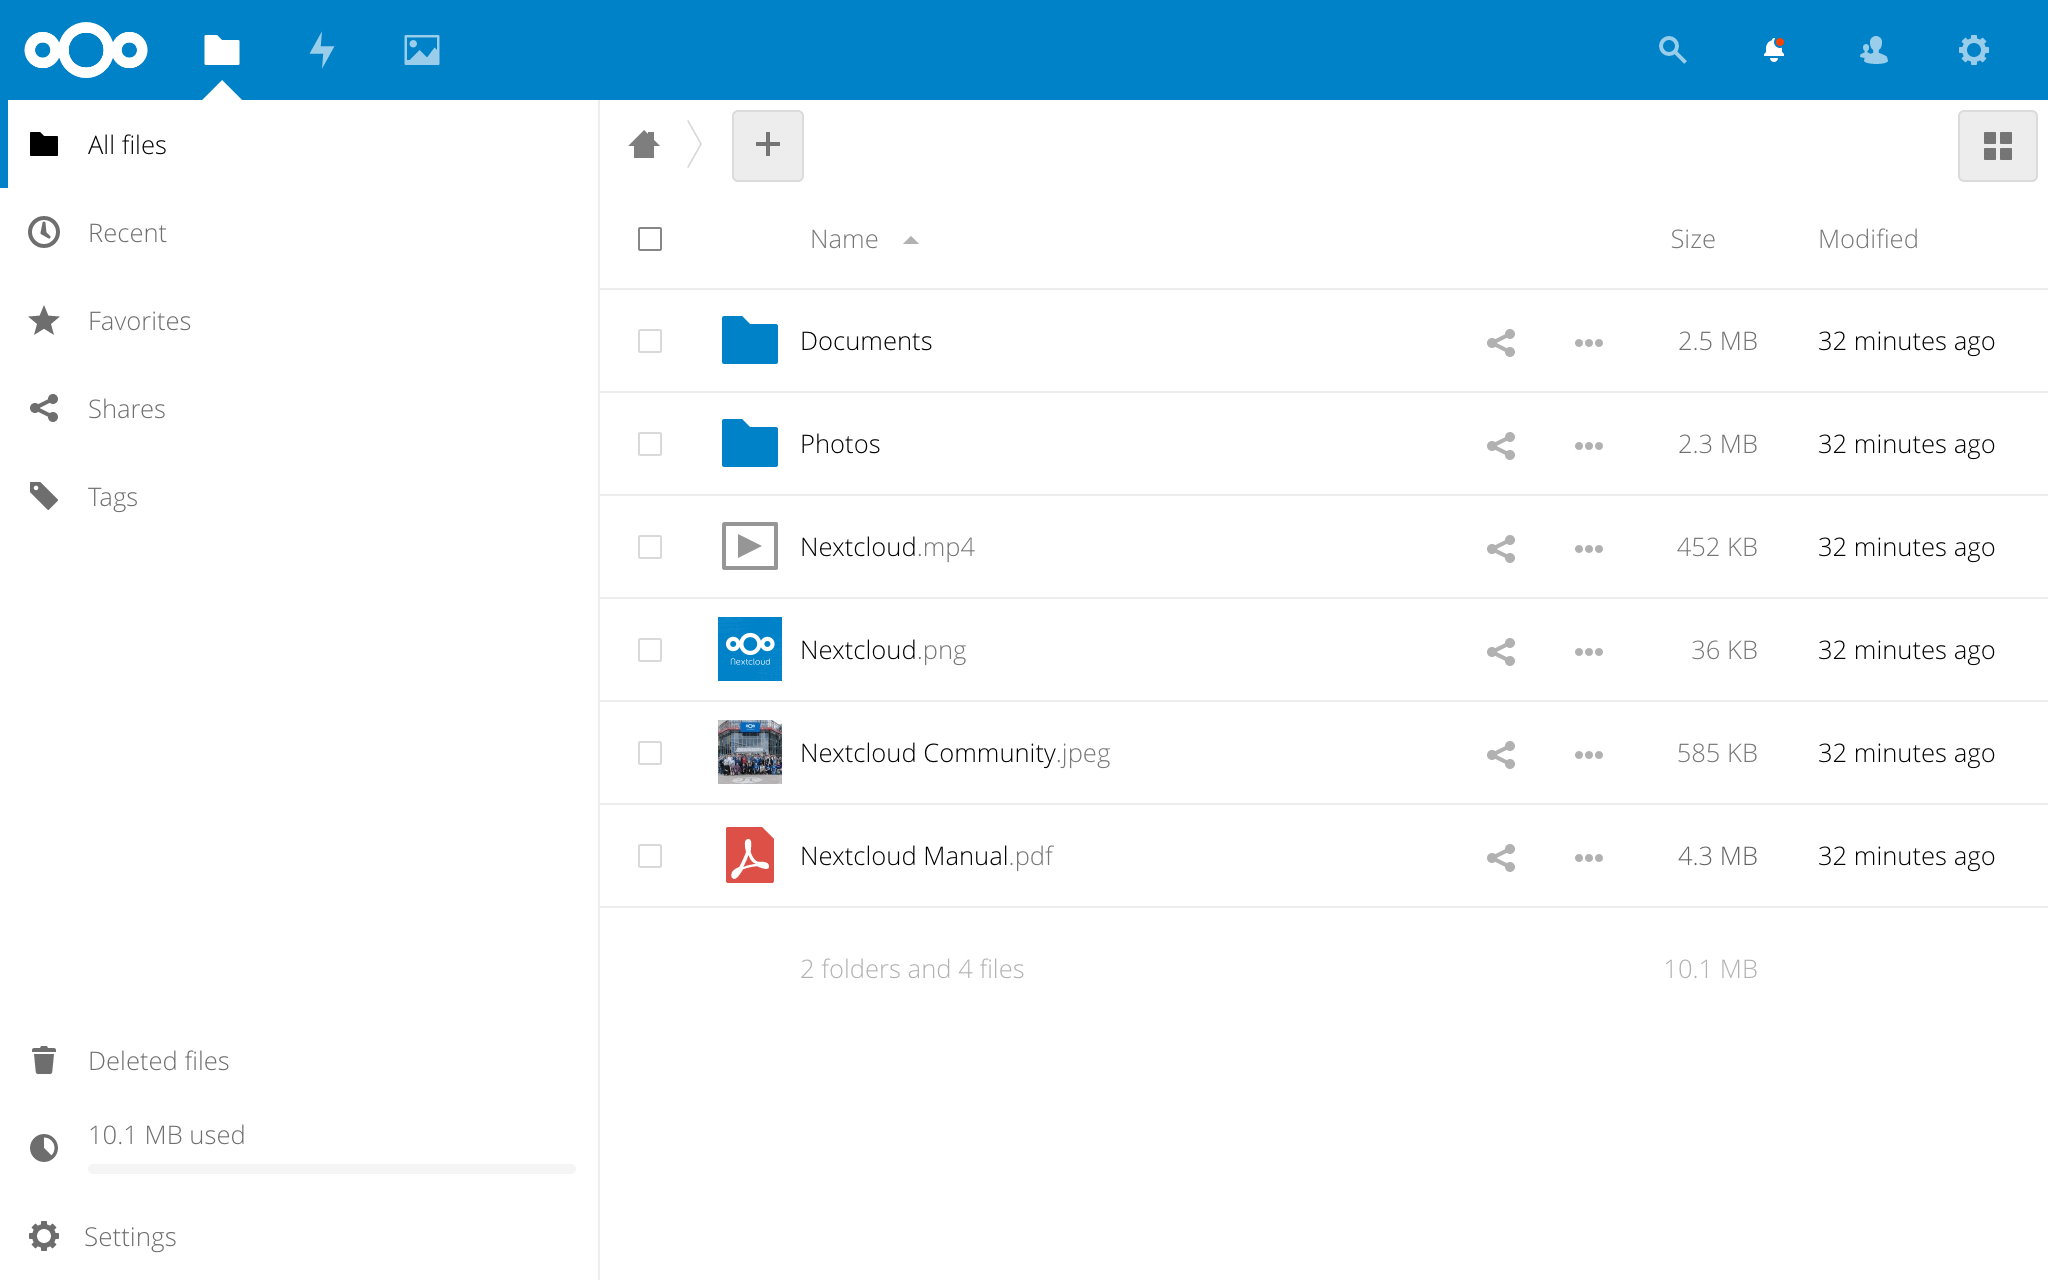
Nextcloud is accessible via regular HTTP/HTTPS ports 80/443 below the /nextcloud path:
- URL:
http://<your.IP>/nextcloud - Username:
admin(or the one you set indietpi.txt) - Password:
<your global password>(default:dietpi)
You can configure Nextcloud via CLI from command line. To simplify this, DietPi has added a shortcut to the otherwise necessary sudo -u www-data php /var/www/nextcloud/occ.
Simply run ncc from your console:
ncc list
More details about available commands can be found in the Nextcloud admin manual.
Nextcloud offers built-in brute-force protection, which will delay your login rate in case of several failed login attempts.
See also:
This protection can be extended with Fail2Ban (see following tab).
Using Fail2Ban your can block users after failed login attempts, which can further harden the brute-force protection of your Nextcloud instance.
To achieve this hardening, execute the following steps:
If not done yet, install Fail2Ban:
dietpi-software install 73Set options in the Nextcloud configuration file, typically
/var/www/nextcloud/config/config.php:Assure that all domains and IPs you use to access your Nextcloud instance were added to the
'trusted_domains'entry.'trusted_domains' => array ( 0 => 'localhost', 1 => 'your.domain/IP.org', ),The entry of the trusted domains is important, because one of the Fail2Ban filters deals with trusted domain errors (“Trusted domain error”, see below). By default, if you try to access with an untrusted domain, Nextcloud will show an error message.
Attention
Take care, if you use this “Trusted domain error”
failregexoption and you then reload the page several times (more often thanmaxretryvalue in the Fail2Ban jail file) you lockout yourself also for logging in via a trusted domain from the IP address you are using.
Create new Fail2Ban filter, e.g.
/etc/fail2ban/filter.d/nextcloud.conf:# Fail2Ban filter for Nextcloud [Definition] _groupsre = (?:(?:,?\s*"\w+":(?:"[^"]+"|\w+))*) failregex = ^\{%(_groupsre)s,?\s*"remoteAddr":"<HOST>"%(_groupsre)s,?\s*"message":"Login failed: ^\{%(_groupsre)s,?\s*"remoteAddr":"<HOST>"%(_groupsre)s,?\s*"message":"Trusted domain error. datepattern = ,?\s*"time"\s*:\s*"%%Y-%%m-%%d[T ]%%H:%%M:%%S(%%z)?"Create new Fail2Ban jail file
/etc/fail2ban/jail.d/nextcloud.local:[nextcloud] enabled = true backend = auto logpath = /mnt/dietpi_userdata/nextcloud_data/nextcloud.log port = 80,443 protocol = tcp filter = nextcloud maxretry = 5 bantime = 600Assure that the
logpathmatches the'datadirectory'value in the Nextcloud configuration file (config.php, see above), or the'logfile'value if defined.Properties not defined here are taken from the
[DEFAULT]block in/etc/fail2ban/jail.conf, or/etc/fail2ban/jail.localif present.
Note the settingbackend = auto: By default,backendis set tosystemdin/etc/fail2ban/jail.conf. As a result, Fail2Ban would ignore thelogpathentry here in the jailnextcloud.local, with the consequence that Fail2Ban does not recognize an attack on Nextcloud (port 80, 443), even though attacks are logged in/mnt/dietpi_userdata/nextcloud_data/nextcloud.log.Restart Fail2Ban:
systemctl restart fail2banTest your settings by trying to sign in multiple times from a remote PC with a wrong user or password. After
maxretryattempts your IP should be banned forbantimeseconds (DietPi does not respond anymore) as the default action by Fail2Ban isroute, specified in/etc/fail2ban/jail.confand defined in/etc/fail2ban/action.d/route.conf.Check the current status on your DietPi:
fail2ban-client status nextcloudIPs can be unbanned via:
fail2ban-client unban 123.123.123.123
See also:
- Option: Use the web-based updater from within the Nextcloud web UI settings.
Option: Use the updater script from console (recommended):
phpenmod phar # The PHP Phar module is required
sudo -u www-data php /var/www/nextcloud/updater/updater.phar
y # Starts download and install of files
y # Starts the internal database upgrade and migration steps
N # Do not keep maintenance mode active
Follow the official documentation for a manual upgrade process: https://docs.nextcloud.com/server/latest/admin_manual/maintenance/manual_upgrade.html
Where is my data stored?
/mnt/dietpi_userdata/nextcloud_data (or dietpi.txt choice)
Why am I limited to 2 GiB file size uploads?
DietPi will automatically apply the max supported upload size to the PHP and Nextcloud configs.
- 32-bit systems can handle 2 GiB
- 64-bit systems can handle 8796 PiB, yep, in petabyte
echo -e "$(( $(php -r 'print(PHP_INT_MAX);') / 1024 / 1024)) MiB"
Will my data be saved after deinstallation?
Your user data directory will stay after deinstallation. As well a database backup will be saved to your user data directory. Thus you can easily restore your instance by reinstalling Nextcloud and restore the database dump.
How can I check my OPcache status?
PHP uses a so called OPcache to store PHP scripts in optimised opcode format in RAM, which speeds up browser access as the raw PHP scripts do not need to be read from disk and parsed first.
The Nextcloud admin panel includes a check for sufficient OPcache settings and in case shows a recommendation for settings to apply. If such appears, we recommend to apply them with an own configuration file, e.g.:
echo -e '; Custom Nextcloud OPcache settings\n; priority=99\nopcache.memory_consumption=128' > /etc/php/7.4/mods-available/custom.ini
phpenmod custom
You can watch the actual usage with the pre-installed opcache-gui by @amnuts.
- URL:
http://<your.IP>/opcache.php
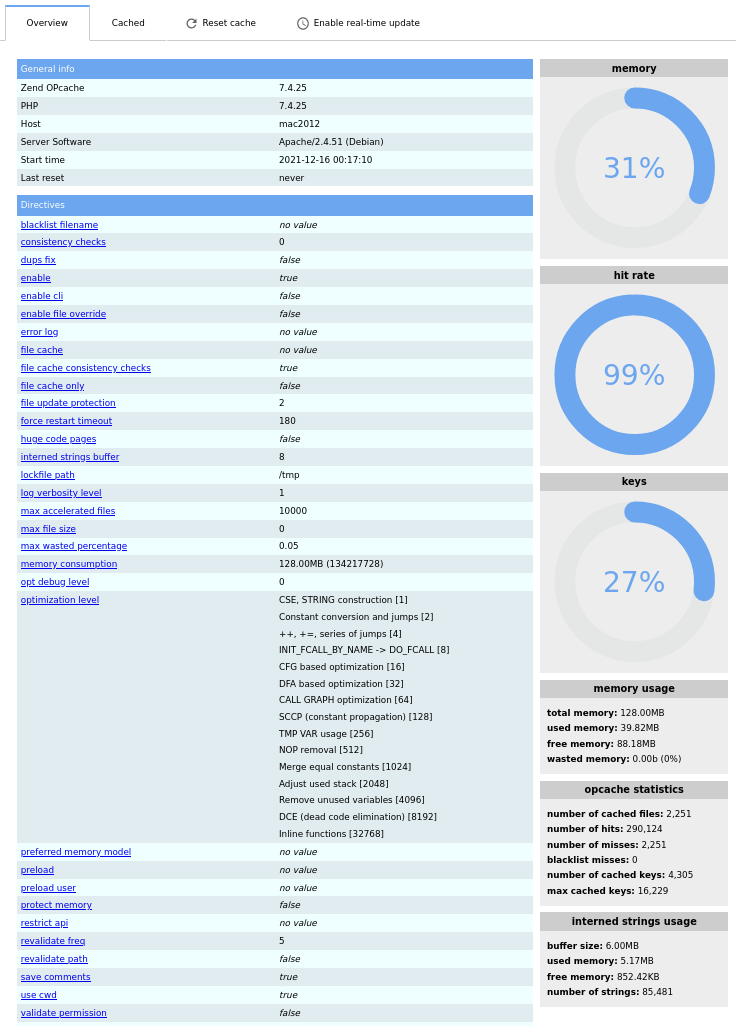
The dialog shows the cache status as well as the settings.
What shall I do about missing bcmath, gmp and imagick PHP modules?
After a fresh install via dietpi-software, the Nextcloud admin panel shows warnings about three missing modules. We propose to ignore them: imagick is not needed at all and a subject of discussion about security issues, bcmath and gmp are required only if you want to use the WebAuthn passwordless authentication with Nextcloud.
If you must mute those warnings, you can install the modules manually:
sudo apt install php-bcmath php-gmp php-imagick libmagickcore-6.q16-6-extra
The imagick related warning can be solved alternatively by disabling the Theming app (in the Nextcloud apps settings), if no manual theming is done to the Nextcloud instance anyway.
Website: https://nextcloud.com/
Official documentation: https://docs.nextcloud.com/server/latest/admin_manual/contents.html
YouTube video tutorial #1: DietPi Nextcloud Setup on Raspberry Pi 3 B Plus
YouTube video tutorial #2: DietPi Docker Nextcloud External Storage Setup with SAMBA SERVER on RPI3B
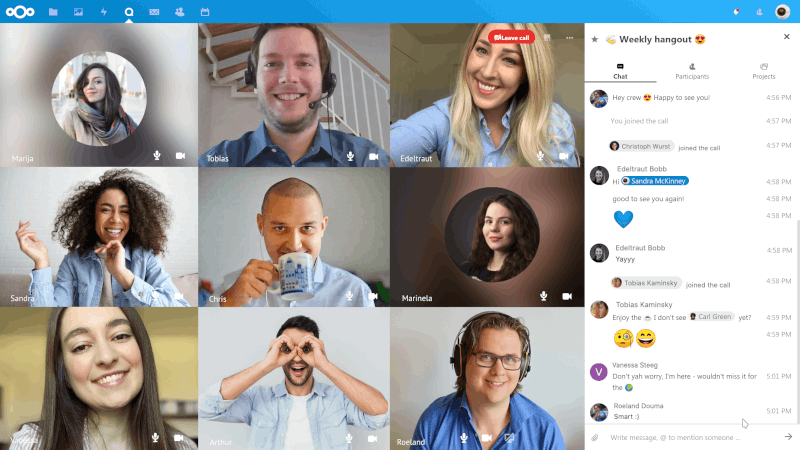
Nextcloud Talk
Host video calls on your own Nextcloud instance. The TURN server Coturn will be installed and configured as well to allow reliable video calls through outside the local network, NAT and firewall setups.
Also installs:
- Nextcloud
- Coturn
For video call throughout your local network, a so called TURN server is required. Coturn is a common implementation and hence installed by default together with our Nextcloud Talk option.
During installation you will be asked to enter your server’s external domain and a port, that you want to use for the Coturn TURN server. Note that you need to forward the chosen port and/or open it in your firewall.
Coturn will be configured with authentication via shared secret and some additional security measures. For details, see this HowTo: https://help.nextcloud.com/t/howto-setup-nextcloud-talk-with-turn-server/30794
Website: https://nextcloud.com/talk/
Source code: nextcloud/spreed
Coturn source code: coturn/coturn
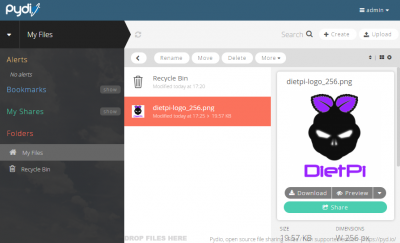
Pydio
Pydio is a feature-rich backup and sync server with web interface. Similar to ownCloud with vast configuration options to meet your “cloud” needs.
Also Installs:
- Webserver
URL: http://<your.IP>/pydio
- Ignore the warnings and click the button titled
CLICK HERE TO CONTINUE TO PYDIO.
Remark: If you require SSL access, please use LetsEncrypt to set this up. - The wizard can now be started, click the
start wizard >button to begin. - Enter and create a new admin account for use with Pydio. Then click the
>>button. - Under database details, enter the following:
- Database type =
MySQL - Host =
localhost - Database =
pydio - User =
pydio - Password =
<your global password>(default:dietpi) - Use MySqli = No
- Database type =
- Click test connection, when successful, click the
>>button. - Under advanced options, use the default values, then click the
Install Pydiobutton.
Once the server has been configured (as per above):
- Download the sync client for your system: https://pydio.com/en/get-pydio/downloads/pydiosync-desktop-app
- When configuring the remote server, use the following:
- Select HTTP option (unless you have setup an SSL cert)
- URL =
http://<your.IP>/pydio(replace IP with your system IP) - User = The “admin” user you setup in initial setup.
- Password = The “admin” password you setup in initial setup.
Website: https://pydio.com
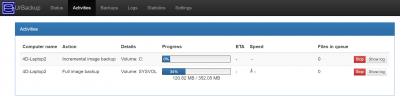
UrBackup
UrBackup Server is an Open Source client/server backup system, that through a combination of image and file backups accomplishes both data safety and a fast restoration time.
Basically, it allows you to create a complete system backup for systems on your network, using a simple web interface.
Clients are available for Windows, macOS, Linux and FreeBSD.
The web interface is accessible via TCP port 55414:
- URL:
http://<your.IP>:55414
The configuration of UrBackup is within these options:
- UrBackup web interface, tab
Settings UrBackup configuration file,
/etc/default/urbackupsrvAfter editing the config file, the service needs to be restart for changes to take effect:
systemctl restart urbackupsrv
Best practice: Disable “Allow client-side pausing of backups”
Backup procedures sometimes are paused by the client side which leads to a long backup duration. To avoid this the pausing can be deactivated via the UrBackup web interface:
- Select
Settings - Select tab
General->Permissions - Uncheck option
Allow client-side pausing of backups - Alternatively this can also be set via the client resp. group based settings in the
Settingsarea
The location of the backups can be set prior to installing UrBackup via SOFTWARE_URBACKUP_BACKUPPATH setting in /boot/dietpi.txt. It defaults to /mnt/dietpi_userdata/urbackup.
After the installation, the path can be changed via web interface:
- Select
Settings - Select tab
General->Server - Change
Backup Storage Path - Click
Save
Backup storage directory and access rights
It is necessary that the new backup directory exists, as UrBackup usually has no permissions to pre-create it.
Additionally, you need to grant UrBackup write access. It can be achieved via
mkdir /path/to/backup/storage
chown -R urbackup:urbackup /path/to/backup/storage
Install the appropriate client on the systems you wish to backup from https://www.urbackup.org/download.html#client_windows.
Remark: For Windows 7 (outdated), the client version 2.4.11 has to be used.
Via web interface Settings > Advanced section, a temporary download buffer can be enabled, where backups are stored to during download, before being moved to the final backup path. See the corresponding UrBackup documentation chapter for details.
By default the /tmp tmpfs (RAM disk) is used for this, which causes issues if you do not have several free GiB of RAM. The directory can be changed via:
nano /etc/default/urbackupsrv
The relevant entry is DAEMON_TMPDIR:
#Temporary file directory
# -- this may get very large depending on the advanced settings
DAEMON_TMPDIR='/tmp'
Note that this means doubled file writes and has no benefits as long as the backup duration from clients’ side is not time critical, or your backup drive is not very slow. It makes sense only if you have a much faster drive available, or plenty GiB of free RAM to use as backup download buffer.
UrBackup logs to /var/log/urbackup.log by default. The path to the log file can be changed via /etc/default/urbackupsrv. See “Configuration” tab for details.
You can easily update UrBackup by reinstalling it. Your settings and data are preserved:
dietpi-software reinstall 111
Official website: https://www.urbackup.org/
Official documentation: https://www.urbackup.org/administration_manual.html
Official forums: https://forums.urbackup.org/
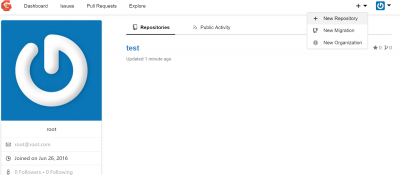
Gogs
Your very own GitHub style server, with web interface.
See also the Git client which is available in dietpi-software as an installation package.
The web interface is accessible via TCP port 3000:
- URL:
http://<your.IP>:3000
Has to be done once, when connected to the web interface:
- Change the following values only:
- Database Type:
MySQL - Host:
/run/mysqld/mysqld.sock - Password:
<your global password>(default:dietpi) - Repository Root Path:
/mnt/dietpi_userdata/gogs-repo - Run User:
gogs - Domain:
<your.domain/IP> - Application URL:
http://<your.domain/IP>:3000/ - Log Path:
/var/log/gogs
- Database Type:
- Scroll to the bottom of page and select “Install Gogs”.
- Depending on whether the application URL above was entered correctly/is accessible by the connected browser, you may need to reconnect to the web page using the IP address, e.g.:
http://<your.IP>:3000 - Once the page has reloaded, you will need to click
Registerto create the admin account.
If you wish to allow external access to your Gogs server, you will need to setup port forwarding on your router, pointing to the IP address of your DietPi device.
- Port: 3000
- Protocol: TCP
If an external access is used, HTTPS is strongly recommended to increase your system security. You can get a free certificate e.g. via dietpi-letsencrypt.
Initial service logs can be viewed via:
journalctl -u gogs
Daemon logs can be found in the following directory:
/var/log/gogs
You can easily update Gogs by reinstalling it. Your settings and data are preserved by this:
dietpi-software reinstall 49
Official website: https://gogs.io/
Official documentation: https://gogs.io/docs
Source code: gogs/gogs
License: MIT
Gitea
Your very own GitHub style server, with web interface.

See also the Git client which is available in dietpi-software as an installation package.
The web interface is accessible via port 3000:
- URL:
http://<your.IP>:3000
Has to be done once, when connected to the web interface:
- Change the following values only:
- Host:
/run/mysqld/mysqld.sock - Password:
<your global password>(default:dietpi) - Server Domain:
<your.domain/IP> - Gitea Base URL:
http://<your.domain/IP>:3000/ - Log Path:
/var/log/gitea(However, file logging is disabled by default.)
- Host:
- Scroll to the bottom of page and select “Install Gitea”.
- Depending on whether the base URL above was entered correctly/is accessible by the connected browser, you may need to reconnect to the web page using the IP address, e.g.:
http://<your.IP>:3000 - Once the page has reloaded, you will need to click
Registerto create the admin account.
If you wish to allow external access to your Gitea server, you will need to setup port forwarding on your router, pointing to the IP address of your DietPi device.
- Port: 3000
- Protocol: TCP
If an external access is used, HTTPS is strongly recommended to increase your system security. You can get a free certificate e.g. via dietpi-letsencrypt.
Using Fail2Ban your can block IP addresses after failed login attempts. This hardens your system against e.g. brute-force attacks.
By default Gitea logs to the systemd journal (see “View logs” tab), in which case Fail2Ban protection can be enabled with the following steps:
Create a new filter /etc/fail2ban/filter.d/gitea.conf:
[Definition]
journalmatch = _SYSTEMD_UNIT=gitea.service
failregex = Failed authentication attempt for \x1b\[1m.+\x1b\[0m from \x1b\[1m<HOST>:\d+\x1b\[0m:
Create a new jail /etc/fail2ban/jail.d/gitea.conf:
[gitea]
enabled = true
backend = systemd
When file logging is enabled (see “View logs” tab), Fail2Ban protection can be enabled with the following steps:
Create a new filter /etc/fail2ban/filter.d/gitea.conf:
[Definition]
failregex = Failed authentication attempt for .+ from <HOST>:\d+:
Create a new jail /etc/fail2ban/jail.d/gitea.conf:
[gitea]
enabled = true
backend = auto
logpath = /var/log/gitea/gitea.log
You can specify other properties like maxretry or bantime to overwrite the defaults in /etc/fail2ban/jail.conf or /etc/fail2ban/jail.local if present. When done:
- Restart Fail2Ban:
systemctl restart fail2ban - Try to login to the Gitea web interface with a wrong password.
- Check whether the failed login has been detected:
fail2ban-client status gitea - When you further try to login
maxretrytimes, your IP should be banned forbantimeseconds, so that neither the Gitea web interface, nor SSH or any other network application will respond to requests from your client. When Fail2Ban was installed viadietpi-software, by defaultroute/blackholeblocking is used, so thatip ron the server should show ablackholeroute for your client’s IP. - See also:
By default, logs can be viewed with the following command:
journalctl -u gitea
File logging to /var/log/gitea/gitea.log can be enabled by editing /mnt/dietpi_userdata/gitea/custom/conf/app.ini and changing MODE = console in the [log] section to MODE = file.
You can easily update Gitea by reinstalling it. Your settings and data are preserved by this:
dietpi-software reinstall 165
Official website: https://about.gitea.com/
Official documentation: https://docs.gitea.com/
Official forum: https://forum.gitea.com/
Source code: go-gitea/gitea
License: MIT
Syncthing
Backup and sync server with web interface. Extremely lightweight and efficient as no webserver is required.
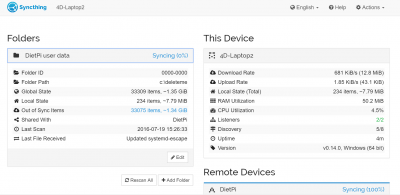
The web interface is accessible via port 8384:
URL = http://<your.IP>:8384
Has to be done once, when connected to the web interface.
- When the
Danger! Please set a GUI Authentication User and Password in the Settings dialog.box appears, click thesettingsbutton inside the box. - Under
GUI Authentication UserandGUI Authentication Password: Enter new login details you would like to use for access to the web interface. Then clicksave.
DietPi will automatically setup your default folder share to /mnt/dietpi_userdata.
In this example we will use a Windows system. The goal is to “sync” the user data from your DietPi device with another system.
- Download, extract and run the Windows application
syncthing.exe: https://syncthing.net/downloads/. - Syncthing web interface will load automatically, if not, you can access it via
http://127.0.0.1:8384/.- Click
Actionsat the top right, then selectShow ID. Copy the UUID code.
- Click
- On the DietPi device, open the web interface and click
Add remote device(bottom right).- Under
Device ID, paste in the UUID we copied earlier. - Under
Device name, enter any name. e.g.: My Windows PC. - Under
Share Folders With Devicetick/select DietPi user data, then clicksave.
- Under
- After a few seconds, go back to the Windows web interface
http://127.0.0.1:8384/. You should receive a message asking you to confirm the new device, clickAdd Device.- Under
Share Folders With Devicetick/select DietPi user data, then clicksave.
- Under
You devices should now duplicate the user data from your DietPi device to your Windows PC.
Website: https://syncthing.net
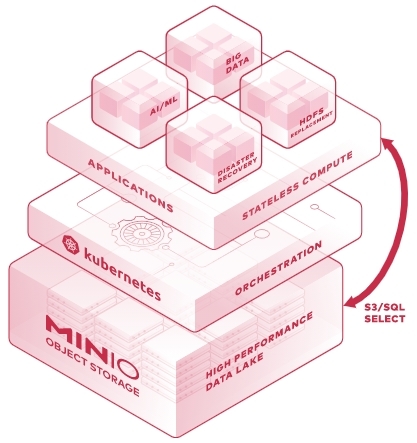
MinIO
It is an open source Kubernetes Native, High Performance Object Storage (S3 Compatible). It helps building cloud-native data infrastructure for machine learning, analytics and application data workloads.
The web interface is accessible via TCP port 9001 and S3 clients need to connect via TCP port 9004:
- Web UI URL:
http://<your.IP>:9001 - S3 API URL:
http://<your.IP>:9004 - Username:
minioadmin - Password:
minioadmin - MinIO Server Quick Start Guide
- Python Client Quick Start Guide - MinIO
- JavaScript Client Quick Start Guide - MinIO
Official website: https://min.io/product/overview
Official documentation: https://docs.min.io/
Source code: minio/minio
License: AGPLv3
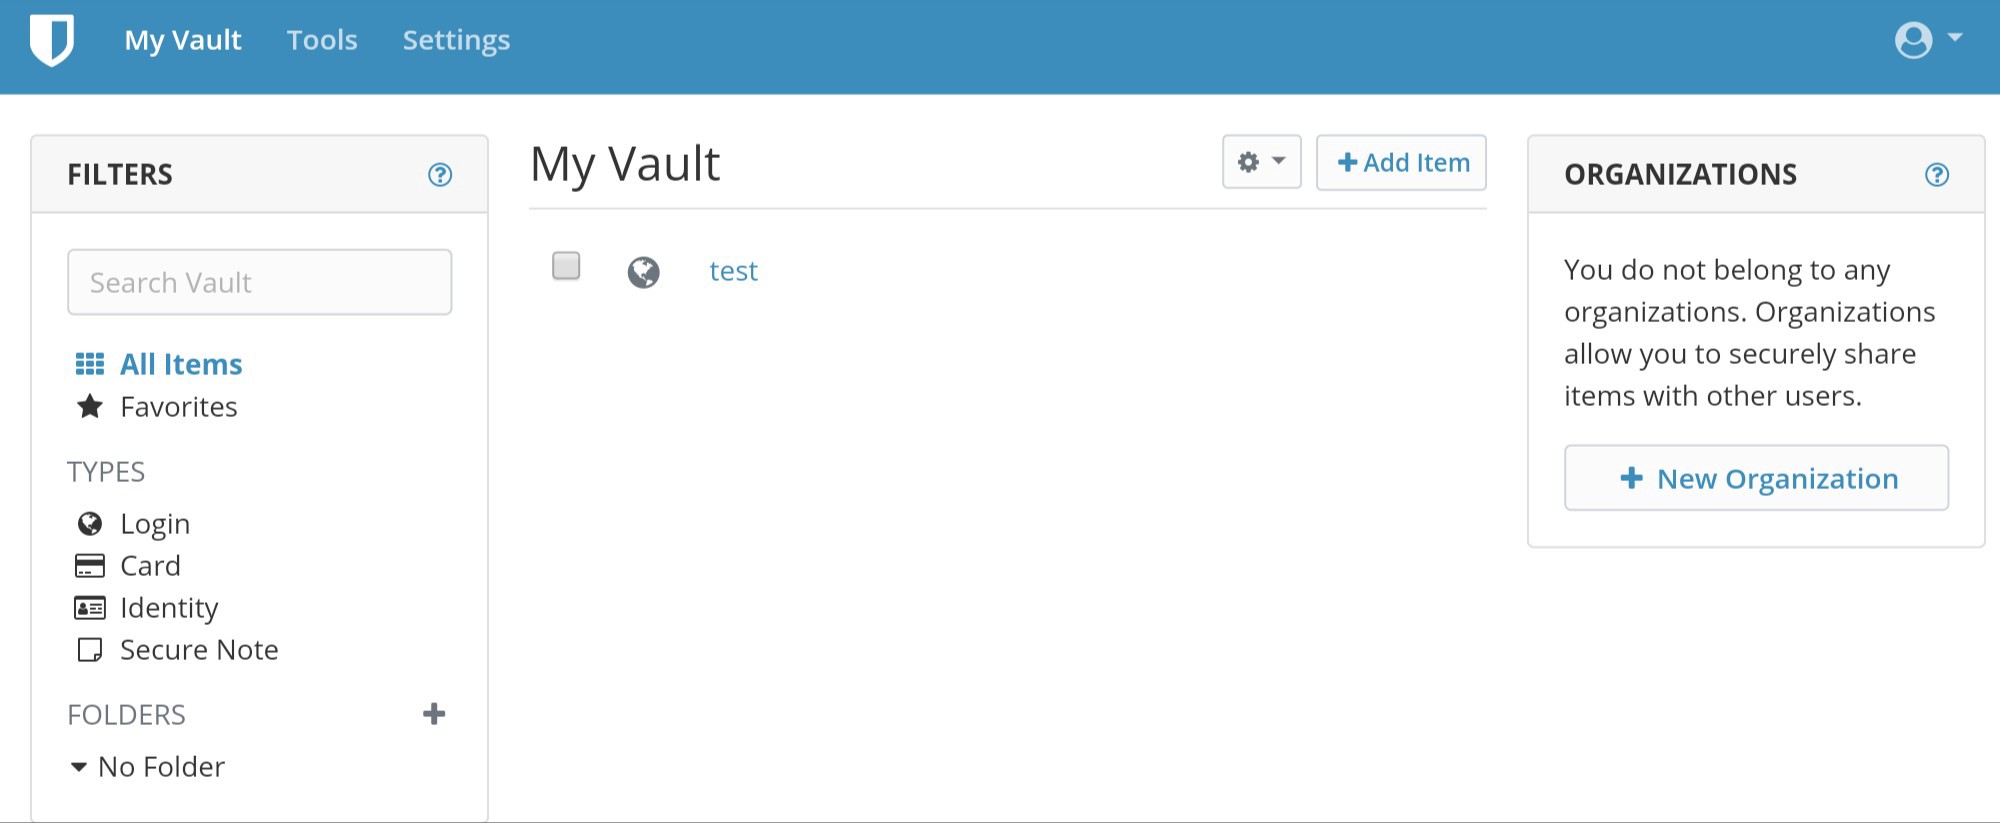
vaultwarden
vaultwarden is an unofficial Bitwarden password manager server with web interface, written in Rust.
- During install, a self-signed 4096-bit RSA TLS certificate is created to allow encrypted HTTPS access, which is required for access with most Bitwarden clients and reasonable as of the sensitivity of the data a password manager handles.
- Most web browsers will warn you on access that the certificate is not trusted, although usually you can choose to ignore that and still access the web vault.
- Most Bitwarden clients on the other hand will deny to access your server, as long as the certificate is not trusted.
- As far as you have a public domain name for your DietPi server, we recommend to request an official trusted CA certificate, e.g. via
dietpi-letsencryptand setup either a reverse proxy, or configure vaultwarden to use the retrieved key and certificate directly via ROCKET_TLS setting in the config file (see “Directories” tab).
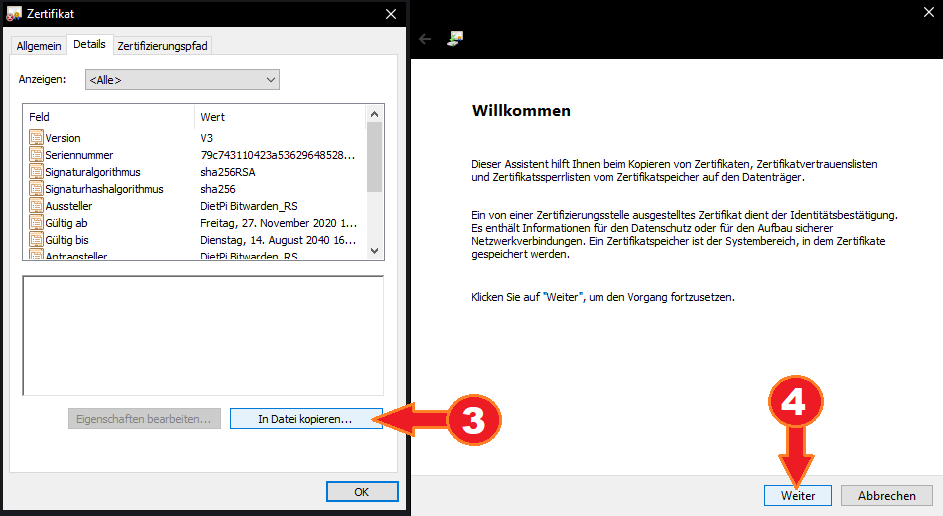
How do I add a self-signed certificate to the OS’ Trusted Root Certification Authorities store?
- In your browser, next to the address bar, select the warning or lock icon. Then select the certificate button to open Windows’ Certificate view.
- Switch to the “Details” tab.

- Select “Save to file”.
- In the newly opened window, select “Continue”.
- Leave default DER coding and select “Continue”.
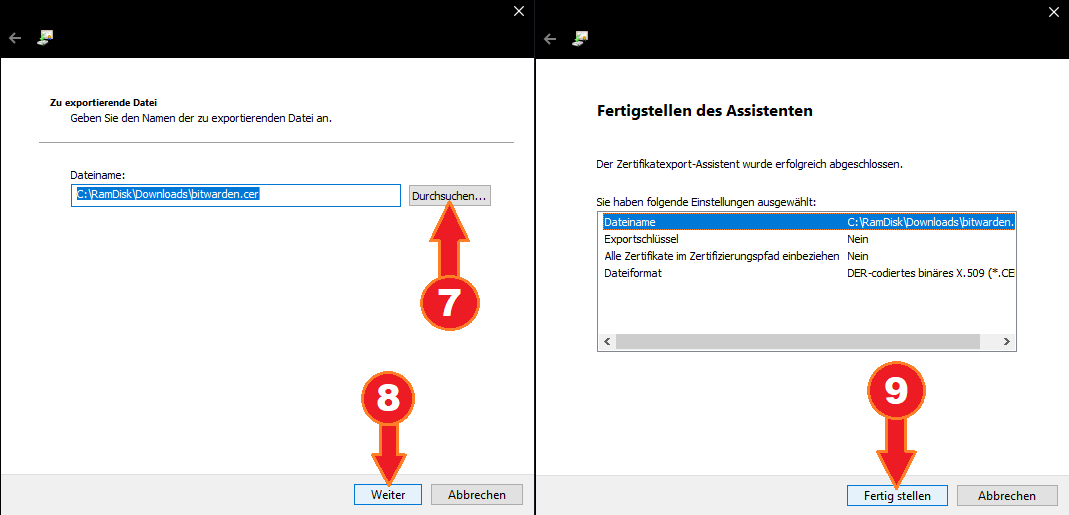
- Select “Browse” to chose a target file location.
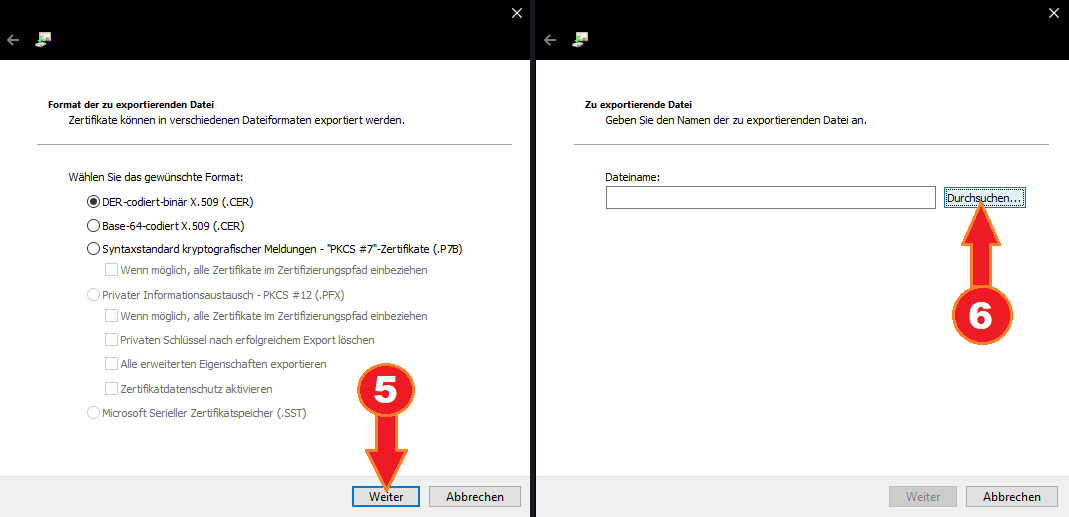
- Choose a target file location and name, it is only required temporarily.
- Select “Continue”.
- Select “Finish”.
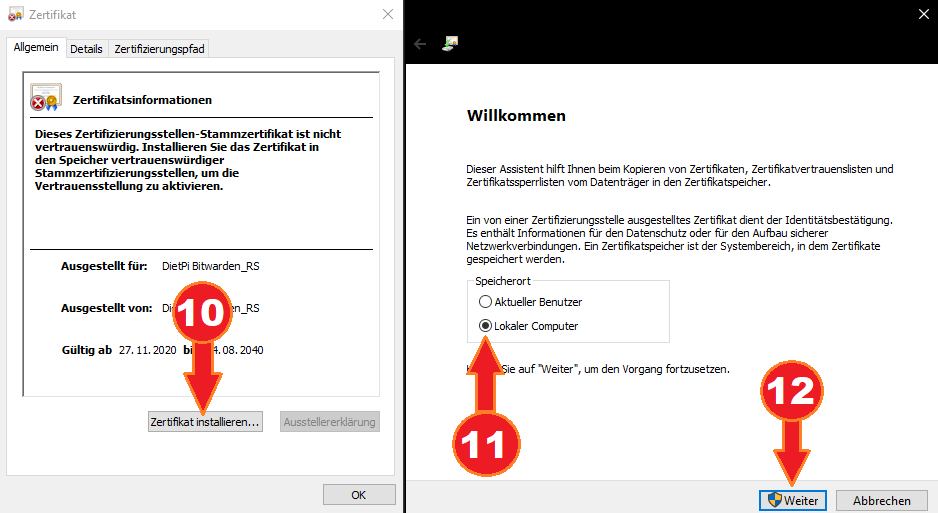
- Double-click the created certificate file and select “Install certificate”.
- Select “Local system”.
- Select “Continue”, which requires administrator permissions.
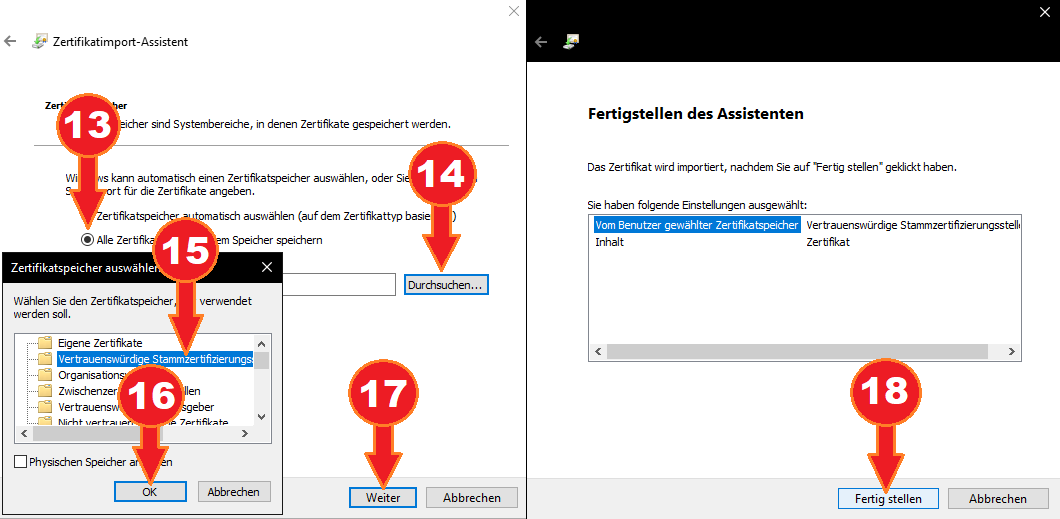
- Choose “Save all certificates to the following store”.
- Select “Browse”.
- Select “Trusted Root Certification Authorities”.
- Select “Ok”.
- Select “Continue”.
- Select “Finish”.
- In your browser (note that this cannot be done in Safari), next to the address bar, select the warning or lock icon. Then select the “Certificate (Invalid)” button.
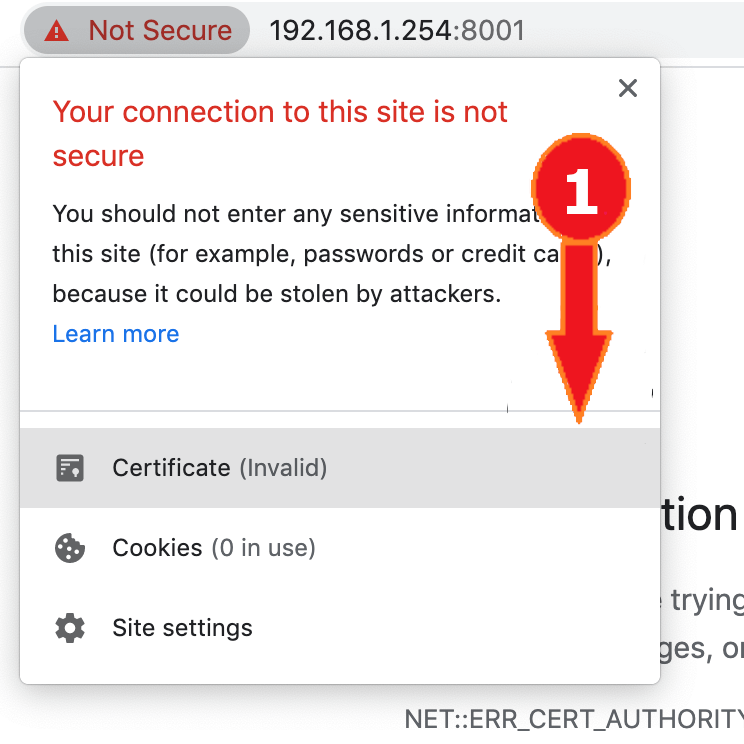
- Drag the certificate icon to your desktop, it is only required temporarily.
- Double-click on the certificate file.

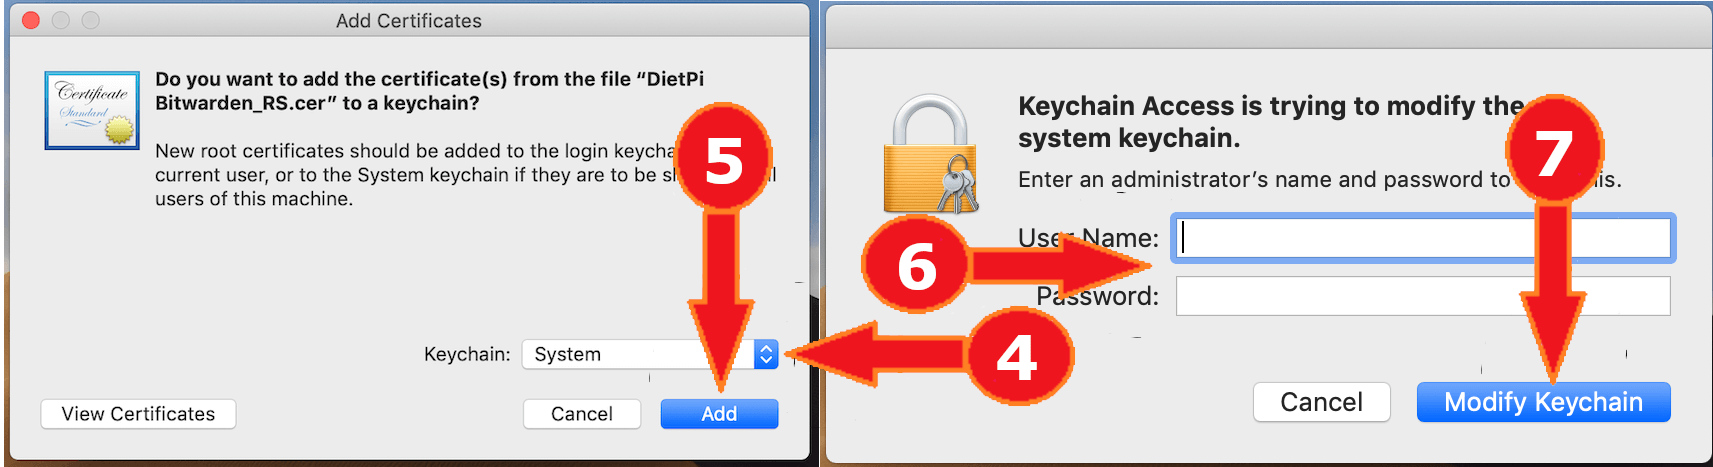
- On the “Keychain” dropdown, select “System”.
- Select “Add”.
- Enter an administrator username and password.
- Select “Modify Keychain”.
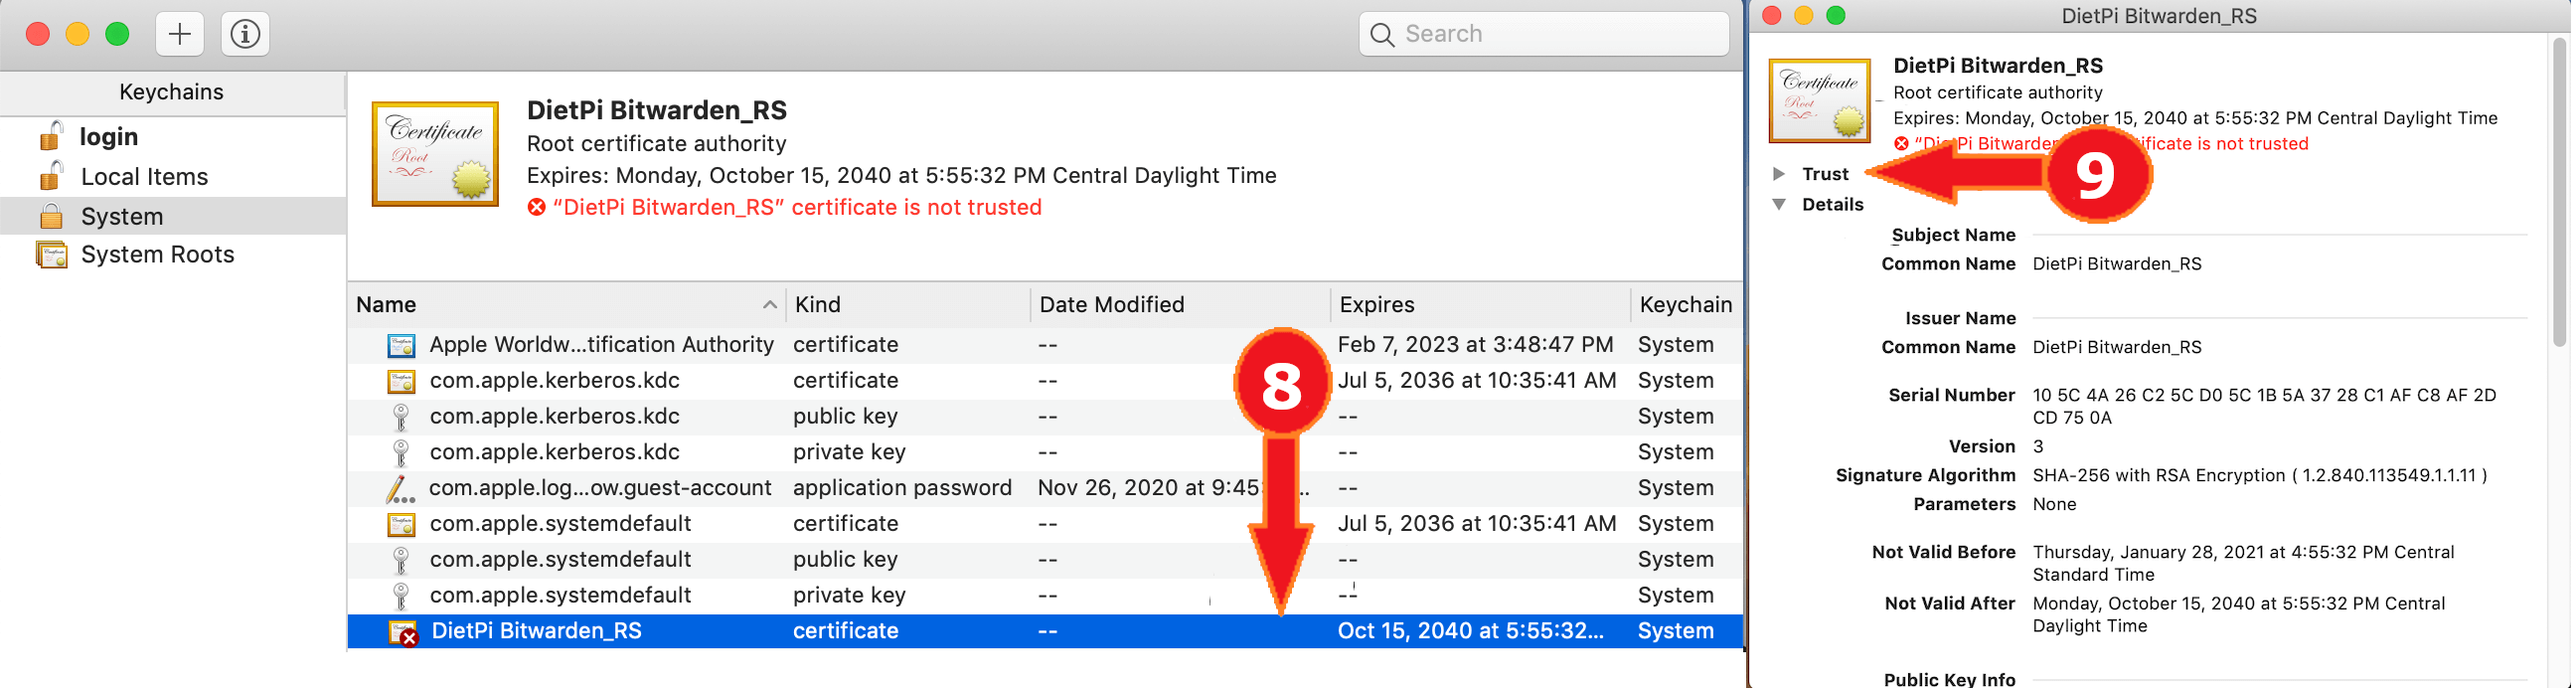
- Double-click on the certificate in the list.
- Select “Trust”.
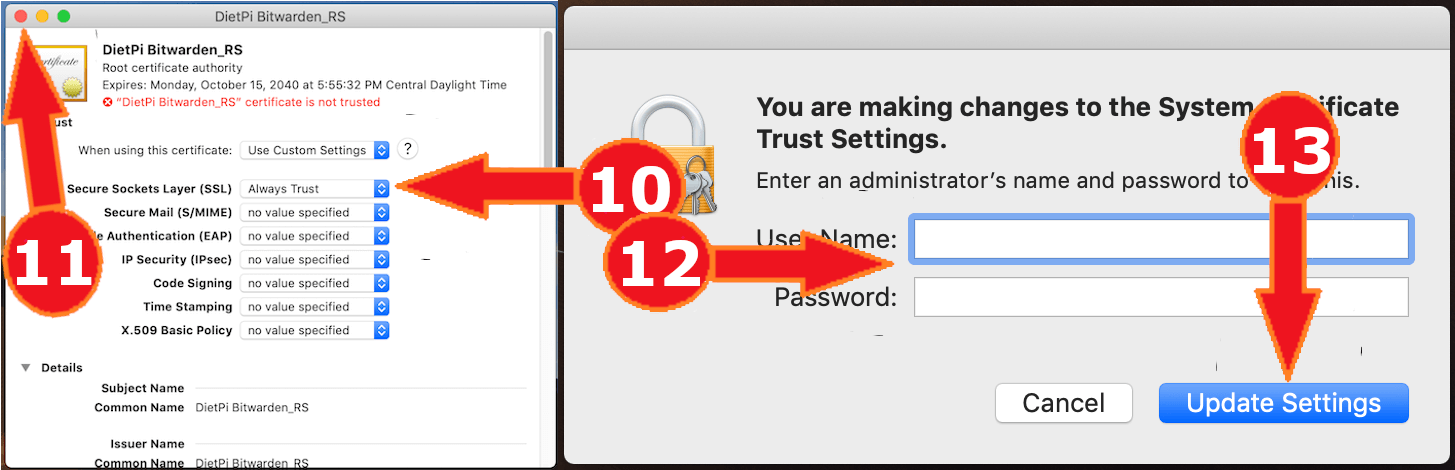
- On the “Secure Sockets Layer (SSL)” dropdown, select “Always Trust”.
- Click the red button in the top left corner of the window.
- Enter an administrator username and password.
- Select “Update Settings”.
The web interface is accessible via port 8001:
- URL =
https://<your.IP>:8001 - On first access, you need to create an account, either via web UI or via client (see “Client access” tab).
Any official Bitwarden client will work: https://bitwarden.com/download
- Select the settings cog at the top left of the window.
- Add
https://<your.IP>:8001into the custom server field. - Create a new account, which will be created on your own server only.
- Install directory:
/opt/vaultwarden - Data directory:
/mnt/dietpi_userdata/vaultwarden - Config file:
/mnt/dietpi_userdata/vaultwarden/vaultwarden.env
journalctl -u vaultwarden
dietpi-software reinstall 183
Official documentation: https://github.com/dani-garcia/vaultwarden/wiki
Forum: https://vaultwarden.discourse.group
Source code: dani-garcia/vaultwarden
Open-source license: GPLv3
Credits: This software title has been added to DietPi-Software by @CactiChameleon9. Thank you!
FuguHub
FuguHub transforms your DietPi device into a secure online storage system, letting you access and share files from any connected computer or device.

The web interface is accessible via regular HTTP and HTTPS ports 80 and 443:
- URL:
http://<your.IP>orhttps://<your.IP>(When using HTTPS, you may ignore the browser warning because of the self-signed certificate which is used by default.) - Username:
dietpi - Password:
<your global password>(default:dietpi)
The fact that FuguHub runs on ports 80 and 443 by default makes it incompatible with regular web servers when using the default setup.

- Install directory:
/home/bd - Config file:
/home/bd/bdd.conf - File server directory:
/mnt/dietpi_userdata/fuguhub-data
- Service:
journalctl -u bdd - Trace:
/home/bd/trace/
It contains an info about the database creation only, even after playing around with the web UI a bit.
To update FuguHub, simply reinstall it:
dietpi-software reinstall 161
All your settings and data will be preserved.
Official website: https://fuguhub.com/
File Browser
Access and manage your data from anywhere via browser with this lightweight remote file manager. Other than ownCloud and Nextcloud, it accesses the raw data on your filesystem, based on a chosen root directory, which makes it similar to Syncthing. You can setup multiple users with their own root directory and also sharing files and directories via password-protected link is possible.

The web interface is accessible via port 8084:
- URL =
http://<your.IP>:8084 - Username =
dietpi - Password =
<your global password>
- Install directory:
/opt/filebrowser - Config directory:
/mnt/dietpi_userdata/filebrowser - Default data directory:
/mnt
File Browser comes with a powerful CLI not only allowing to change the configuration, but also execute commands, set rules, etc. (some settings can also be changed via the web interface).
You can find the full feature set in the official documentation of File Browser, linked below, or run:
/opt/filebrowser/filebrowser --help
Here is an example for how to change the default data directory (in this example set to /foo/bar/baz): - Stop the service:
```sh
systemctl stop filebrowser
```
Apply new config:
/opt/filebrowser/filebrowser config set -r /foo/bar/baz -d /mnt/dietpi_userdata/filebrowser/filebrowser.dbBring the service back:
systemctl start filebrowser
View the logs by executing:
journalctl -u filebrowser
You can easily update File Browser by reinstalling it. Your settings and data are preserved by this:
dietpi-software reinstall 198
Official documentation: https://filebrowser.org/
Source code: filebrowser/filebrowser
License: Apache 2.0
Rclone
Rclone is a command-line program to manage files on cloud storage. It is a feature-rich alternative to cloud vendors’ web storage interfaces. Over 40 cloud storage products support Rclone, including S3 object stores, business & consumer file storage services, as well as standard transfer protocols.
![]()
Run rclone config to setup. See Rclone config docs for more details.
Rclone can be updated by simply reinstalling it:
dietpi-software reinstall 202
Official documentation: https://rclone.org/
Source code: rclone/rclone
License: MIT
Restic
Restic is a fast, efficient and secure command-line backup program.
![]()
In order to create a repository at /mnt/dietpi_userdata/restic-repo, run the following command and enter the same password twice:
$ restic init --repo /mnt/dietpi_userdata/restic-repo
enter password for new repository:
enter password again:
created restic repository 085b3c76b9 at /mnt/dietpi_userdata/restic-repo
Please note that knowledge of your password is required to access the repository.
Losing your password means that your data is irrecoverably lost.
Remembering your password is important! If you lose it, you won’t be able to access data stored in the repository.
For more information please read the related section in the official Restic docs: Preparing a new repository
Official website: https://restic.net/
Official documentation: https://restic.readthedocs.io/en/stable/
Source code: restic/restic
License: BSD 2-Clause