Part 1: System overview and installation of the RAID.
RAID storage systems can act as a backup system with a low failure rate. Setting up such a system is no rocket science and is described in a step by step manner below.
This blog post is one of a series regarding setup, usage and management of a RAID system:
- Using a RAID system with DietPi – part 1: System overview and installation of the RAID
- Using a RAID system with DietPi – part 2: Access the RAID
- Using a RAID system with DietPi – part 3: Basic management and diagnosis tasks
- Using a RAID system with DietPi – part 4: RAID maintenance
- Using a RAID system with DietPi – part 5: Redundancy tasks
The objective is to achieve an economical NAS storage for access via NFS (network file system), Samba or others. It shall be lean and lightweight to be able to use a cheap Pi based hardware. The costs of Raspberry Pi based software RAID systems are relatively low compared to purchasable NAS systems which contain many bells and whistles typically not needed if only a backup system shall be implemented.
A next step with more functionality and higher complexity could e.g. be an OpenMediaVault based system. In this article the focus is on a lightweight and resource optimal solution.
So, the main goals of the targeted application are:
- Use case: Backup system (i.e. no further functionality within the same SBC)
- RAID based system
- Low power consumption
- Economic
- Flexible (open source)
The used solution is based on a software RAID (i.e. the software package mdadm).
One major motivation for the use of a software RAID instead of a hardware RAID is, that in case of a hardware failure of the RAID controller, there is no exact identical RAID controller needed to reinstall a RAID using the hard disks without data loss. Also, a change of the Raspberry hardware (e.g. change from a Raspberry Pi to a Native PC) is easily possible without loosing all RAID data.
The first part of the article series describes the setup to the RAID assembly.
The further parts contain descriptions of RAID’s usage, furthermore management use cases like disk exchange, RAID extension, etc.
Table of contents
- Setup overview
- Connection of the hard drives and identification within the system
- Preparing the drives
- Installation of needed software packages
- Build, formatting and mounting the RAID
- Final step: Check if all went right
1. Setup overview
In the following, USB connected hard disks are assumed within the system. USB connected hard disks are quite cheap but it should be kept in mind checking for long life hard disks for the RAID (i.e. not to use the cheapest available USB disks for an 24/7 RAID). As an example, Western Digital WD Red Plus or Seagate Ironwolf might be a choice. An SSD is not recommended due to often lower write cycle capability compared to magnetic hard disks (this lifetime issue is under discussion…).
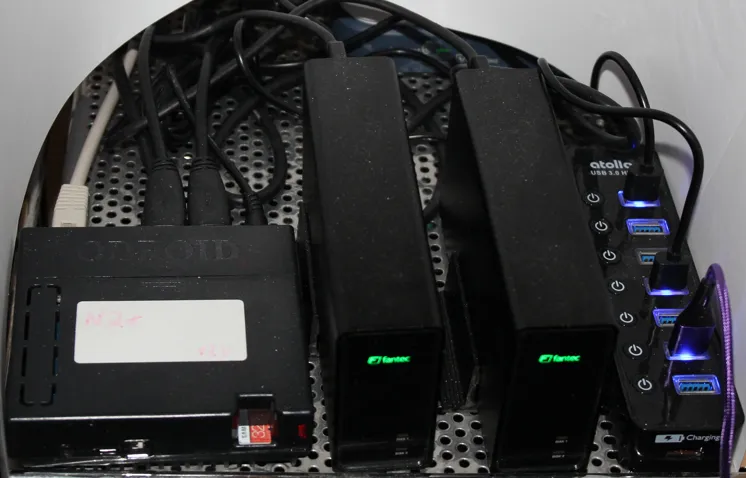
The author e.g. uses the small 2,5“ Seagate Barracuda hard disks. They are available up to a capacity of 2 TB. Hard disks with a higher capacity often have 3,5“ and are larger in size and are more robust. In 3,5“ there are also special NAS disks (e.g. Seagate Ironwolf) available. Due to the fact that in the targeted use case of a backup system, the disks mostly are in a spin down mode, the lifetime of the 2,5” disks are assumed to be acceptable for a 24/7 operation.
The 2,5” disks have an additional advantage of a lower power consumption, which is one of the goals. The system with 4 disks (RAID 5) and an ODROID N2+ SBC uses only 10 W (idle), 11 W (during backup) and 8 W (disks spindown).
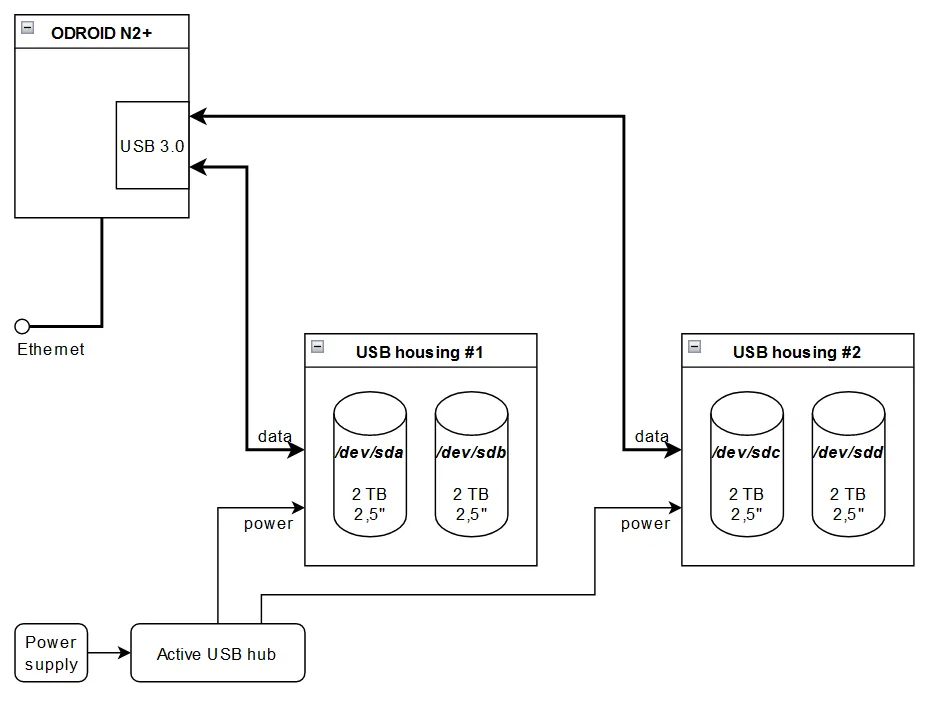
The disks are mounted in a Fantec USB 3.0 dual disk housing and are connected via USB directly to the ODROID N2+. An active USB hub (active = with own power supply) only supplies the power to the hard disks to avoid an excessive USB power burdening of the ODROID board.
Please remark that the power supply of the used USB hub is able to supply the USB drives. As a rule of thumb, a 2.5“ hard disk draws a maximum current of about 1 A (equals to 5 W).
This means, the USB hub in a four disk RAID setup needs a power supply of at least 20 W.
In the example below, a RAID 5 system is set up. RAID 5 is a good choice if three or more hard disks shall be used and a reasonable redundancy level shall be achieved. RAID 6 could be used if more than four or more hard disks are present. Also, other RAID levels can be used but are out of focus.
Please remark, that in case of a RAID5 or RAID6, the hard disks should have the same capacity, because the smallest capacity limits the overall RAID capacity. Therefore, it is a good practice to use identical hard disk models.
The basic RAID software package is mdadm (multiple disk administration).
The setup of the RAID system is done in these steps:
- Connection of the hard drives and identification within the system
- Preparing the drives
- Build, formatting and mounting the RAID
Generally, it should be considered that Raspberry Pi and compatible SBCs typically are not designed for a high availability, especially if the power supply is a simple one. It should be considered to attach importance to the hardware quality.
Don’t forget: Using a RAID system does not excuse from making backups!
2. Connection of the hard drives and identification within the system
The goal of this first step is to have the hard disks accessible in the system and be able to identify every hard disk (i.e. to know which hardware is which /dev/... device like /dev/sda, /dev/sdb, etc.). Labelling the disks makes the management of the running RAID system easier.
The identification of all disks (block devices) can be achieved using the command lsblk (list block devices):
- Execute
lsblk --helpfor a first command help - Execute
lsblkfor a list of all block devices - Execute
lsblk /dev/sdXfor a list of a special device
Example:
If 4 devices are connected via USB, lsblk /dev/sd? may look like:
NAME   MAJ:MIN RM   SIZE RO TYPE MOUNTPOINT
sda      8:0    0   1,8T  0 disk
sdb      8:16   0   1,8T  0 disk
└─sdb1   8:17   0   1,8T  0 part
sdc      8:32   0   1,8T  0 disk
├─sdc1   8:33   0  18,6G  0 part
├─sdc2   8:34   0 184,4G  0 part
└─sdc3   8:35   0   1,6T  0 part
sdd      8:48   0   1,8T  0 disk
In the example, there are four identical hard disks with different partitioning states present to show a bit more complex starting point. This will be aligned in the step of preparing the drives.
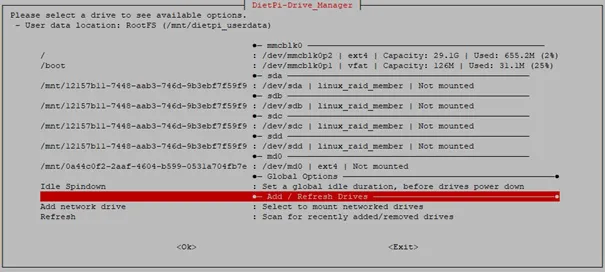
Alternatively, the information can be gathered using the DietPi-Drive_Manager:
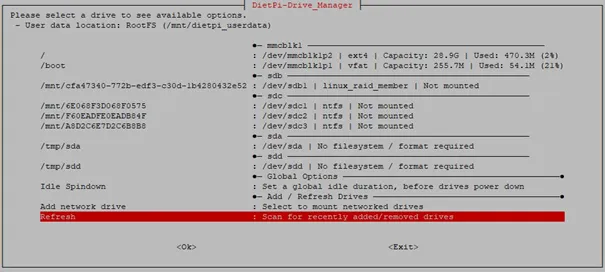
In an easy case (e.g. untouched new disks) the lsblk /dev/sd? would show:
NAME   MAJ:MIN RM   SIZE RO TYPE MOUNTPOINT
sda      8:0    0   1,8T  0 disk
sdb      8:16   0   1,8T  0 disk
sdc      8:32   0   1,8T  0 disk
sdd      8:48   0   1,8T  0 disk
For identification, it is a good practice to only connect the disks step by step to clearly assign each hard disk to the sdX identifier. Using the command blkid gives more information about every disk.
Example: After connecting one of the disks, blkid /dev/sd? gives:
/dev/sdb: PTUUID="b28fec86-3f2a-4128-97bf-7c512e66bbe9" PTTYPE="gpt"At this point, it is a good option to label the hard disk with the description of /dev/sdb and the first part of the PTUUID (b28fec86 in the example). This makes life easier to identify the disk later on.
Then the same thing should be done with every further disk until every disk is labelled. blkid /dev/sd? then would show:
/dev/sda: PTUUID="7a4748ea" PTTYPE="dos"
/dev/sdb: PTUUID="b28fec86-3f2a-4128-97bf-7c512e66bbe9" PTTYPE="gpt"
/dev/sdc: PTUUID="6ea6187e-6aa4-4f55-9936-47cb4f20e6d4" PTTYPE="gpt"
/dev/sdd: PTUUID="cb11bb4e-bd0a-4067-b8ff-f715f525df4c" PTTYPE="gpt"
3. Preparing the drives
The goal of this step is to have the hard drives ready for the RAID setup. This contains to delete old partitions on the disks.
As shown in the example above, the lsblk showed partitions on the disks /dev/sdb and /dev/sdc. In the first step they will be deleted. This can be done via the command parted /dev/sdX rm Y with X set to the drive number and Y set to the partition. The partition number can be read out via parted /dev/sdX print.
Example: parted /dev/sdc print shows
Model: JMicron Generic (scsi)
Disk /dev/sdc: 2000GB
Sector size (logical/physical): 512B/512B
Partition Table: gpt
Disk Flags:

Number  Start   End     Size    File system  Name                  Flags
 1      1049kB  20,0GB  20,0GB  ntfs         Basic data partition  msftdata
 2      20,0GB  218GB   198GB   ntfs         Basic data partition  msftdata
 3      218GB   2000GB  1782GB  ntfs         Basic data partition  msftdata
As can be seen in the example, three partitions with numbers 1, 2 and 3 are present.
Now, the first partition is deleted with:
parted /dev/sdc rm 1After this parted /dev/sdc print would give:
Number  Start   End     Size    File system  Name                  Flags
 2      20,0GB  218GB   198GB   ntfs         Basic data partition  msftdata
 3      218GB   2000GB  1782GB  ntfs         Basic data partition  msftdata
Then also the other two partitions with parted /dev/sdc rm 2 and parted /dev/sdc rm 3 are deleted.
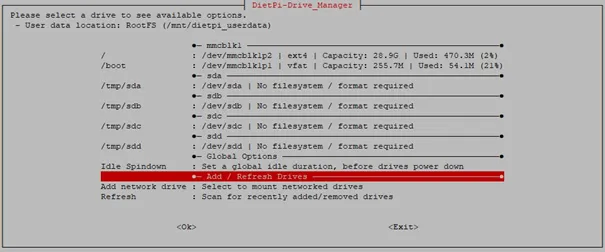
This needs to be done with all other disks. lsblk /dev/sd? should finally give:
NAME MAJ:MIN RM  SIZE RO TYPE MOUNTPOINT
sda    8:0    0  1,8T  0 disk
sdb    8:16   0  1,8T  0 disk
sdc    8:32   0  1,8T  0 disk
sdd    8:48   0  1,8T  0 disk
If all partitions were removed, dietpi-drive_manager shows:
Hint: In case of problems removing the partitions with the
partedcommand, it might be an option first to format the disks viadietpi-drive_managerand removing the partitions afterwards.
4. Installation of needed software packages
The basic RAID software package is mdadm (multiple disk administration). Additionally, the smartmontools are needed. They are installed via:
apt install mdadm smartmontoolsIf the RAID assembly shall be formatted with a file system type other than ext4, the appropriate formatting package has to be installed (e. g. Btrfs, XFS):
- BTRFS:
apt install btrfs-progs - XFS:
apt install xfsprogs
For exporting the RAID via NFS later on, the NFS server package needs to be installed:
dietpi-software install 1095. Build, formatting and mounting the RAID
In this step, the RAID system is built, the disks are linked to the RAID assembly, are formatted and mounted.
5.1 Building the RAID
In this step, building the RAID assembly is initiated via the command
mdadm --create /dev/md0 --level=5 --raid-devices=4 /dev/sda /dev/sdb /dev/sdc /dev/sddRemark: Depending on the number of disks the command given above needs to be changed:
- In case of a RAID 5 assembly with only three disks this e.g. would be
mdadm --create /dev/md0 --level=5 --raid-devices=3 /dev/sda /dev/sdb /dev/sdc - In case of a RAID 6 assembly with four disks this e.g. would be
mdadm --create /dev/md0 --level=6 --raid-devices=4 /dev/sda /dev/sdb /dev/sdc /dev/sdd
The mdadm --create command
mdadm --create /dev/md0 --level=5 --raid-devices=4 /dev/sda /dev/sdb /dev/sdc /dev/sddgives this output:
root@raid:~# mdadm --create /dev/md0 --level=5 --raid-devices=4 /dev/sda /dev/sdb /dev/sdc /dev/sdd
mdadm: partition table exists on /dev/sda
mdadm: partition table exists on /dev/sda but will be lost or
       meaningless after creating array
mdadm: partition table exists on /dev/sdb
mdadm: partition table exists on /dev/sdb but will be lost or
       meaningless after creating array
mdadm: partition table exists on /dev/sdc
mdadm: partition table exists on /dev/sdc but will be lost or
       meaningless after creating array
mdadm: partition table exists on /dev/sdd
mdadm: partition table exists on /dev/sdd but will be lost or
       meaningless after creating array
Continue creating array? yes
mdadm: Fail create md0 when using /sys/module/md_mod/parameters/new_array
mdadm: Defaulting to version 1.2 metadata
mdadm: array /dev/md0 started.
The warnings regarding the partition tables can be ignored.
The next question „Continue creating array?“ is answered with „yes“. Then the mdadm command runs until it is finished. This may take a longer time.
In the background, a RAID build process taking a quite long time is started. This process may be interrupted by reboots or a shutdown, at the next reboot it automatically restarts at the point it was interrupted.
This build process can be monitored via
cat /proc/mdstator
watch -n1 cat /proc/mdstatThere is a time given, the system will need to finish the build („finish=…“) in the cat /proc/mdstat command output:
Personalities : [raid6] [raid5] [raid4]
md0 : active raid5 sdd[4] sdc[2] sdb[1] sda[0]
      5860144128 blocks super 1.2 level 5, 512k chunk, algorithm 2 [4/3] [UUU_]
      [>....................]  recovery =  1.5% (30243876/1953381376) finish=671.9min speed=47703K/sec
      bitmap: 0/15 pages [0KB], 65536KB chunk
unused devices: <none>
After the whole build has finished, cat /proc/mdstat will show:
Personalities : [raid6] [raid5] [raid4]
md0 : active raid5 sdd[4] sdc[2] sdb[1] sda[0]
      5860144128 blocks super 1.2 level 5, 512k chunk, algorithm 2 [4/4] [UUUU]
      bitmap: 0/15 pages [0KB], 65536KB chunk

unused devices: <none>
Then, dietpi-drive_manager shows the RAID assembly as:
                                           ●─ md0 ────────────────────────────────────────────────
/tmp/md0                                   : /dev/md0 | No filesystem / format required
In a final step, the RAID assembly’s layout should be added to the /etc/mdadm/mdadm.conf file to ensure the identical RAID operation (e.g. name of /dev/md0) also after a reboot.
This is done via
mdadm --examine --scan --verbose >> /etc/mdadm/mdadm.confOf course, the file mdadm.conf can be edited manually.
5.2 Formatting the RAID assembly
As the final step the RAID (/dev/md0) needs formatting. It has to be decided, which file system type is chosen for the RAID assembly.
5.2.1 File system type for the RAID system
Typical file system types for usage in a RAID are:
- ext4: The Linux standard file system type
- Btrfs: Modern file system, sometimes used by NAS systems (e.g. Synology)
- XFS: Modern file system
There are many contrary opinions which file system is the best, also in the application of RAID systems. Out from this, the favourite type is the user’s choice.
More often, Btrfs is proposed because of its higher data loss security. The file system performance in case of a NAS should not be the main argument for its choice, mostly the network connection is the bottleneck for the overall performance.
Remark: The file system type F2FS was not mentioned due to the description targeting to rotational hard disks and not to SSDs. If use of SSDs (more expensive) is planned, the usage of F2FS should be considered.
5.2.2 The easy way
Formatting the RAID assembly depends on the chosen file system, there are different commands which start typically with mkfs (make file system).
In the following commands, „myRAIDdisk“ will be the disk name of the RAID assembly (e.g. shown in the dietpi-drive_manager).
5.2.2.1 ext4 system
The formatting is executed via:
mkfs.ext4 -m 1 -L "myRAIDdisk" /dev/md05.2.2.2 Btrfs system
The formatting is executed via:
mkfs.btrfs -L "myRAIDdisk" /dev/md05.2.2.3 XFS system
The formatting is executed via:
mkfs.xfs -L "myRAIDdisk" /dev/md0Once the RAID assembly is formatted, dietpi-drive_manager shows it as (example Btrfs):
                                          ●─ md0 ────────────────────────────────────────────────
/mnt/myRAID                               : /dev/md0 | btrfs | Not mounted
5.2.3 In case of ext4 filesystem: Optional optimisation of the alignment
Since XFS and Btrfs automatically determines the optimal formatting parameters, no additional parameters have to be given within the mkfs.xfs and mkfs.btrfs command.
In case that the RAID assembly (/dev/md0) shall be formatted as an ext4 type filesystem, there is the option to optimise the disks alignment. This might give a slightly better performance.
This replaces the previous mkfs.ext4 formatting step with a more complex formatting procedure.
To achieve this optimal alignment, the following steps need to be executed:
5.2.3.1 Determine disk properties
Some disk properties need to be determined for the optimal formatting alignment:
- Chunk size of the RAID:
mdadm --detail /dev/md0 | grep "Chunk Size" - Sector size of the disks (example
/dev/sda):smartctl -i /dev/sda | grep "Sector Sizes"
5.2.3.2 Determine optimal formatting parameters
There are tools available calculating the optimal formatting parameters, e.g.
https://busybox.net/~aldot/mkfs_stride.html

The determined parameters have to be entered into the last two fields and the properties of the RAID assembly into the first two fields.
The resulting -b -E stride parameter are used in the following format command.
5.2.3.3 Formatting
With the example values given above the format command in case of an ext4 filesystem is:
mkfs.ext4 -v -m 1 -b 4096 -E stride=128,stripe-width=384 -L "myRAIDdisk" /dev/md05.3 Mounting the RAID
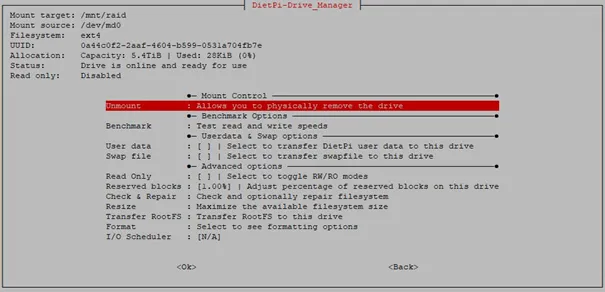
After the RAID has been formatted, the next step is to mount the /dev/md0 volume.
The mount of the RAID is done via the dietpi-drive_manager. It mounts and adds the RAID to the /etc/fstab so that it is available on next boot.
In the dietpi-drive_manager the /dev/md0 is selected and mounted in the following dialog. In the example, the mount point /mnt/raid is used:
5.4 Changing user:group of the RAID share
In order to be able to access the RAID share it is a good option to change the user:group to dietpi:dietpi (typically it will be mounted as root:root). Especially for SMB access this is useful.
The ownership can be achieved via the change owner command
chown -R dietpi:dietpi /mnt/raidAt this point, the whole RAID is set up and running. Next steps are e.g. to grant access to the /mnt/raid share.
6. Final step: Check if all went right
Check #1: Do all devices belong to the RAID?
Execute lsblk which could give:
NAME        MAJ:MIN RM  SIZE RO TYPE  MOUNTPOINT
sda           8:0    0  1,8T  0 disk
└─md0         9:0    0  5,5T  0 raid5 /mnt/raid
sdb           8:16   0  1,8T  0 disk
└─md0         9:0    0  5,5T  0 raid5 /mnt/raid
sdc           8:32   0  1,8T  0 disk
└─md0         9:0    0  5,5T  0 raid5 /mnt/raid
sdd           8:48   0  1,8T  0 disk
└─md0         9:0    0  5,5T  0 raid5 /mnt/raid
mmcblk0     179:0    0 29,7G  0 disk
├─mmcblk0p1 179:1    0  128M  0 part  /boot
└─mmcblk0p2 179:2    0 29,6G  0 part  /
In this example, it can be seen that the four devices /dev/sda .. /dev/sdd all belong to the RAID md0.
Check #2: Is the RAID mounted?
Execute mount | grep md0 which could give:
/dev/md0 on /mnt/raid type ext4 (rw,noatime,lazytime,stripe=384,x-systemd.automount)In this example, it can be seen that the RAID /dev/md0 is mounted to /mnt/raid.
Check #3: Is the RAID’s size and free space correct?
Execute df -h | grep 'system\|md0' which could give:
Filesystem      Size     Used  Avail  Use%  Mounted on
/dev/md0        5,5T     28K   5,4T     1%  /mnt/raid
In this example, it can be seen that the RAID on /mnt/raid has a size of 5.5 TiB and is nearly empty (1% usage).
Check #4: Are the user:group settings correct?
Execute ls -l /mnt | grep raid which could give:
drwxr-xr-x 3 dietpi dietpi 4096 17. Sep 12:23 raidIn this example, it can be seen that the directory belongs to user dietpi and group dietpi.
References
- https://raid.wiki.kernel.org/index.php/A_guide_to_mdadm
- https://raid.wiki.kernel.org/index.php/Linux_Raid
- https://ctaas.de/software-raid.htm
- https://www.digitalocean.com/community/tutorials/how-to-create-raid-arrays-with-mdadm-on-debian-9
- https://www.tecmint.com/create-raid-5-in-linux/
- https://en.wikipedia.org/wiki/Standard_RAID_levels#RAID_5
Very nice, thank you so much. This was exactly what I needed.
Planning to do a RAID 1 with 2 disks for Backups & media (on an Odroid HC4).
Thx.
Within the next 2 weeks I plan to issue the second part dealing with the access to the RAID (no big issue).
Worked…somehow. My Raid1 is called md127 for some reason and the mountpoint is /mt/md0 , but I guess I can live with this…
This will be one issue in the planned further part #3… 🙂
Could you issue a
update-initramfs -u
(possibly with sudo, if needed)?
Maybe you need to to it after you first generated the RAID, before you reboot. I can answer this in a couple of days more in detail.
Can you please give the output of ‘lsblk’ command?