Part 3: Basic management and diagnosis tasks.
The first two posts “Using a RAID system with DietPi – part 1” and “- part 2” dealt with the setup of and the access to a RAID system with an example of a RAID 5.
This blog post deals with the basic management and diagnosis tasks, e.g. renaming the RAID and checking options.
These tasks will be updated resp. extended, whenever suitable issues become present (e.g. via the DietPi Forum).
This blog post is one of a series regarding setup, usage and management of a RAID system:
- Using a RAID system with DietPi – part 1: System overview and installation of the RAID
- Using a RAID system with DietPi – part 2: Access the RAID
- Using a RAID system with DietPi – part 3: Basic management and diagnosis tasks
- Using a RAID system with DietPi – part 4: RAID maintenance
- Using a RAID system with DietPi – part 5: Redundancy tasks
Table of contents
1. Basic management of the RAID system
There are some basic management tasks which can be executed to handle the RAID. These are
- Save and restore the RAID layout (within mdadm.conf)
- Rename the hostname of the RAID system
1.1 Important task: Save and restore RAID layout
Saving the RAID layout is a very important task to do: It is needed in case that
- the RAID assembly shall be transferred to a different Linux system
(e.g. in case of an upgrade to a quicker Linux system) - the hardware of the Linux system shall be exchanged
(e.g. in case of an SBC hardware failure)
The RAID layout contains the information which hard disks of the system are used within a RAID assembly. If e.g. there are five hard disks connected to the system and the RAID assembly only consists of three of them, the RAID layout shows which of the five hard disks are linked to the RAID assembly.
1.1.1 Show RAID info/layout
The mdadm ‑‑examine ‑‑scan command gives the RAID layout information.
root@raid:~# mdadm --examine --scan
ARRAY /dev/md/0  metadata=1.2 UUID=12157b11:7448aab3:746d9b3e:bf7f59f9 name=raid:0

root@raid:~# mdadm --examine --scan --verbose

ARRAY /dev/md/0  level=raid5 metadata=1.2 num-devices=4 UUID=12157b11:7448aab3:746d9b3e:bf7f59f9 name=raid:0

   devices=/dev/sdb,/dev/sdd,/dev/sdc,/dev/sda
1.1.2 Save RAID layout
The RAID configuration information is stored in a file, typically called mdadm.conf, located in the directory /etc/mdadm.
To save the RAID layout, this file needs to contain the information given by the command
mdadm --examine --scan --verboseEasily it can be appended to the file with
mdadm --examine --scan --verbose >> /etc/mdadm/mdadm.confThis leads to some lines at the end of the file like e.g.:
ARRAY /dev/md/0  level=raid5 metadata=1.2 num-devices=4 UUID=12157b11:7448aab3:746d9b3e:bf7f59f9 name=raid:0
   devices=/dev/sdc,/dev/sdd,/dev/sdb,/dev/sda
To be able to transfer the RAID disks to a different system or to replace the system hardware, this file should be copied to a different location.
During the setup of a new system, the mdadm package has to be installed and this file has to be copied to the new system. Then the new system is able to start the RAID assembly with the previously used hard disks without reformatting them. All data from the former hard disks will then be preserved.
1.1.3 Restore RAID layout
The use case of this task may be a hardware exchange of the Linux system and keeping the RAID hard disks.
The preparation for this contains
- Basic setup of the new system
- Installation of software (
mdadmetc, see in the former blog entry: „Installation of needed software packages“) - Copy of saved
mdadm.confto the new system - (In case of a different hostname see section „Rename RAID hostname“)
- Reboot
After the reboot is can be checked via lsblk, whether /dev/md0 is output (or a different value, e.g. /dev/md127). If the output is not /dev/md0 then the actions of „Rename RAID hostname“ have to be done until the command line
mdadm --assemble --update=name --name=raid:0 /dev/md0After this, the status of mdadm via
cat /proc/mdstattypically shows:
Personalities : [linear] [multipath] [raid0] [raid1] [raid6] [raid5] [raid4] [raid10]
md0 : active (auto-read-only) raid5 sdd[0] sdc[4] sdb[2] sda[1]

      5860147200 blocks super 1.2 level 5, 512k chunk, algorithm 2 [4/4] [UUUU]

        resync=PENDING

      bitmap: 2/15 pages [8KB], 65536KB chunk

unused devices: <none>
If the output contains „auto-read-only“, the system is in a read only status and needs to be set to read/write via mdadm --readwrite md0 (then the RAID resyncs itself for a short while):
root@raid:~# mdadm --readwrite md0
root@raid:~# cat /proc/mdstat

Personalities : [linear] [multipath] [raid0] [raid1] [raid6] [raid5] [raid4] [raid10]

md0 : active raid5 sdd[0] sdc[4] sdb[2] sda[1]

      5860147200 blocks super 1.2 level 5, 512k chunk, algorithm 2 [4/4] [UUUU]

      [>....................]  resync =  0.0% (17084/1953382400) finish=1905.2min speed=17084K/sec

      bitmap: 2/15 pages [8KB], 65536KB chunk

unused devices: <none>
As a last step, dietpi-drive_manager can be started to mount /dev/md0 if not already mounted.
Optionally it needs to be exported like described above (e.g. via NFS).
1.2 Rename RAID hostname
1.2.1 General
If the hostname of the RAID system shall be renamed, also the RAID configuration needs some adjustments. The RAID configuration file (typically /etc/mdadm/mdadm.conf) has to be changed as well as a write of the so-called superblock of the RAID.
1.2.2 Example
In this example, the hostname shall be changed from „dietpi“ to „raid“.
Assumed is a state where the hostname is on its old value. The system then gives:
root@dietpi:~# mdadm --examine --scan –-verbose
ARRAY /dev/md/0  level=raid5 metadata=1.2 num-devices=4 UUID=12157b11:7448aab3:746d9b3e:bf7f59f9 name=dietpi:0

   devices=/dev/sdd,/dev/sdc,/dev/sdb,/dev/sda
In mdadm.conf the contents is:
ARRAY /dev/md/0  level=raid5 metadata=1.2 num-devices=4 UUID=12157b11:7448aab3:746d9b3e:bf7f59f9 name=dietpi:0
   devices=/dev/sdc,/dev/sdd,/dev/sdb,/dev/sda
After this, the next step is to change the hostname, but nothing in the RAID configuration. Then a reboot of the system shall be conducted.
After the reboot, the RAID is not running properly at first. This can be seen with the command lsblk: It will not show the correct ‚md..“ values.
E.g. it will show „md127“ instead of „md0“:
root@raid:~# lsblk
NAME        MAJ:MIN RM  SIZE RO TYPE  MOUNTPOINT
sda           8:0    0  1,8T  0 disk
└─md127       9:0    0  5,5T  0 raid5 /mnt/raid
sdb           8:16   0  1,8T  0 disk
└─md127       9:0    0  5,5T  0 raid5 /mnt/raid
sdc           8:32   0  1,8T  0 disk
└─md127       9:0    0  5,5T  0 raid5 /mnt/raid
sdd           8:48   0  1,8T  0 disk
└─md127       9:0    0  5,5T  0 raid5 /mnt/raid
mmcblk0     179:0    0 29,7G  0 disk
├─mmcblk0p1 179:1    0  128M  0 part  /boot
└─mmcblk0p2 179:2    0 29,6G  0 part  /
With this value the RAID needs to be stopped:
mdadm --stop /dev/md127Hint: If this fails, maybe there is a need of unmounting /dev/md127 (or editing /etc/fstab, removing the mount and rebooting the system).
As a next step the superblock has to be rewritten:
mdadm --assemble --update=name --name=raid:0 /dev/md0To be sure that the RAID’s name is known the next reboot, execute
update-initramfs -uAdditionally, in mdadm.conf the hostname of the RAID has to be actualized. Therefore, an edit of the file is necessary to change the RAID’s name:
ARRAY /dev/md/0  level=raid5 metadata=1.2 num-devices=4 UUID=12157b11:7448aab3:746d9b3e:bf7f59f9 name=raid:0
   devices=/dev/sdc,/dev/sdd,/dev/sdb,/dev/sda
After a following reboot a check whether the name corresponds between mdadm --examine --scan –verbose and the configuration file (mdadm.conf) should be conducted.
2. RAID diagnosis
RAID diagnosis tasks shall help to examine the RAID, it’s state, configuration, etc.
2.1 Check RAID detection
After a RAID assembly is formatted and mounted, it can be checked whether the system has correctly detected the RAID storage space via
df -h -x devtmpfs -x tmpfs | grep md0might give
/dev/md0 5,5T 28K 5,4T 1% /mnt/raidIn the example the /dev/md0 device is shown with its capacity (e.g. 5,4 TB in the example above) which confirms that the RAID is setup appropriate.
2.2 Check whether all RAID disks are present
The presence of all disks of a RAID can be checked via
lsblkAs an example, in the error free case of a four-disks RAID it shows:
NAME        MAJ:MIN RM  SIZE RO TYPE  MOUNTPOINT
sda           8:0    0  1,8T  0 disk
└─md0         9:0    0  5,5T  0 raid5 /mnt/raid
sdb           8:16   0  1,8T  0 disk
└─md0         9:0    0  5,5T  0 raid5 /mnt/raid
sdc           8:32   0  1,8T  0 disk
└─md0         9:0    0  5,5T  0 raid5 /mnt/raid
sdd           8:48   0  1,8T  0 disk
└─md0         9:0    0  5,5T  0 raid5 /mnt/raid
mmcblk0     179:0    0 29,7G  0 disk
├─mmcblk0p1 179:1    0  128M  0 part  /boot
└─mmcblk0p2 179:2    0 29,6G  0 part  /
As can be seen, all four disks (sda, sdb, sdc, sdd) are present and belong to the RAID md0.
Remark: After system boot, it may take a while until all disks show the underlying md0 in the lsblk command output.
2.3 Check whether RAID is running resp. the RAID state
A detailed information about a RAID system can be displayed via
mdadm --detail /dev/md0One of the important information is the given „State“. It may have e.g. these values:
- clean
- active
- inactive
- degraded
- recovering
In the case of state „inactive“, the RAID can be started via
mdadm --run /dev/md02.4 Check formatting and mounting
This may be checked via the dietpi-drive_manager.
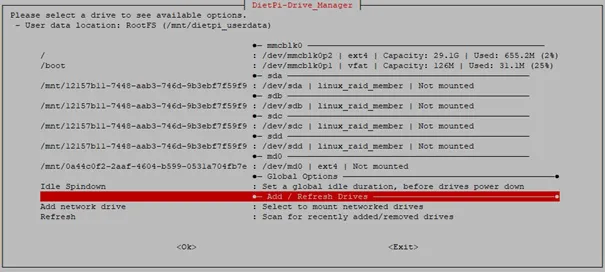
As can be seen, the RAID (/dev/md0) is formatted as ext4 filesystem type, but is not mounted yet. There are four device (/dev/sda .. /dev/sdd) which have the attribute „linux_raid_member“, i.e. they belong to a RAID (Remark: Basically they could belong to different RAID systems). These four RAID disks should be “Not mounted” like shown.
2.5 Check the RAID configuration (within mdadm.conf)
Another check is to compare the RAID configuration set via mdadm.conf to the actual RAID status:
mdadm --examine --scan --verboseis executed and compared against the entry within the file /etc/mdadm/mdadm.conf.
2.6 Check the RAID build status
During any build/rebuild of a RAID the command mdstat gives status information:
cat /proc/mdstatresp.
watch -n1 cat /proc/mdstatIn the case of an error free RAID this might give:
root@raid:~# cat /proc/mdstat
Personalities : [raid6] [raid5] [raid4]

md0 : active raid5 sdd[4] sdc[2] sdb[1] sda[0]

      5860144128 blocks super 1.2 level 5, 512k chunk, algorithm 2 [4/4] [UUUU]

      bitmap: 0/15 pages [0KB], 65536KB chunk

unused devices: <none>
Basic maintenance and diagnostic chores, such as renaming the RAID and verifying options, are covered in this blog post.