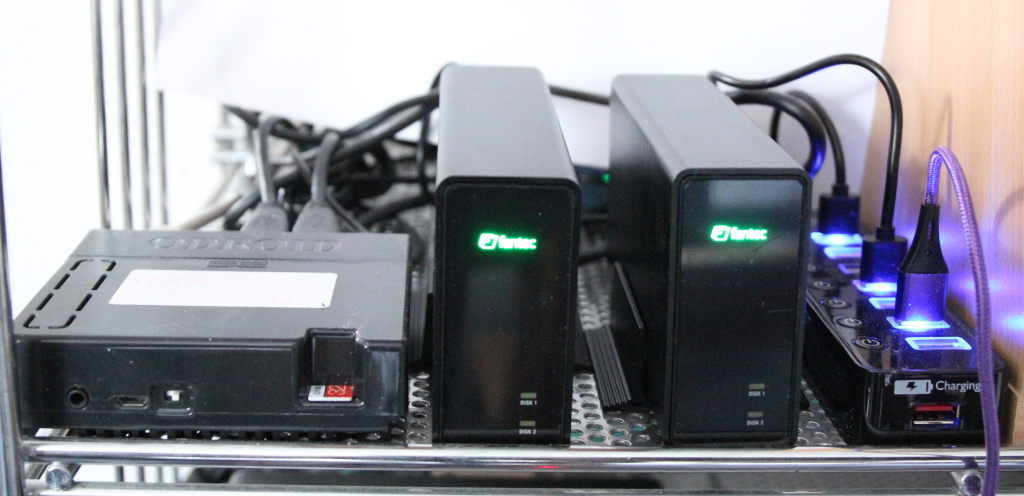
Part 2: Access the RAID.
The first post “Using a RAID system with DietPi – part 1” dealt with the setup of a RAID system with an example of a RAID 5.
This blog post deals with the usage, i.e. managing the access to the RAID from outside via NFS, Samba and FTP.
This blog post is one of a series regarding setup, usage and management of a RAID system:
- Using a RAID system with DietPi – part 1: System overview and installation of the RAID
- Using a RAID system with DietPi – part 2: Access the RAID
- Using a RAID system with DietPi – part 3: Basic management and diagnosis tasks
- Using a RAID system with DietPi – part 4: RAID maintenance
- Using a RAID system with DietPi – part 5: Redundancy tasks
Table of contents
1. Introduction
The access to the RAID can be done by various methods. Some of these are:
- NFS mount (Network File System)
- Samba server share
- FTP access (e.g. ProFTPD, vsftpd)
To access the RAID, basically two actions need to be executed:
- Grant access on the RAID storage (server side)
- Gain access to the RAID storage (client side)
Granting access on the RAID side exposes the RAID storage to the network. This allows clients to browse and access the RAID storage.
Gaining access to the RAID storage is needed on every client who wants access.
2. NFS mount (Network File System)
Basic information about NFS mount can be retreived from the internet, e.g.
2.1 Grant access on the RAID storage (server side)
As a prerequisite, on the server side the software option NFS has to be activated via dietpi-software.
This can either be done via the interface of dietpi-software or via the command
dietpi-software install 109The next step is to export the RAID storage. Basically, the file /etc/exports or files within the directory /etc/exports.d needs to be edited.
Per default, DietPi exports the directory /mnt/dietpi_userdata via the file /etc/exports.d/dietpi.exports. To export the RAID storage this file can be edited to exchange /mnt/dietpi_userdata with /mnt/raid. Finally the export is actualized via
exportfs -raSee also https://dietpi.com/docs/software/file_servers/#nfs for details.
2.2 Gain access to the RAID storage (client side)
To gain access on another system, the NFS storage on this system has to be mounted („remote mount“). This can be achieved via the dietpi-drive_manager.
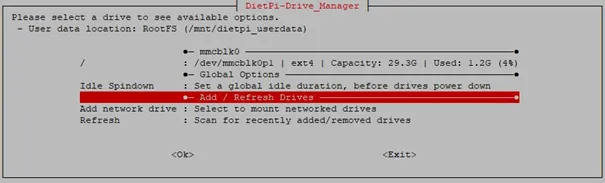
At first, „Add network drive“ is selected, at second „NFS“ is selected.
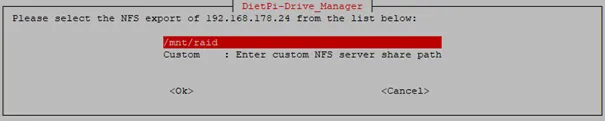
In the following dialog the IP or hostname of the RAID system is entered.

Then the mount point on the client where the NFS mount shall appear is entered (default is „nfs_client“).
After doing this, in the dietpi-drive_manager main menu the mounted share appears:
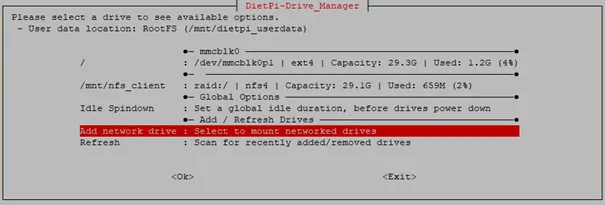
As can be seen, the /mnt/nfs_client is the newly mounted NFS share.
Remark:
There are additional NFS options (on the server side), like access management. Please refer to https://dietpi.com/docs/software/file_servers/#nfs and to NFS documents available in the internet.
2.3 Monitoring access
Monitoring the access to the RAID storage can be done on the server side (display storage exports) as well as on the client side (display mounted network storage). This gives an option to check the correct settings in case of troubles.
2.3.1 Monitoring on the server side
On the server side the command line program exportfs is present, e.g.
root@raid:~# exportfs
/mnt/raid       <world>
can be used to get a list of the exported NFS shares. In the example, only the exported share /mnt/raid is given.
Another good monitoring tool is the web-based management tool Webmin. It can be installed via dietpi-software (e.g. dietpi-software install 115) and gives a feature rich option to manage and monitor NFS shares.
2.3.2 Monitoring on the client side
After mounting the RAID storage its availability (e.g. /dev/md0) can be checked via
df -h -x devtmpfs -x tmpfsThis should give a line output like
raid:/ 5,5T 17M 5,5T 1% /mnt/nfs_client
Additionally, browsing the mountable shares can be achieved by executing showmount, e.g.
root@client:~# showmount -e raid
Export list for raid:
/mnt/raid *
3. Samba server share
Basic information about Samba server can be retreived from the internet, e.g.
3.1 Grant access on the RAID storage (server side)
As a prerequisite, on the server side the software option Samba Server has to be activated via dietpi-software.
This can either be done via the interface of dietpi-software or via the command
dietpi-software install 96The next step is to export the RAID storage. Basically, the file /etc/samba/smb.conf need to be edited.
Per default, DietPi exports the /mnt/dietpi_userdata via the file /etc/samba/smb.conf. To export the RAID storage, this file can be edited to exchange /mnt/dietpi_userdata with /mnt/raid. Finally the Samba export is actualized via
systemctl restart nmbd smbdSee also https://dietpi.com/docs/software/file_servers/#samba for details.
3.2 Gain access to the RAID storage (client side)
To gain access on another system, the Samba share needs to be connected. This can be achieved via the dietpi-drive_manager.

First, selecting „Add network drive“ and then selecting „Samba“ has to be done.
In the following dialog the IP or hostname of the RAID system is entered.

In the next step the Samba share folder name is entered (e.g. „dietpi“).

Additionally the Samba share credentials which are username and password are entered (username „dietpi“ and password „dietpi“ by default).
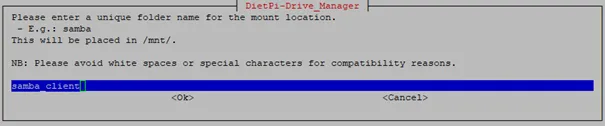
In the next step the mount point on the client where the Samba share shall appear is entered (default is „samba“, in the example it was changed to „samba_client“ to be similar to the NFS mount point).
After doing this, in the dietpi-drive_manager main menu the mounted share appears:
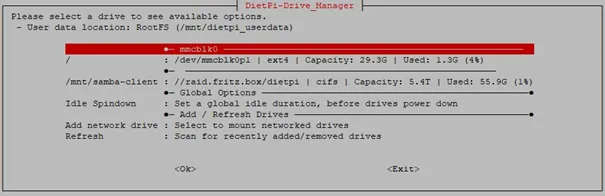
As can be seen, the /mnt/samba_client is the new mounted Samba share.
Remark:
There are additional Samba options (on the server side), like access management. Please refer to https://dietpi.com/docs/software/file_servers/#samba and to Samba documents available in the internet.
3.3 Monitoring access
Monitoring the access to the RAID storage can be done on the server side (display storage exports) as well as on the client side (display mounted network storage). This gives an option to check the correct settings in case of troubles.
3.3.1 Monitoring on the server side
On the server side the command line program smbstatus resp. smbstatus -b resp. smbstatus -v is present, e.g.
smbstatus -bcan be used to get a list of the Samba clients connected to the server.
Another good monitoring tool is the web-based management tool Webmin. It can be installed via dietpi-software (e.g. dietpi-software install 115) and gives a feature rich option to manage and monitor Samba shares.
3.3.2 Monitoring on the client side
After mounting the RAID storage its availability (e.g. /dev/md0) can be checked via
df -h -x devtmpfs -x tmpfsThis should give a line output like
//raid 5,5T 56G 5,4T 2% /mnt/samba-client
4. FTP access
There are many FTP servers available for Linux systems. DietPi supports the installation of these servers via dietpi-software:
- ProFTPD
- vsftpd
Basic information about FTP server can be retreived from the internet, e.g.
4.1 ProFTPD
See https://dietpi.com/docs/software/file_servers/#proftpd.
T.b.d.
4.2 vsftpd
See https://dietpi.com/docs/software/file_servers/#vsftpd.
T.b.d.