This blog post deals with the DietPi tool DietPi-Backup, it describes the procedure of the backup/restore, especially if you have several DietPi systems which you want to backup on a central backup server.
It shall be shown,
- what’s behind (rsync based system backup)
- how to use it (command line with/without interface)
- how to configure it (backup options etc.)
- how to diagnose it (log info)
The basic backup/restore functionality was described in the recommendable video “Raspberry Pi Backup Einrichtung – ganz easy mit DietPi” from Holger Erbe (LOGIN SystemHaus GmbH) which can be found in his Youtube video about this issue (german language).
Table of Contents
- Basics
- Configuration
- 2.1 NFS mounts
- 2.2 Backup settings
- 2.3 Time scheduling
- Monitoring results
- Restoring
- References
1. Basics
One of the tools which comes with DietPi is DietPi-Backup. It can be used to
- Backup your whole DietPi system (whole system installation as well as user data)
- Restore a DietPi system from your backup (e.g. crashed SD card)
- Backup/restore parts of your system
Read also the DietPi documentation chapter about DietPi-Backup.
1.1 Architecture used in this example
Basically, the backups can be stored on every mounted directory location (e.g. locally, on an external USB stick/disk, on a mounted NFS/Samba share, etc.).
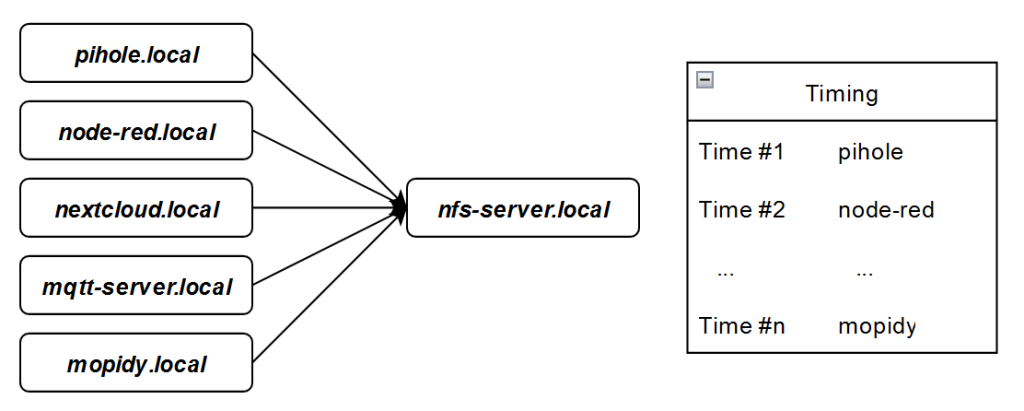
In the example, several DietPi based systems (pihole, node-red, … nfs-backup) shall be backed up on one central DietPi based backup server (nfs-server).
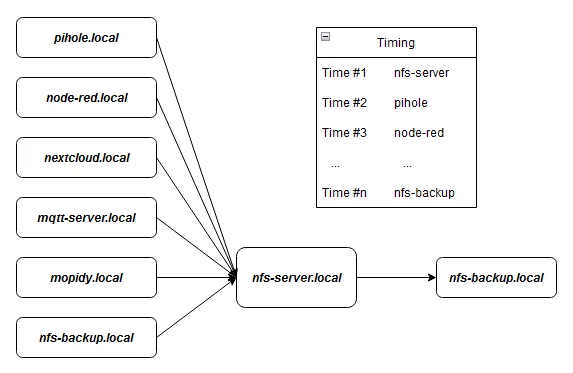
In a second option (step 2), the nfs-server shall also be backed up on another DietPi system (nfs-backup):
Omitting the backup of the nfs-server to the nfs-backup (step 1) gives an easier structure. The idea behind is, that a re-installation of the nfs-server typically is a quick job. In this case you do not use the nfs-backup system.
This minimal solution simplification will be also pointed out in the following as step 1 and the solution with the nfs-backup system as step 2.
1.2 Directory mounts (NFS)
Characteristics of the example:
- To keep it simple, all accesses are executed via NFS share mechanisms, i.e. NFS exports (nfs-server, nfs-backup) and NFS mounts (all systems). In a local environment (e.g. at home) this less secure transmission should be adequate
- In the backup structure the nfs-backup system is an NFS client of the nfs-server system as well as a NFS server for the nfs-server system (only step 2)
- The backups of all systems on the nfs-server shall contain a complete system backup
- The backup of the nfs-server on the nfs-backup shall contain a complete system backup of the nfs-server except the backup data from the other systems (only step 2)
- The backup times shall have a (mostly) non overlapping schedule
As a prerequisite, the NFS server package need to be installed on the nfs-server and nfs-backup systems which can be achieved via dietpi-software.
In addition, the appropriate NFS mounts have to be arranged, e.g. via dietpi-drive_manager.
In a first step, a general NFS export e.g. on the nfs-server system are assumed to be globally, so that all NFS clients mount the same base directory. The exportfs command might give:
root@nfs-server:~# exportfs
/mnt/backup-directory
The mount on the other systems might show:
nfs-server.local:/mnt/backup-directory on /mnt/remote_nfs-backupserver type nfs (rw,relatime,vers=3, ...The backups of the systems on nfs-server shall reside in own directories below /mnt/backup-directory:
/mnt/backup-directory/pihole
/mnt/backup-directory/node-red
/mnt/backup-directory/nextcloud
/mnt/backup-directory/mqtt-server
/mnt/backup-directory/mopidy
/mnt/backup-directory/nfs-backup        # (only step 2)
1.3 Software basis
The software basis for DietPi-Backup is the well known tool Rsync from rsync.samba.org with its feature rich filtering rules (include/exclude rules).
DietPi-Backup adds options for keeping a selectable amount of older backups and to execute the backup processes automated via the Linux cron feature.
As a good practice, a list of the backup times can be generated to keep an overview about the backup schedule which is set via dietpi-cron.
The timing schedule was chosen like follows:
- Backup of the nfs-server (nfs-server -> nfs-backup) (only step 2)
- Backup of the remaining systems (pihole -> nfs-server, node-red -> nfs-server,…)
- Backup of the nfs-backup (nfs-backup -> nfs-server) (only step 2)
2. Configuration
The solution was chosen that the nfs-server exports its /mnt/backup-directory directory and that the different backup directories are set within DietPi-Backup.
2.1 NFS mounts
The mounts to the nfs-server from the other systems are identically directing to thenfs-server.local/mnt/backup-directory.
This is achieved via the dietpi-drive_manager, menu option “Add network drive”. Then the exported share from the nfs-server is selected and mounted e.g. to /mnt/remote_nfs-backupserver which results to this /etc/fstab entry:
nfs-server.local:/mnt/backup-directory /mnt/remote_nfs-backupserver nfs nofail,noauto,x-systemd.automount
A comparable NFS export of an nfs-backup directory and NFS mount on the nfs-server to it need to be carried out in an analogous manner (only step 2).
All NFS mounts will lead to the structure in the graphic above, every of the sevem sketched arrows define a mount representative.
2.2 Backup settings
2.2.1 Best practice settings
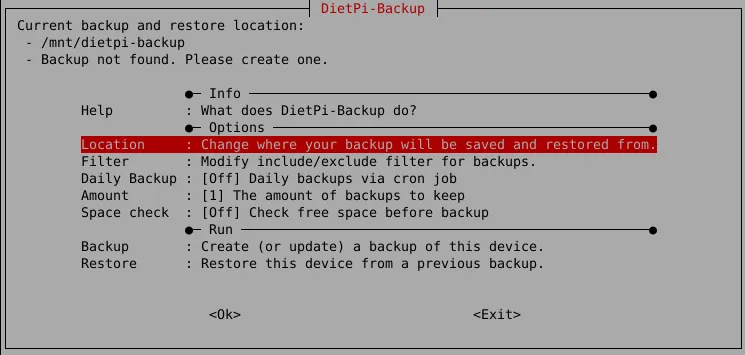
In dietpi-backup, at first the location of the backup has to be set. For the example, the location shall be one directory below the mount point, so that every system backs up into an own area (-> “Location”).
As a good practice, doing an automated daily backup can also be selected (-> “Daily Backup”).
In case of sensitive systems, several older backups can be kept (-> “Amount”), otherwise keeping only one backup ist often sufficient.
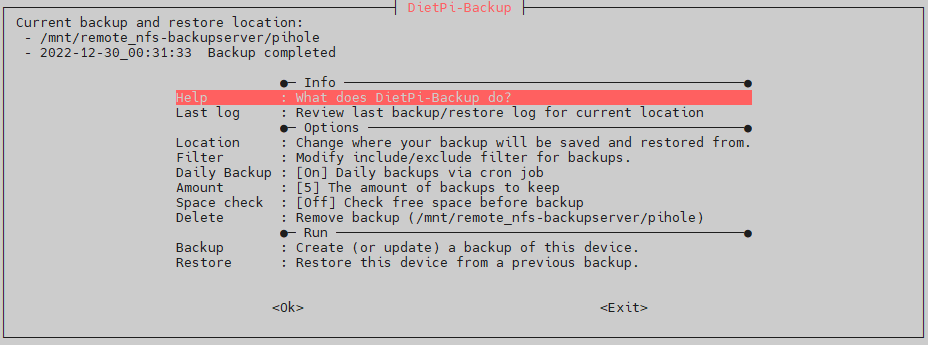
The example shows five backups on a daily base stored at /mnt/remote_nfs-backupserver/pihole.
In case of a backup target which always has space left, the option of omitting the space check should be chosen to speed up the backup procedure.
The filter settings should be fine for most applications. A special case is given below.
With these settings, the backup runs automatically.
2.2.2 Filter settings
The standard filter settings exclude all files below /media and also all files below /mnt except /mnt/dietpi_userdata.
+ /mnt/dietpi_userdata/
- /mnt/*
- /media/
More details can be found there: https://download.samba.org/pub/rsync/rsync.1#FILTER_RULES.
2.2.3 Additional filter settings (only step 2)
In the example step 2, the nfs-backup also backs up its data to the nfs-server. It needs to be avoided that the nfs-server backup data on the nfs-backup is backed up to the nfs-server in a cyclic manner.
If we assume, that the nfs-server backup data on the nfs-backup is located in nfs-backup.local/mnt/nfs-server-backup, i.e. below /mnt, but not within /mnt/dietpi_userdata, all would be o.k.
If we assume that nfs-server backup data on the nfs-backup is located in nfs-backup.local/mnt/dietpi_userdata/nfs-server-backup, i.e. below /mnt/dietpi_userdata, this directory needs to be excluded.
# Include all directories below /mnt/dietpi_userdata which shall be backed up
+ /mnt/dietpi_userdata/
+ /mnt/dietpi_userdata/Music
+ /mnt/dietpi_userdata/Video
+ /mnt/dietpi_userdata/Download
# ... include further subdirectories to be backed up

# Exclude all other directories below /mnt/dietpi_userdata/
- /mnt/dietpi_userdata/*
- /mnt/*
- /media/
Remarks:
- It is important that the order of the include/exclude areas are like shown above.
- It is important to include every directory hierarchy (i.e. do not forget the
+ /mnt/dietpi_userdataalthough there might be no files, otherwise the include of subordinated directories will fail.
More details can be found there: https://download.samba.org/pub/rsync/rsync.1#FILTER_RULES.
2.3 Time scheduling
In the example, five (step 1) resp. six (step 2) systems back up their data to nfs-server. The starting time is defined by the daily cron job which is started at 01:25 by default.
In this case, all systems start at the same time with their backup procedures and try to access nfs-server in parallel. This parallel operation takes a longer time as doing it sequentially. Due to the fact that during the DietPi-Backup procedure the system services are mostly stopped (e.g. webserver, mariadb, etc.), the system’s target functionality is not fully available.
Therefore it is a good practice to avoid overlapping backup times to optimize system availability and overall backup speed. This can be achieved by sequentially start the backups by changing the starting time via dietpi-cron.
With the use of the statistics file .dietpi-backup_stats you can determine typical backup runtimes and set the cron.daily entry accordingly.
In the example, these times could be a result:
| Source system | Backup destination | cron.daily time (backup start) | Assumed duration (determined value) | |
| nfs-server.local | nfs-backup.local | 01:00 | 0:30 | (only step 2) |
| pihole.local | nfs-server.local | 01:30 | 0:20 | |
| node-red.local | nfs-server.local | 01:50 | 0:10 | |
| nextcloud.local | nfs-server.local | 02:00 | 0:45 | |
| mqtt-server.local | nfs-server.local | 02:45 | 0:05 | |
| mopidy.local | nfs-server.local | 02:50 | 0:35 | |
| nfs-backup.local | nfs-server.local | 03:25 | 0:40 | (only step 2) |
3. Monitoring results
Like described in the DietPi-Backup documentation, the starting/ending times (-> duration) and backup results can be determinded from the log information files .dietpi-backup_stats resp. .dietpi-backup.log.
Also overlapping backup procedures can be evaluated with these figures.
4. Restoring
In case of a needed restore process, also DietPi-Backup is used. In case of multiple backups (-> “Amount”) you can select the backup you want to restore within a dialog:
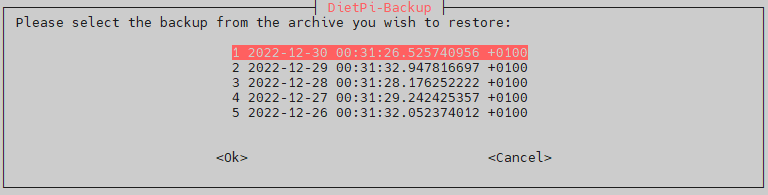
The remaining process is easy: Just let do DietPi-Backup all the “automagical” work.
Typically, the restore needs to be finalized with a reboot.
5. References
- DietPi documentation: DietPi-Backup
- Rsync documenation: rsync.samba.org