Linux offers the option of logical volumes, these are disk arrays which form larger single volumes. A software package for this purpose is called lvm2 and can be used in a DietPi system.
This post shows how to generate a logical volume and use resp. manage it using the lvm2 package.
Table of contents
- Introduction
- 1.1 Motivation
- 1.2 Basics
- 1.3 Examples used in this post
- Prerequisites
- Creation of the logical volume(s)
- Diagnosis and management of the logical volume
- 4.2 Removing a logical volume, a volume group or a physical volume
- 4.3 Moving a logical volume to a different system
- 4.4 Logical volume procedures which must not be done within DietPi
- 4.5 Further interesting commands
- 4.6 Combine RAID and Logical Volumes
- 4.7 GUI support (gparted, KDE Volume and Partition Manager, Webmin)
- References
1. Introduction
1.1 Motivation
In some cases it is necessary to have a large disk space, but only smaller disks are available. In this case a RAID 0 system (“striping”) or a Logical Volume (LV) can be used to form larger logical disks from several physical disks resp. disk partitions.
Additionally, volume groups built from several disks may give a larger performance compared to one single disk due to concurrent accesses to several disks.
The blog post series Using a RAID system with DietPi – part 1ff, it is shown based on the software package mdadm (multi device administration) how to form a RAID system. This software package can also be used to form a RAID 0 system.
In comparison to this, the presented lvm2 based solution gives the following advantages:
- Ease of use:
lvm2is easier to learn and has less complexity in usage - Flexibility of disk arrangement:
lvm2offers more options to combine disk partitions to new logical volumes independent of disk sizes - No explicit formatting necessary: An
mdadmbased RAID systems need an explicit (time consuming) RAID formatting procedure. This is not needed usinglvm2 - Moving a
lvm2based logical volume environment to a different Linux system is much easier compared to moving a RAID based environment
In the following, lvm2 is presented to operate logical volumes in a very flexible way.
1.2 Basics
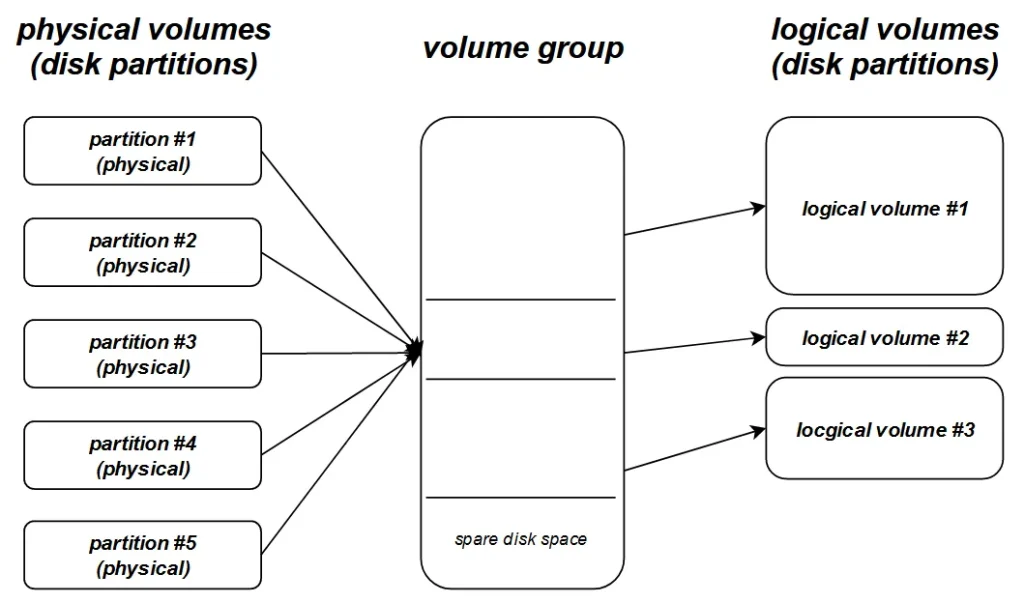
Logical Volumes combine physical disks/partitions and are structured as follows:
- Physical Volumes (PV), like disk partitions, are combined to form a Volume Group (VG)
- A part of a VG or a whole VG form a Logical Volume (LV)
- Several Volume Groups can be organized from one logical volume manager
1.3 Examples used in this post
The following two examples will be used in the rest of this post to show a very simple option (example 1) and a more complex usage (example 2).
- Example 1: Two disks form one volume group which forms one single logical volume
- Example 2: Three partitions of two disks from two volume groups which form three logical volumes
1.3.1 Example 1: Two disks, one volume group, one logical volume

|-----------------------------------------|
|                   LV #1                 | Logical Volume (LV)
|-----------------------------------------|
|                   VG #1                 | Volume Groups (VG)
|-----------------------------------------|
|   /dev/sdb1   |        /dev/sdc1        | Physical Volumes (PV)
|-----------------------------------------|
In this example,
- VG #1 is built from disks
/dev/sdb1and/dev/sdc1 - LV #1 is built from the whole VG #1
1.3.2 Example 2: Two disks, three partitions, two volume groups, three logical volumes
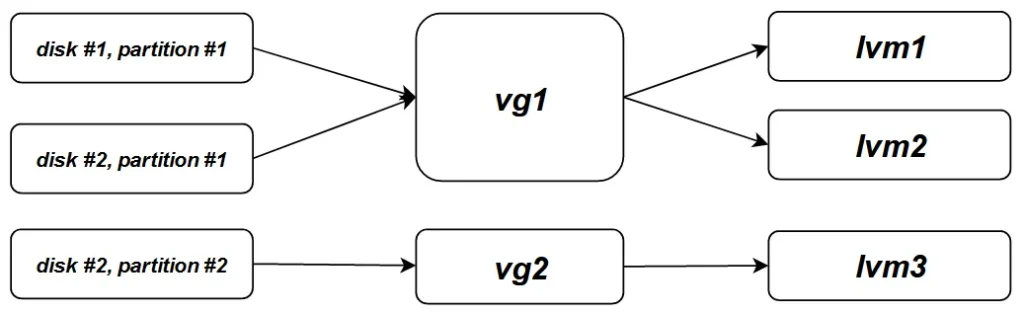
|-----------------------------------------|
|       LV #1      |  LV #2 |    LV #3    | Logical Volumes(LV)
|---------------------------|-------------|
|            VG #1          |    VG #2    | Volume Groups(VG)
|---------------------------|-------------|
|  /dev/sdc1  |  /dev/sdd1  |  /dev/sdd2  | Physical Volumes(PV)
|-----------------------------------------|
In this example,
- VG #1 is built from disks
/dev/sdc1and/dev/sdd1 - VG #2 is built from disk
/dev/sdd2 - LV #1 is a larger part from VG #1
- LV #2 is a smaller part from VG #1
- LV #3 is the whole VG #2
2. Prerequisites
2.1 Installation of package lvm2
As a first step, the software package lvm2 is installed via:
apt install lvm22.2 Preparation of the disks
The disks need to be prepared, so that the needed partitions are present.
For the next example steps, a starting point of two disks (/dev/sdb resp. /dev/sdc) with different sizes (1.8 TB resp. 931,5 GB) having no partitions is assumed.

Remark: Disk /dev/sda1 holds the root file system and must remain untouched.
2.2.1 Example 1
In order to come to this state, possibly existing partitions on the disks need to be remove (e.g. via fdisk).
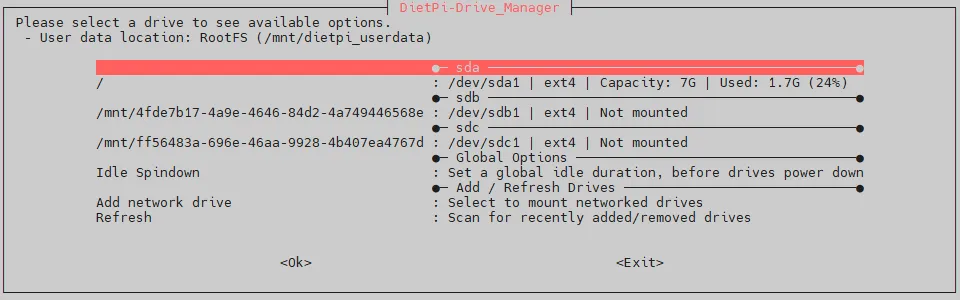
As next, the disk partitions are added using DietPi-Drive_Manager.
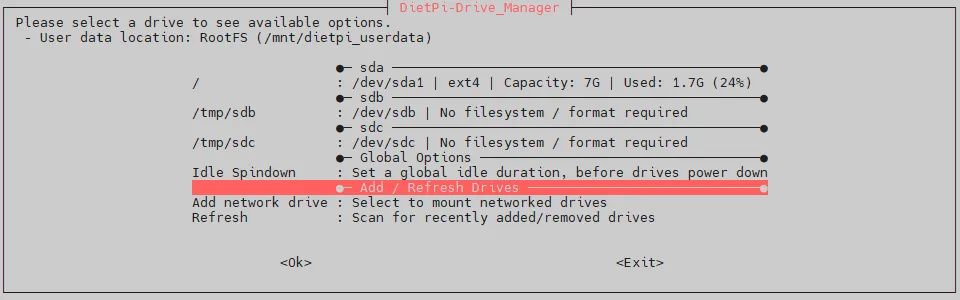
The partitions are added by selecting a disk and executing the Format option:

After generation of the GPT partition table and the ext4 partition, the program asks for a desired mount point. This step has to be cancelled, i.e. the generated partition is not mounted.
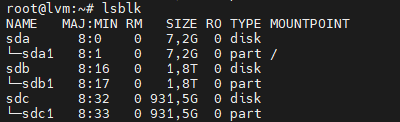
Doing this with both disks leads to the following state:
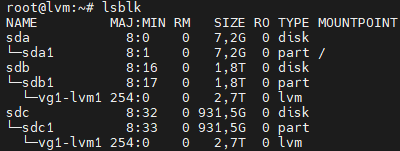
The lsblk command then shows:
2.2.2 Example 2
In example 2, it is needed to generate the partitions /dev/sdc1, /dev/sdd1 and /dev/sdd2 outside of DietPi-Drive_Manager, because it can only generate a single partition on a disk. The formatting of the partitions can then be done via DietPi-Drive_Manager.
The next steps start with:
3. Creation of the logical volume(s)
In this step, the logical volumes are generated with these steps:
- Create physical volumes
- Create the volume group(s)
- Create the logical volume(s)
- Format and mount the created logical volume(s)
These steps are given in the next sections within two different examples.
3.1 Example 1
The physical volumes of the two partitions (/dev/sdb1 resp. /dev/sdc1) are created with the following command:
pvcreate /dev/sdb1 /dev/sdc1This leads to:

Then the volume group /dev/vg1 is created with the following command:
vgcreate vg1 /dev/sdb1 /dev/sdc1This leads to:

As next, the logical volume /dev/vg1/lvm1 is created. In example 1 it shall be the whole part of the volume group /dev/vg1:
lvcreate -l 100%FREE -n lvm1 vg1This leads to:

The result is an entry (/dev/vg1-lvm1) in DietPi-Drive_Manager:
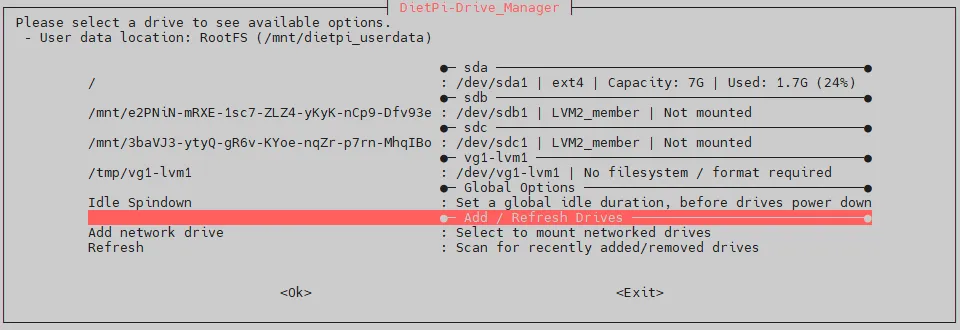
This entry needs to be formatted and mounted.
Important: No formatting of /dev/vg1-lvm1 although DietPi-Drive_Manager signals “format required”!
Instead, mkfs has to be used. Otherwise corrupted data occurs on the disks forming the volume group.
The formatting of the logical volume is done via mkfs:
mkfs.ext4 /dev/vg1/lvm1The format command leads to vg1-lvm1 in the lsblk output:
Mounting the formatted logical volume (virtual block device /dev/mapper/vg1-lvm1) can then be done via DietPi-Drive_Manager. This e.g. ends up in this state:
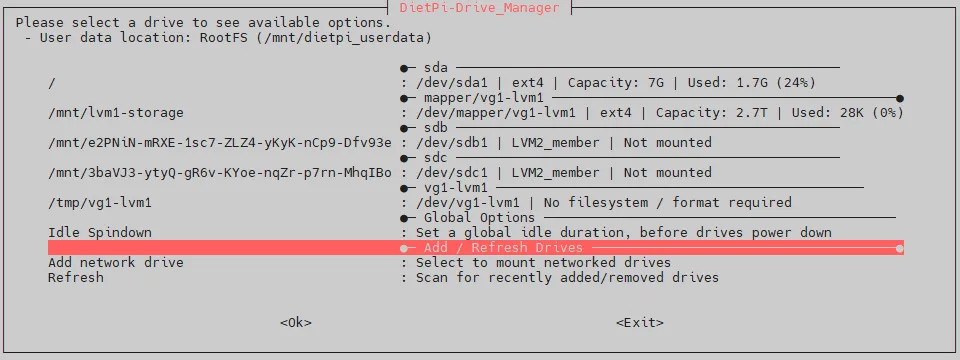
As can be seen, the size of /mnt/lvm1-storage is 2.7 TB which fits to the sum of the used 1.8 TB and 0.9 TB disk space (this e.g. could also be monitored via the command df -h).
The mount definition /etc/fstab also shows the newly mounted logical volume group /mnt/lvm1-storage:
#----------------------------------------------------------------
# PHYSICAL DRIVES
#----------------------------------------------------------------
UUID=26457e06-65b3-4a97-9e42-dc728b16e842 / ext4 noatime,lazytime,rw 0 1
UUID=dbe633c5-533d-46c9-a069-41abc215398b /mnt/lvm1-storage ext4 noatime,lazytime,rw,nofail,noauto,x-systemd.automount
At this point, the new generated logical volume /dev/vg1-lvm1 mounted to /mnt/lvm1-storage can be used like any other disk space.
3.2 Example 2
The corresponding commands for example 2 are:
# Create physical volumes
pvcreate /dev/sdc1 /dev/sdd1 /dev/sdd2

# Create volume groups vg1 and vg2
vgcreate vg1 /dev/sdc1 /dev/sdd1
vgcreate vg2 /dev/sdd2

# Create logical volumes lvm1, lvm2 and lvm3
#           lvm1 is 70% of the vg1 space
lvcreate -l 70%VG -n lvm1 vg1
#           lvm2 is 100% of the resulting space (30% of the vg1 space)
lvcreate -l 100%FREE -n lvm2 vg1
#           lvm3 is 100% of the vg2 space
lvcreate -l 100%FREE -n lvm3 vg2

# Format logical volumes
mkfs.ext4 /dev/vg1/lvm1
mkfs.ext4 /dev/vg1/lvm2
mkfs.ext4 /dev/vg2/lvm3
This leads to an environment of:
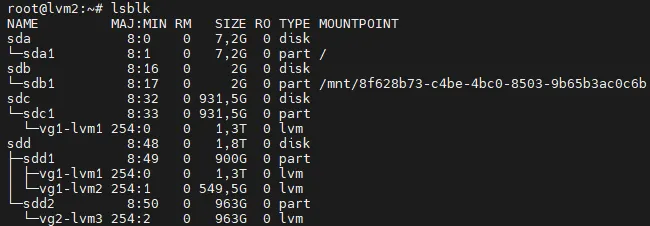
The result are the logical volumes (virtual block devices)
/dev/mapper/vg1-lvm1of 1.3TB/dev/mapper/vg1-lvm2of 550GB/dev/mapper/vg2-lvm3of 963GB
These logical volumes lvm[1-3] can then be mounted via DietPi-Drive_Manager (shown as not mounted in the screenshot):
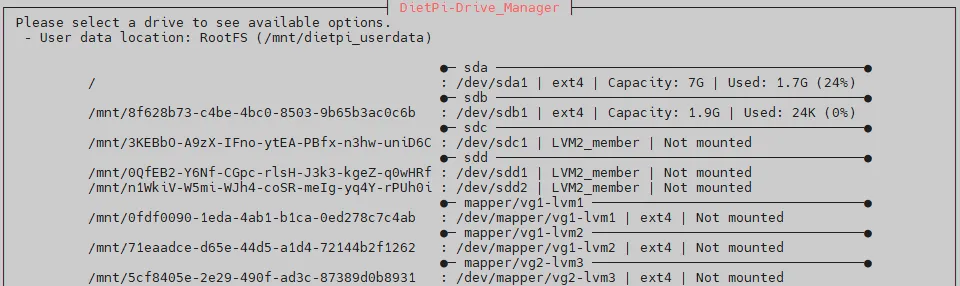
The lower three entries are the volumes to be mounted.
Remark: lvcreate has futher options, e.g. could the lvm1 size be set by a percentage value of the whole VG space (see lvm1 above), set by a percentage value of the free space (see lvm2, lvm3 above) or set by an absolute size value like e.g. with a size of 1.3 TB:
lvcreate -l 1300G -n lvm1 vg14. Diagnosis and management of the logical volume
The diagnosing is shown in the following with the environment of example 1 (two disks, one volume group, one logical volume).
4.1 Diagnosing logical volumes
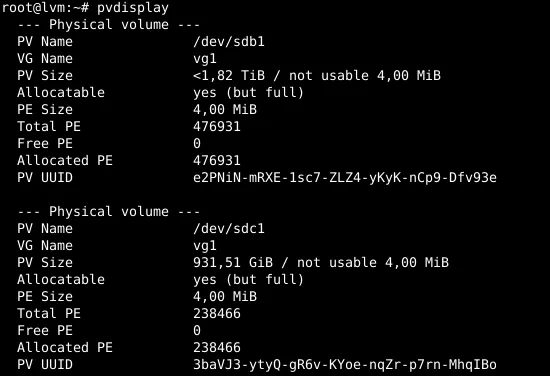
4.1.1 Diagnosing the physical volumes
Physical volumes can be monitored with these commands:
pvspvdisplaypvscanThe commands e.g. show this information:


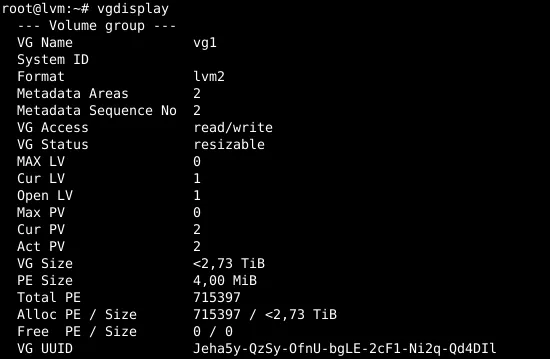
4.1.2 Diagnosing the volume groups
Volume groups can be monitored with these commands:
vgsvgdisplayvgscanThe commands e.g. show this information:


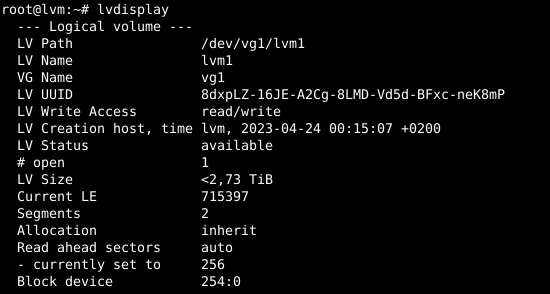
4.1.3 Diagnosing the logical volumes
Logical volumes can be monitored with these commands:
lvslvdisplaylvscanThe commands e.g. show this information:


4.2 Removing a logical volume, a volume group or a physical volume
Removing a logical volume, a volume group and physical volumes is done in reverse order, like e.g.:
- Unmount file system via
DietPi_Drive_Manager - Delete logical volume, volume group, physical volume
lvremove /dev/vg1/lvm1
vgremove vg1
pvremove /dev/sdb1
4.3 Moving a logical volume to a different system
Moving a logical volume resp. a volume group to a different system is quite easy, especially much easier than doing this with a RAID environment.
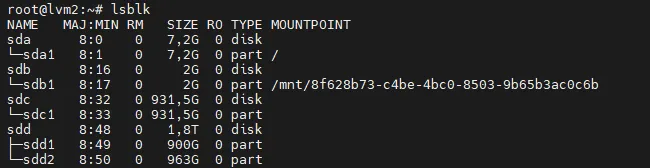
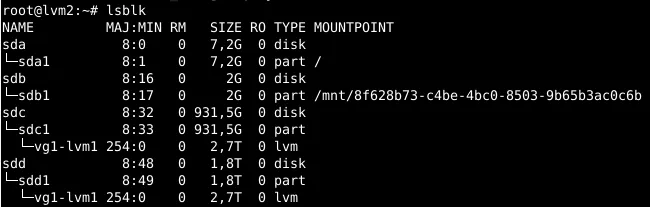
In the following example, a target system with hostname lvm2 is assumed: It contains two disks (/dev/sda and /dev/sdb), therefore having a different disk layout compared to the origin system lvm from example 1:

/dev/sda
/dev/sda and /dev/sdbAs a result, putting the two disk devices /dev/sdb and /dev/sdc from origin host lvm to target host lvm2 gives the two disk devices /dev/sdc and /dev/sdd:
Checking via lvscan, vgscan, pvscan shows that the logical volume is present without any further action:
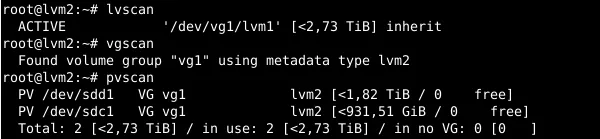
Only, the final mounting of the logical volume on the target host lvm2 is necessary.
Tataa! That’s it.
4.4 Logical volume procedures which must not be done within DietPi
The following actions must not be executed when using lvm2 within DietPi:
- Formatting of a virtual block device via
DietPi-Drive_Manager(e.g. /dev/mapper/vg1-lvm1) - Formatting of a logical volume via
DietPi-Drive_Manager(e.g. /dev/vg1-lvm1)
These action may lead to a corrupted logical volumes/volume groups.
4.5 Further interesting commands
The following command list is a list of additional lvm2 commands which can be walked through and which are described in the lvm2 documentation resp. command help (e.g. vgrename --help):
vgrename vg1 new_vg_name
lvrename vg1 lvm1 new_lvm_name
lvextend -L50G /dev/vg1/lvm1           # In combination with resize2fs
lvextend -l +100%FREE /dev/vg1/lvm1    # In combination with resize2fs
lvreduce -L10G /dev/vg1/lvm1           # In combination with resize2fs
vgextend vg1 /dev/sde1
vgreduce vg1 /dev/sde1
pvmove /dev/sdb1 /dev/sdf1
4.6 Combine RAID and Logical Volumes
RAID and Logical Volumes do not exclude each other, they might be combined.
As an example, a subordinated mdadm based RAID 1 system with an overlaying lvm2 based logical volume system is possible:
|-----------------------------------------------|
|                     LV #1                     | Logical Volume (LV)
|-----------------------------------------------|
|                     VG #1                     |Volume Groups (VG)
|-----------------------------------------------|
|       /dev/md0        |       /dev/md1        | RAID 1 system (mdadm)
|-----------------------------------------------|
| /dev/sdb1 | /dev/sdc1 | /dev/sdd1 | /dev/sde1 | Physical devices
|-----------------------------------------------|
The shows structure is:
/dev/sdb1and/dev/sdc1form a RAID 1/dev/md0/dev/sdd1and/dev/sde1form a RAID 1/dev/md1/dev/md0and/dev/md1form the Volume Group VG #1- The whole VG #1 forms the Logical Volume LV #1
4.7 GUI support
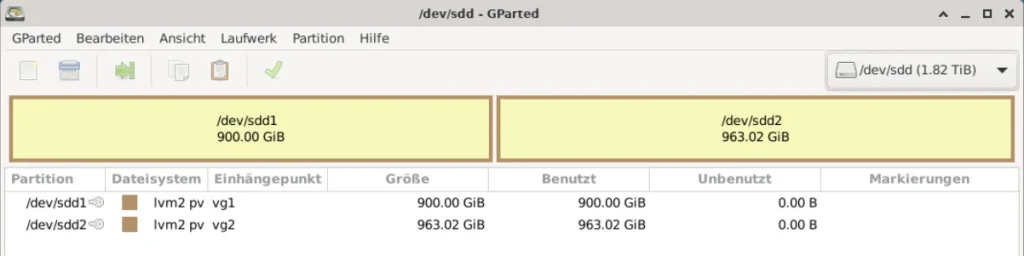
4.7.1 gparted
The tool gparted is installed via
apt install gpartedIt has only very little support, it only shows the volume groups on physical disks:
4.7.2 KDE Volume and Partition Manager
KVPM (KDE Volume and Partition Manager) is installed via
apt install partitionmanagerThe logical volume support of KVPM is very good, the following screenshots show outputs from the environment of example 2.
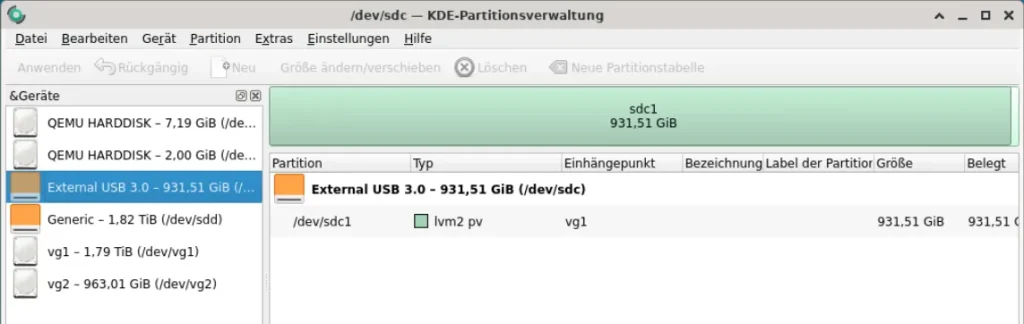
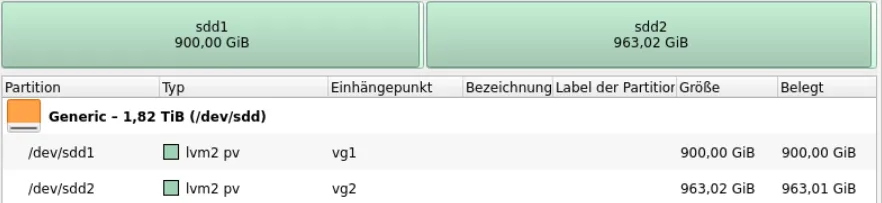
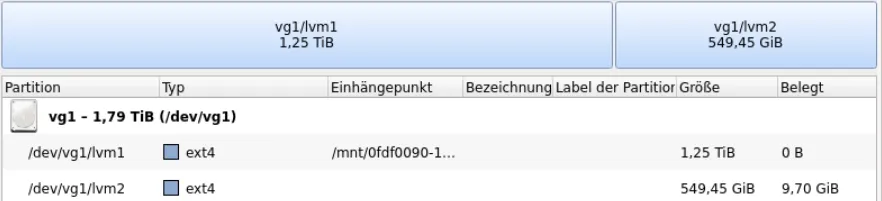

Many operations regarding logical volumes can be executed using this tool.
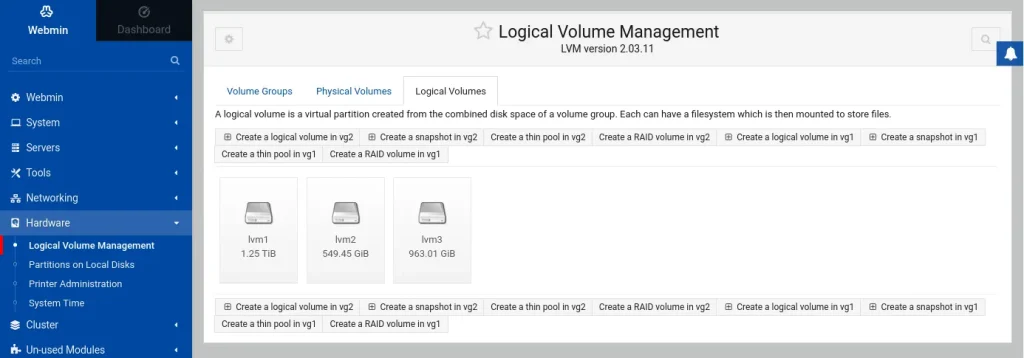
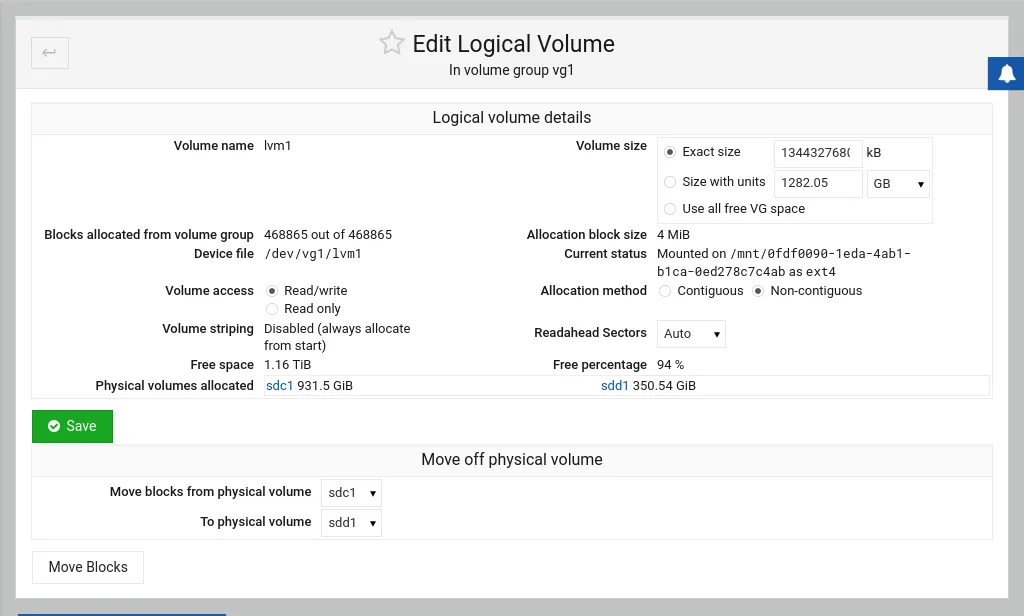
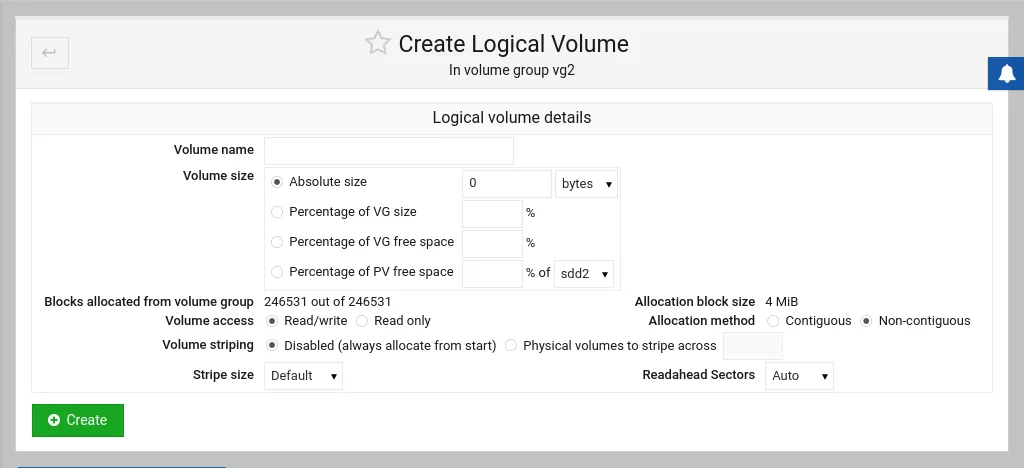
4.7.3 Webmin
Webmin can also be used to manage logical volumes. It comes with dialog support with tabs for handling volume groups, physical volumes and logical volumes, like e.g.:
5. References
- Wikipedia Logical Volume Manager
- opensource.com: A Linux user’s guide to Logical Volume Management
- debian.org: LVM
I’m constantly amazed by your ideas.
Thank your for your kind feedback.
The logical volume support of KVPM is very good, the following screenshots show outputs from the environment of example 2.
KVPM: See https://sourceforge.net/projects/kvpm/