The DietPi base installation basically focuses on headless resp. machines without a graphical user interface (GUI) dealing with server applications like Nextcloud, Pi-hole, media servers, etc.
Generally, an installation of a graphical desktop via dietpi-config and dietpi-software is not difficult, but with the DietPi built-in automated installation process this can be simplified.
This blog article shows how to install a fully working DietPi system with an graphical desktop and some applications (office programs) in just a few steps. This should be used only on relatively powerful machines like the Raspberry Pi 4, Raspberry Pi 400, ODROID N2+, powerful virtual machines, native PC systems, etc. (i.e. rather not on slower machines like the Raspberry Pi 2, Raspberry Pi Zero, NanoPi M1, etc.).
Installation overview
The installation is based on these basic DietPi features:
- Fully automated base installation via
/boot/dietpi.txt - Fully automated installation of DietPi supported software packages
- Fully automated installation of additional office programs
- Fully automated installation of users
In the given example, the goal is to achieve a basic office system containing these components:
- DietPi as the base system
- Graphical user interface (X11) with the Xfce desktop environment and LightDM login dialog
- Remote access to the GUI via Xrdp
- Firefox web browser
- Graphical desktop applications: GIMP, Flameshot (Capture tool) and Eye Of GNOME (image viewer)
- Office applications: LibreOffice (all-in-one word processor, presentation, spreadsheed application,…) and Thunderbird (E-Mail client)
- Office tools: Evince (PDF document viewer) and XSane (scanner program)
- General tools: CUPS (printing system), KeePassXC (password manager), KCalc (calculator), gedit (Gnome’s simple graphical text editor), Krusader+Konsole (TotalCommander clone with embedded console), Xarchiver (zip/unzip tool)
- Additional user “arthur.dent” for normal work on the system (instead of root user)
Prerequisites
The starting point is a flashed DietPi installation media. This has to be mounted in another system to edit the file /boot/dietpi.txt. This is needed to cover the two installation steps base installation and installation of some DietPi supported software packages.
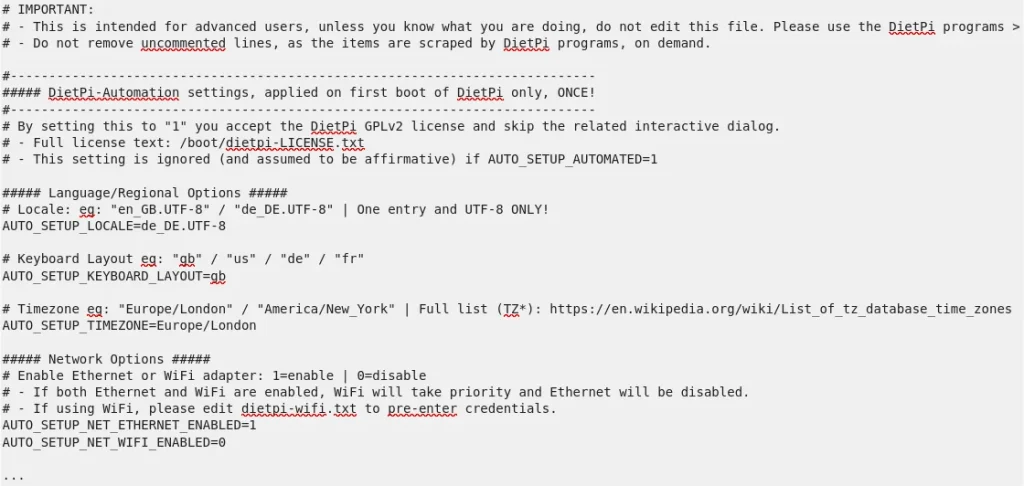
dietpi.txt (extract)It consists of these main areas where the user can edit several options for the base installation, like e.g.:
- ##### Language/Regional Options #####
- ##### Network Options #####
- ##### Software Options #####
- ##### Non-interactive Firstrun Setup #####
- ##### DietPi-Config settings #####
- ##### DietPi-Software settings #####
The comments within the file contain a basic description how all of these options can be used. Take into account that these settings are evaluated only once at the first systems boot procedure.
Prepare the first boot
Step 1: Basic settings and automated installation
In this step, the file /boot/dietpi.txt is edited (e.g. via nano /boot/dietpi.txt).
A general description about this can be found in the DietPi documentation in the chapter “How to do an automatic base installation at first boot”: This chapter resp. the dietpi.txt file contents can be examined to set the options for
so that they fit to the system environment and users needs.
In the “General options” area the fully automated installation is activated via:
| Setting in dietpi.txt | Remark |
AUTO_SETUP_AUTOMATED=1 | Activate the fully automated installation |
Step 2: Settings for the graphical user interface (Xfce)
In this blog article, Xfce is selected as the graphical desktop environment, but this also works for the other UIs selectable for DietPi.
To enable Xfce with a graphical login mask, these entries have to be set in /boot/dietpi.txt:
| Setting in dietpi.txt | Remark |
AUTO_SETUP_INSTALL_SOFTWARE_ID=25 | Xfce and X11 base installation |
AUTO_SETUP_AUTOSTART_TARGET_INDEX=16 | LightDM login mask (or select =2 for autologin) |
AUTO_SETUP_INSTALL_SOFTWARE_ID=29 | Xrdp |
Step 3: Settings for automated installation of graphical desktop applications
In this step, the software packages which the DietPi installation supports natively, are just selected, the rest ist done by DietPi. Therefore, these entries have to be set in /boot/dietpi.txt:
| Setting in dietpi.txt | Remark |
AUTO_SETUP_INSTALL_SOFTWARE_ID=67 | Firefox web browser |
AUTO_SETUP_INSTALL_SOFTWARE_ID=174 | GIMP (GNU Image Manipulation Program) |
AUTO_SETUP_INSTALL_SOFTWARE_ID=187 | CUPS (Common Unix Printing System) |
Remark: For every AUTO_SETUP_INSTALL_SOFTWARE_ID= entry an own entry is needed. This section in dietpi.txt might look like
# Software to automatically install
# - Requires AUTO_SETUP_AUTOMATED=1
# - List of available software IDs: https://github.com/MichaIng/DietPi/wiki/DietPi-Software-list
# - Add as many entries as you wish, one each line.
AUTO_SETUP_INSTALL_SOFTWARE_ID=25    # Xfce
AUTO_SETUP_INSTALL_SOFTWARE_ID=29    # Xrdp
AUTO_SETUP_INSTALL_SOFTWARE_ID=67    # Firefox
AUTO_SETUP_INSTALL_SOFTWARE_ID=174   # GIMP
AUTO_SETUP_INSTALL_SOFTWARE_ID=187   # CUPS
Step 4: Scripted automated installation of further programs
Like mentioned above, the software packages Flameshot, Eye Of GNOME, LibreOffice, Thunderbird, Evince, XSane, CUPS, KeePassXC, KCalc, gedit, Krusader/Konsole, Xarchiver shall be installed.
An execution of a user script for this installation should be done at this instant of time: Post-DietPi base installation. Therefore, the user script /boot/Automation_Custom_Script.sh is used (instead of /boot/Automation_Custom_PreScript.sh).
The entry AUTO_SETUP_CUSTOM_SCRIPT_EXEC within dietpi.txt shows more details.
To install all of the software packages, these entries have to be put into the script file (e.g. via nano /boot/Automation_Custom_Script.sh:
apt install -y flameshot
apt install -y eog
apt install -y libreoffice
apt install -y thunderbird
apt install -y evince
apt install -y xsane
apt install -y keepassxc
apt install -y kcalc
apt install -y gedit
apt install -y krusader
apt install -y konsole
apt install -y xarchiver
Remark: Alternatively, all installations can be put within a single line (e.g. apt install -y flameshot eog libreoffice thunderbird evince xsane keepassxc kcalc gedit krusader konsole xarchiver).
Using one installation package per line gives a better diagnosis, because all installation steps are logged separately in consecutive sections in the log file (dietpi-automation_custom_script.log, see below “Final step”).
Step 5: Scripted setup of users and passwords
In this step, additional users are installed via the useradd command. This is also done via the Automation_Custom_Script.sh file, i.e. the following lines are appended at the end of the file:
useradd -m -s /bin/bash arthur.dent
echo 'arthur.dent:42?Z@phod' | chpasswd
In this example, the new user has the name arthur.dent with the password 42?Z@phod and the bash shell.
Step 6: Final reboot
To enable all installed options (e.g. system language/localization), a final reboot is needed. This is also done via the Automation_Custom_Script.sh file, i.e. the following line is appended at the end of the file:
rebootFinal step: Reboot and run of the automated installation procedure
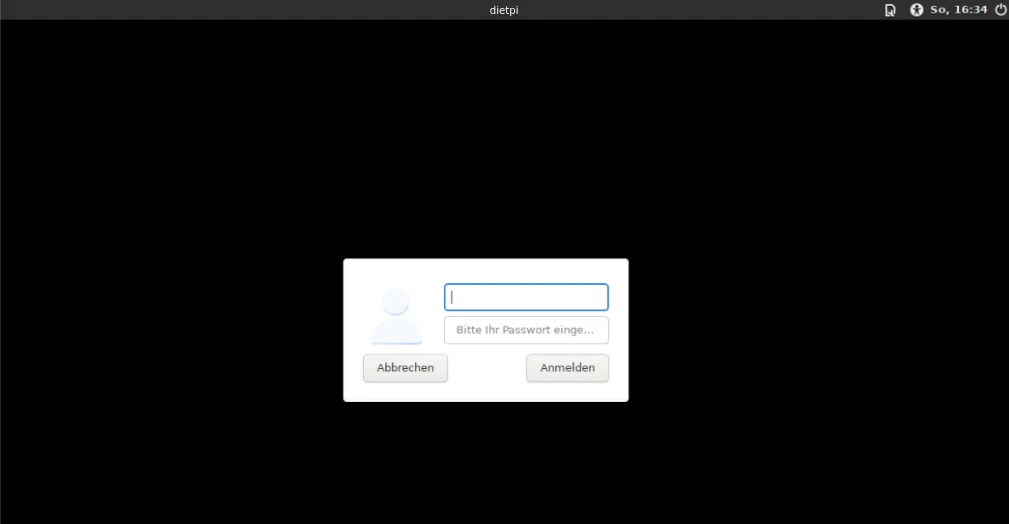
After the dietpi.txt and Automation_Custom_Script.sh files were edited, the system can be booted for the first time. On the console the status can be monitored (or by looking at the tail of the log file). At the end, the system reboots and starts up with the LightDM graphical login dialog:
The results of the automated installation process are logged into these files:
/var/tmp/dietpi/logs/dietpi-firstboot.log/var/tmp/dietpi/logs/dietpi-firstrun-setup.log/var/tmp/dietpi/logs/dietpi-automation_custom_script.log
Complete example file Automation_Custom_Script.sh
For the examples given above, the resulting script file entry would look like:
apt install -y flameshot
apt install -y eog
apt install -y libreoffice
apt install -y thunderbird
apt install -y evince
apt install -y xsane
apt install -y keepassxc
apt install -y kcalc
apt install -y gedit
apt install -y krusader
apt install -y konsole
apt install -y xarchiver
useradd -m -s /bin/bash arthur.dent
echo arthur.dent:42?Z@phod | chpasswd
reboot
References
- “How to do an automatic base installation at first boot”
- Blog entry (German language) from
Holger Erbe: Vollautomatische Installation eines Raspberry Pi unter DietPi – Schritt für Schritt
Does this need wifi? Is is fully automatic? I don’t want to use a keyboard, I have a mouse and I need a virtual keyboard at first boot? What should I do?
Hello Ginuel, it does not need WiFi. But you can use it depending on the settings in the dietpi.txt file resp. dietpi-wifi.txt.
You do not need a keyboard if the settings are appropriate (e.g. automatic login etc.).
Most desktop environments come with an included virtual on-screen keyboard as part of their accessibility options. Otherwise, you can install one, e.g. by connecting via SSH to the system first:
I cannot install additional packages via Automation_Custom_Script.sh:
apt update
apt install -y openssh-sftp-server
apt install -y nfs-common netbase
gives me following error message in dietpi-automation_custom_script.log:
E: Invalid operation update
Reading package lists…
Building dependency tree…
Reading state information…
E: Unable to locate package openssh-sftp-server
Reading package lists…
Building dependency tree…
Reading state information…
E: Unable to locate package netbase
The error remains identical when i use apt-get for installation.
Any hints?
Thank you very much!
Might be, that in /etc/apt/sources.list there is
deb http://deb.debian.org/debian-security/ bookworm-security main
missing?
See e.g. https://packages.debian.org/search?lang=de&searchon=names&keywords=openssh-sftp-server
It seems to me that this blog is incomplete somehow, as I’ve followed it to a T, yet LXDE never automatically installed after reboot.
AUTO_SETUP_AUTOMATED=1
AUTO_SETUP_INSTALL_SOFTWARE_ID=23
AUTO_SETUP_AUTOSTART_TARGET_INDEX=16
… made no difference.
Worked for me with Trixie (e.g. on a X86 virtual machine).
Did you reboot once after the whole installation is finished? After the installation the system ends in the console and you have to execute a reboot which leads to the graphical login.