The Raspberry Pi family typically boots from an SD card plugged to the system. To avoid SD card lifetime issues, these systems can run from an connected USB resp. USB disk stick or – on some Pi derivatives – from an onboard eMMC flash memory.
Lifetime issues may occur from the fact that the number of write cycles to SD cards are much lower than to USB sticks/disks or eMMC. Additionally, systems often boot quicker from USB resp. eMMC compared to a plugged SD card.
At best, you can start with the USB device resp. a removable eMMC card) by flashing DietPi directly to this.
In case of an already running system, there may be the need of moving this running system to a different location: This blog post describes how to move your system to a USB stick/disk or to the onboard eMMC.
The description below is focused on a DietPi system, but – with minor changes – generally also works for other distributions.
Table of contents
- Introduction
- Preconditions
- Step 1: Check filesystem size
- Step 2: Shrink filesystem size
- Step 3: Move operating system to USB stick resp. eMMC
- Step 4: Finalize
- Special hardware handling
- Troubleshooting
- References
1. Introduction
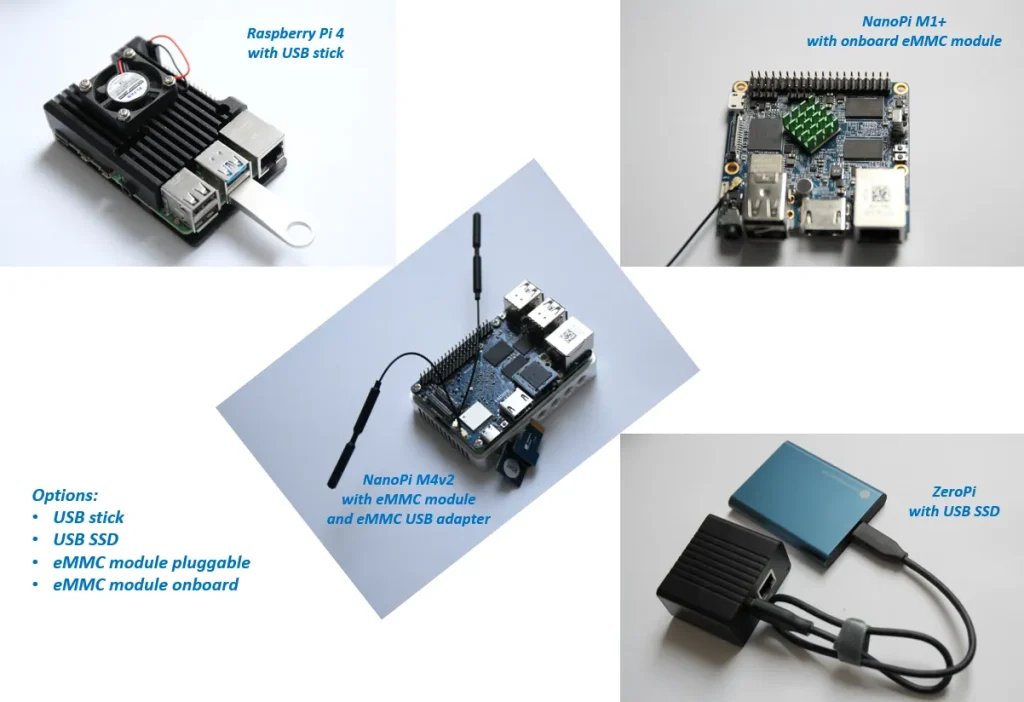
DietPi supports various types of SBCs (see there), some of theses hardware variants contain onboard eMMC memory or a connector for an eMMC memory module.
These devices e.g. are:
- ODROID N2+, C2, C4, XU4(Q)
- NanoPi M4, M4B, M4v2, NEO4, K2, M1, M1+, R1
- NanoPC T4
- Pine A64, H64, ROCK64, ROCKPro64
- ROCK Pi 4, Radxa Zero
- Sparky SBC
- ASUS Tinker Board S
All these boards can boot from this eMMC, some boards, like the ODROID N2+, contain a switch to select the boot media (onboard, SD card).
In addition, most of the systems can boot from a USB connected device, like e.g.
- Raspberry Pi 4, 400
- Raspberry Pi 3B, 3B+ (maybe needed to be activated via
dietpi-config -> Advanced Options) - Many derivates like ODROID C4, XU4, N2+, ASUS Tinker Board, many of the NanoPi boards
Therefore, it is a good practice to move the SBCs system to such an eMMC or USB device.
Basically, only the dd command is needed to copy the SD cards contents to the USB device resp. eMMC and reboot. That’s all.
But life is not this easy in all cases…
2. Preconditions
The following preconditions must be checked to go on:
- A running DietPi system
- The size of the eMMC memory resp. USB memory stick/disk
The following procedures are given as the user ‘root’. If the shell runs without root privileges, the ‘sudo’ prefix shall be set in front of the given commands.
2.1 Running DietPi system
We assume a DietPi system running from an SD card which shall be moved completely (all SD card partitions) to the USB/eMMC.
To obtain a good performance, the USB device should be plugged into a USB3 connector. There are devices, like the Raspberry Pi 4, which have both USB2 and USB3 connectors onboard.
2.2 Size of the eMMC memory resp. USB memory device
The USB/eMMC memory must be larger than the actual needed storage on the SD card. Otherwise the SD card partitions need to be shrinked (e.g. using the gparted program, see below).
3. Step 1: Check filesystem size
Whether the USB/eMMC memory is larger than the actual needed storage on the SD card can be checked via lsblk which may give (example 1):
root@Pi4:~# lsblk
NAME MAJ:MIN RM SIZE RO TYPE MOUNTPOINT
sda 8:0 1 115.5G 0 disk
mmcblk0 179:0 0 14.9G 0 disk
├─mmcblk0p1 179:1 0 256M 0 part /boot
└─mmcblk0p2 179:2 0 14.6G 0 part /
The example 1 shows a 128 GB USB stick (/dev/sda) and a 16 GB SD card (/dev/mmcblk0).
A different situation may occur, if the size of the SD card used is larger than the USB device resp. eMMC capacity (example 2):
root@Pi4:~# lsblk
NAME        MAJ:MIN RM  SIZE RO TYPE MOUNTPOINT
sda           8:0    1  3.9G  0 disk
mmcblk0     179:0    0 14.9G  0 disk
├─mmcblk0p1 179:1    0  256M  0 part /boot
└─mmcblk0p2 179:2    0 14.6G  0 part /
As can be seen in example 2, the size of the USB stick (/dev/sda) is 4 GB and is smaller than the SD card (/dev/mmcblk0) capacity of 16 GB. In this case, the SD card needs to be shrunk (e.g. using the gparted program, see below).
In another example 3, the size of the eMMC is smaller than the SD card (example was done on a NanoPi M1+ with eMMC soldered onboard):
root@M1plus:~# lsblk
NAME         MAJ:MIN RM  SIZE RO TYPE MOUNTPOINT
mmcblk0      179:0    0 29.8G  0 disk
└─mmcblk0p1  179:1    0 29.8G  0 part /
mmcblk2      179:8    0  7.3G  0 disk
└─mmcblk2p1  179:9    0  7.3G  0 part
mmcblk2boot0 179:16   0    4M  1 disk
mmcblk2boot1 179:24   0    4M  1 disk
As can be seen, there are two block devices: mmcblk0 and mmcblk2. The device mmcblk2 is the onboard eMMC flash (size 8 GiB), this can be deducted from the additional boot partitions mmcblk2boot0 and mmcblk2boot1.
Additionally the output shows that the active root partition (SD card) is mounted to the mount point /.
In example 1 and 2, the final goal is to copy the SD card mmcblk0 to the USB stick sda.
In example 3, the final goal is to copy SD card mmcblk0 to the onboard eMMC flash mmcblk2.
4. Step 2: Shrink filesystem size
This step 2 can be skipped in the case that the USB device / eMMC capacity is larger than the SD card size.
The example given below is based on the above example 3 which was a NanoPi M1+ with onboard eMMC.
See above example 3: As can be seen, the SD card on /dev/mmcblk0 has a size of 29.8 GiB. This partition needs to be resized to a value smaller than the 7.3 GiB of the onboard eMMC.
As a requirement, the data on the SD card needs to be less than the 7.3 GiB. If this cannot be achieved, we won’t be able to clone the drive and hence won’t be able to boot from eMMC.
The resizing of the SD cards partition can be done with various tools. One of them is the graphical tool GParted. It can be run on a (different) Linux system with an X11 desktop or may be run on a PC as an USB booted live system (see GParted Live on USB from gparted.org).
Before the partition is shrunk, the SD cards partitions are shown like this (select the appropriate device, here /dev/sdb):
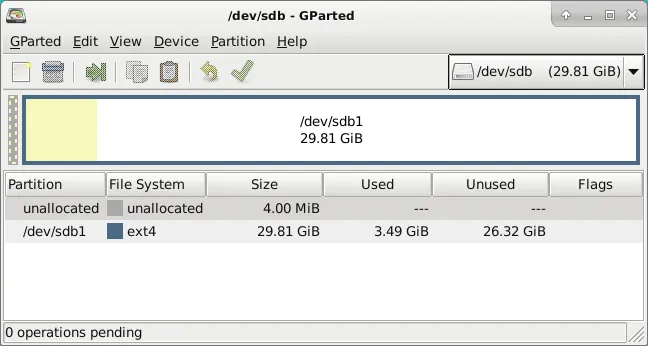
The resizing is done via the Partition menu entry:
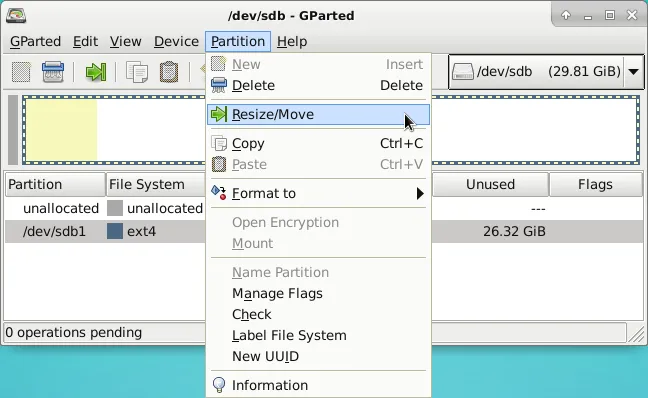
In the next dialog, drag the partition size quite near the minimum possible size:
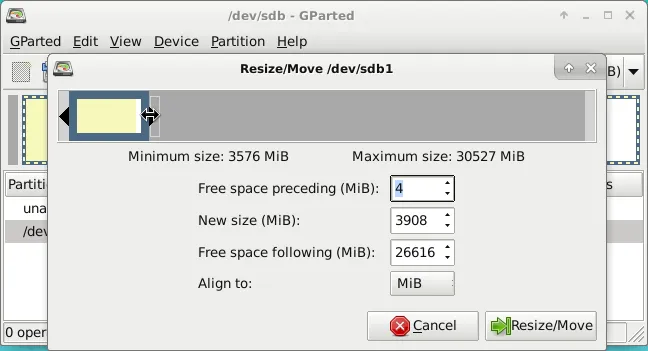
Press the button Resize/Move, afterwards do an Edit->Apply All Operations. After the resizing is finished, the SD cards partitions looks like this:
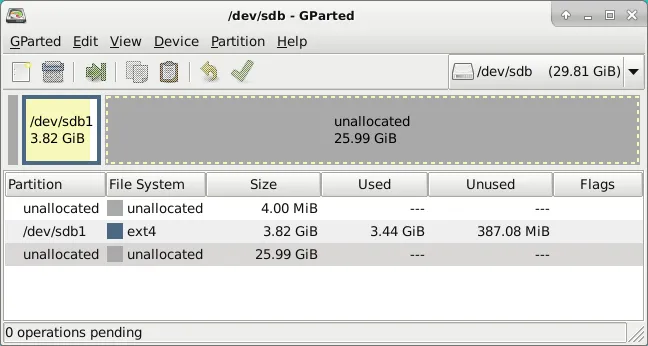
You see that the partition is shrunk to 3.82 GiB. As next, eject the SD card, put it back to your system and boot. There the SD card /dev/mmcblk0 may look like this:
root@M1plus:~# lsblk
NAME         MAJ:MIN RM  SIZE RO TYPE MOUNTPOINT
mmcblk0      179:0    0 29.8G  0 disk
└─mmcblk0p1  179:1    0  3.8G  0 part /
mmcblk2      179:8    0  7.3G  0 disk
└─mmcblk2p1  179:9    0  4.7G  0 part
mmcblk2boot0 179:16   0    4M  1 disk
mmcblk2boot1 179:24   0    4M  1 disk
As can be seen the size of the partition mmcblk0p1 was shrunk from 29.8 GiB down to 3.8 GiB which is less than the 7.3 GiB of the onboard eMMC.
5. Step 3: Move operating system to USB stick resp. eMMC
The basic command to do this is dd.
To ensure that during the OS copy process no other processes change the filesystem, a good practice is to change the filesystem to read-only mode
Read only vs. read/write file system:
If you set the file system to read only, an access via SSH is not possible after the reboot, i.e. in this case you need access to the local console (via keyboard and monitor).Alternatively, you might keep the system set to read/write and do the copying in this state. Due to the fact that this might lead to an inconsistent file state (e.g. if a different user or process writes files in parallel to the
ddcommand below), this should only be done if you are sure that no other users/processes use the file system during the copying process.
Setting the filesystem to read only mode is done via:
dietpi-services stop
swapoff -a
mount -o remount,ro /
In case of an error message like “mount point is busy” at the mount command (last line), you need to manually set the root filesystem to read only. This can be achieved via
sed -i '\|[[:blank:]]/[[:blank:]]|s|,rw|,ro|' /etc/fstab
reboot
which changes the root filesystem in the /etc/fstab to read only and reboots the system.
Then the SD card is copied to the USB device resp. eMMC.
For example 1 and 2 this is done via:
dd if=/dev/mmcblk0 of=/dev/sda bs=1M status=progressFor example 3 this is done via:
dd if=/dev/mmcblk0 of=/dev/mmcblk2 bs=1M status=progressThe option bs=1M speeds up by copying larger chunks. The option status=progress gives an output at the command line to be able to track the operation. The copy process will take some time.
After the execution of the copy process, the next steps are:
- Shutdown the system
- Remove the SD card (Important!)
- Reboot the system
As a final step, you need to change the root filesystem back to read/write via:
mount -o remount,rw /
sed -i '\|[[:blank:]]/[[:blank:]]|s|,ro|,rw|' /etc/fstab
Another options to move the SD card contents to your target device may be to use
- balenaEtcher or Rufus (graphical user interface option)
gnome-disks(graphical user interface option)
These are options which typically are executed on a different system.
6. Step 4: Finalize
If the system is booted from the USB device / eMMC, the system looks like this (example onboard eMMC from example 3):
root@M1plus:~# lsblk
NAME MAJ:MIN RM SIZE RO TYPE MOUNTPOINT
mmcblk2 179:0 0 7.3G 0 disk
└─mmcblk2p1 179:1 0 4.7G 0 part /
mmcblk2boot0 179:8 0 4M 1 disk
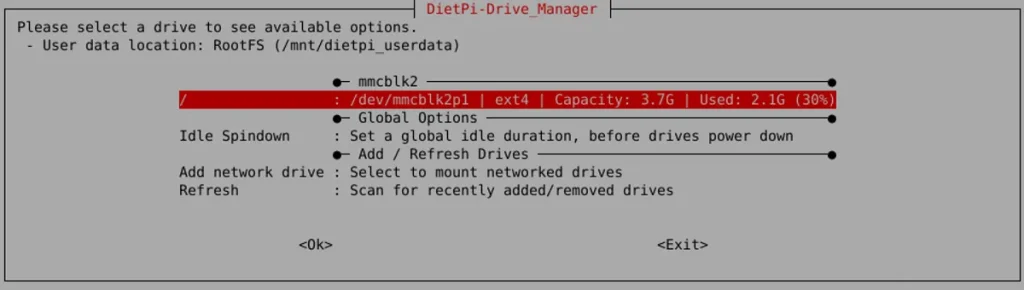
mmcblk2boot1 179:16 0 4M 1 diskThe size of the partition mmcblk2p1 (4.7 GiB) in this status is smaller than the whole onboard eMMC size (7.3 GiB). To be able to use the rest of the onboard flash, start the dietpi-drive_manager to resize the partition to maximum size (Remark: The start of the dietpi-drive_manager may take a longer time for this procedure).
Select the disk containing the root (/) partition and press Enter.
In the following dialog select Resize to go on:
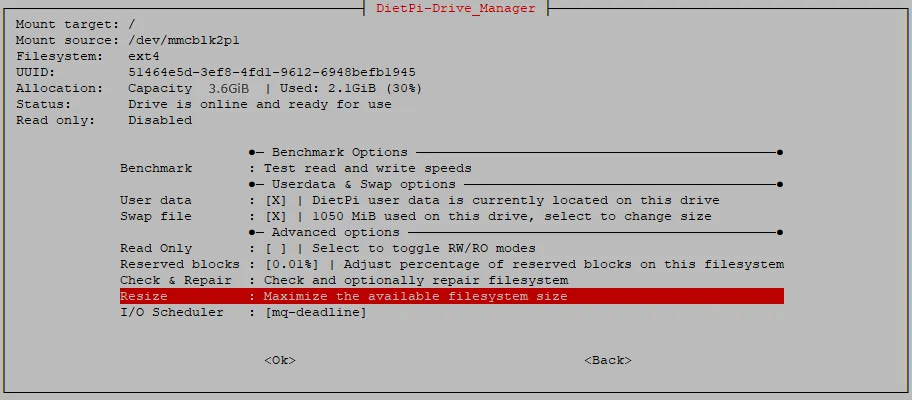
After this procedure the disk partition sizes are:
root@M1plus:~# lsblk
NAME         MAJ:MIN RM  SIZE RO TYPE MOUNTPOINT
mmcblk2      179:0    0  7.3G  0 disk
└─mmcblk2p1  179:1    0  7.3G  0 part /
mmcblk2boot0 179:8    0    4M  1 disk
mmcblk2boot1 179:16   0    4M  1 disk
Now, the partition size is now enlarged to 7.3 GiB and the complete operating system move is finished.
Tataa! You have reached your target.
7. Special hardware handling
7.1 Special partitioning (e.g. NanoPi R6 series)
The NanoPi R6S has this complex partitioning, so it is important to not mess with this but shrink the last 8th partition only.
As an alternative, a base installation can be done directly to the onboard eMMC (also valid for USB devices). As a prerequisite, a running system (e.g. running from an SC card) need to be present.
The steps will be to download the DietPi image on the running system, extract it and flash it to the onboard eMMC.
7.1.1 Check system filename
First of all the needed image file name has to be determined. The downloadable DietPi images are located on the page https://dietpi.com/downloads/images/. The according filename needs to be determined from the present files (e.g. DietPi_NanoPi6-ARMv8-Bookworm.7z).
7.1.2 Download and flash file
This is achieved with these commands:
cd /tmp
curl -O https://dietpi.com/downloads/images/DietPi_NanoPi6-ARMv8-Bookworm.img.xz
7zr x DietPi_NanoPi6-ARMv8-Bookworm.img.xz
dd if=DietPi_NanoPi6-ARMv8-Bookworm.img of=/dev/mmcblk2 bs=1M status=progress
7.1.3 Remove SD card and reboot
The final step will be to remove the SC card and reboot to initialize the fresh DietPi installation from the eMMC.
8. Troubleshooting
If your Raspberry Pi does not boot from the USB stick you can also check this instruction: How to Boot Raspberry Pi 4 / 400 From a USB SSD or Flash Drive.
9. References
- LOGIN TechBlog, Holger: DietPi: System im laufenden Betrieb auf externe USB-Disk / Stick / SSD übertragen
- PiMyLifeUp, Gus: Raspberry Pi Boot from USB
Very good article, but the word is “shrunk”, not “shrinked”.
Many thanks! Found and fixed some other typos, and switched to English decimal separator :).
Thanks for the great article.
Is this article still valid for DietPi 8.11 on Debian Bullseye (RPi4)?
Thanks for your kind feedback. Yes it is generally still valid.
The instructions worked perfectly!
Just a note to step 3: if you need to put the filesystem in to read-only mode, you need access to the console. In short: next steps can’t be done via SSH. 🙂
Thx, I added this to the text.
Could you please add the warning before the sed command.
I had set the filesystem to read-only before I read the warning and closed myself out from ssh. Now I need to stand up from my armchair and go look for a hdmi cable and a keyboard.
Done.
Tried it with a PINE A64+. Won’t boot from USB-SSD. Any hint/advise please?
Not every SBC supports USB boot. Some only do with dedicated SPI bootloader enabled. Not sure in case of PINE A64 tbh, but the dedicated “bootable” at the micro SD info of PINE64 wiki article is an indicator that USB booting is not possible: https://wiki.pine64.org/wiki/PINE_A64#Storage
Thx a lot. Works on PINE A64 with SD used for boot and Systemruns from USB-SSD.
It is working, thanks for sharing.
But before making it working I need to put
BOOT_ORDER=0xf41 (before this it was 0x1, so only sd card was checked for boot)
Where
1 = Check SD card
4 = Check USB drive
f = Start again
And it is executed/red from right to left.
With the command :
sudo -E rpi-eeprom-config –edit
Now, my Diet-Pi check SD Card, then USB, then retry.
I now use a M3 SSD disk with Aragon M2 Case, it is working well.
Very cool!
I used this method to leave the /boot on the SD card, but clone over the / (root filesystem) to the larger/faster drives
https://learn.adafruit.com/external-drive-as-raspberry-pi-root?view=all
This should definitely reduce boot issues because now the /boot is only touched at boot and updating
Hi!
Thank you for this really helpful explanation – it’s right what I was looking for!
Is the “final step” in subsection “Step 3” required always or only if manually setting the file system to read-only was necessary (at the beginning of step 3)? It isn’t quite clear to me and I’d like to know before I start…
What are the advantages/downsides of leaving /boot on the SD and moving / (root) to a different drive (cf. Brian C’s comment)? (I use dietpi-RAMlog to reduce R/W access.)
I have dietpi run from a USB memory stick. I would like to connect a (rather huge, but still USB-powered) USB HDD to the RaspiPi 4B. I thought of moving dietpi to it, and use the HDD also for storing data like media files and backups from other machines in the same LAN, maybe also a cloud storage. Are there any things I should know?
Many thanks for your kind feedback!
The final step is only needed if you previously needed to change /etc/fstab and reboot, to get the root filesystem mounted read-only, i.e. if you hit the “target is busy” error. Otherwise, the root filesystem is writable again after reboot. But there is no risk in running those two commands regardless, they just won’t change anything.
There is not benefit I can think of to leave the /boot partition on the SD card. But it is necessary e.g. on older RPi models (1 and 2), as they do not support booting from USB. But to move the root filesystem only, if /boot is a dedicated partition already, you do not need to follow this guide but can use dietpi-drive_manager to copy the root partition with all steps automated.
Leaving the /boot partition on the smaller SD card, it leaves the bootable initramfs and other stuff to kick off the “start” of the boot process on a drive NOT connected to the main drive…if something causes the main drive to corrupt, it can/will boot in a “recovery” state where e2fsck can be run to fix the main drive. Plus with the SD only being used to initial boot, there will be almost no wear leveling needed as the drive is only used initially on boot, and if/when something in the /boot partition is changed. The biggest thing is, almost ALL SBC’s without some sort of firmware fiddling/re-writing/flashing will boot from the SD, thus cheaper smaller SD’s can be used to initially “boot” and point to the faster/more resilient USB or EMMC partitions.
I tried it multiple times on my DietPi R6S but as soon as the files have been copied and I shutdown the Pi and remove the SSD, the DietPi wont start anymore
Can you be a bit more specific:
– From where to where did you try to copy the system? “Files” are not to be copied, but the raw system drive.
– What do you mean by “remove the SSD”? Since the NanoPi R6S does not support USB boot, an SSD can neither be the origin root drive nor the target root drive.
– The NanoPi R6S has an internal eMMC, so the obvious way would be to boot anything from SD card, download and flash the DietPi image from there to eMMC, then remove the SD card to boot from eMMC. This works fine here.
Thank you very much for your Reply and sorry for my bad writing.
– With copy the files I meant the “dd if=/dev/mmcblk0 of=/dev/mmcblk2 bs=1M status=progress” command
– I for some reason wrote SSD but actually meant SD Card so I flashed DietPi to SD Card plugged and installed it and from there followed your instructions.
– So I followed your Instructions step by step, having the emmc at mmcblk0. I shrink down my SD Card via gparted and then right after the “dd if=/dev/mmcblk0 of=/dev/mmcblk2 bs=1M status=progress” I shutdown the device and removed the SD Card. But as soon as I reboot the device the SYS LED glows red and the device seems to not boot.
Okay that should work. The NanoPi R6S has this complex partitioning, so it is important to not mess with this but shrink the last 8th partition only. Does it work when you simply download and flash a new DietPi image?
Thank you very much again for your really quick response. Simply Downloading and flashing the partition actually worked. I am now able to boot DietPi just from the eMMC. Thank you very much.
Btw. I am pretty sure I did just shrink the biggest ( 8th ) partition at least a few times
@Mikey: Just to be sure about your disk structuring: Could you please execute `lsblk` after you have a running system (running from SD card)?
Then we can see the mmcblk2 structuring like MichaIng mentioned (8 partitions) etc.
Thank you too for your really quick response, as mentioned to @Michalng ‘s reply I was able to flash right from the device. I again did a mistake by writeing in my last reply “having the emmc at mmcblk0” whats pretty much wrong, I guess thats what made you curious about disk structuring. I am sorry for that, I really have to write slower and check more what I have written. But thank you both very much for your great work on the Project and you quick help.
Also here is the disc structure before actually flashing the device and before changing the SD Card size:
mmcblk2 179:0 0 28.9G 0 disk
mmcblk2boot0 179:32 0 4M 1 disk
mmcblk2boot1 179:64 0 4M 1 disk
mmcblk0 179:96 0 29.7G 0 disk
├─mmcblk0p1 179:97 0 4M 0 part
├─mmcblk0p2 179:98 0 4M 0 part
├─mmcblk0p3 179:99 0 4M 0 part
├─mmcblk0p4 179:100 0 16M 0 part
├─mmcblk0p5 179:101 0 40M 0 part
├─mmcblk0p6 179:102 0 32M 0 part
├─mmcblk0p7 179:103 0 32M 0 part
└─mmcblk0p8 179:104 0 29.6G 0 part /
That is also in coincidence to my R6S environment which runs from the eMMC.
I think it could be worth to describe this “only-shrink-last-partition-in-a-multi-partition-image” remark in the troubleshooting section.
So, nice to hear that finally all now works at your site.
Enjoy and have fun with DietPi. 🙂
I followed the procedure and it’s work! However, my SSD have a size of 4To and when I type the command “lsblk”, the result is :
sda 8:0 0 3.6T 0 disk
├─sda1 8:1 0 128M 0 part /boot
└─sda2 8:2 0 1.6T 0 part /
How can I use all the size for the partition root (3.6T). I know that my SSD must be use a GPT partition table but how to do it ?
Thank for your help
Florian
Did you follow step 4 til the end, i.e. resizing partition and filesystem via
dietpi-drive_manager?EDIT: Ah, right if the sector size is 512 bytes, only 2 TiB can be used. Hmm, I am not entirely sure whether an RPi boots just fine when converting the partition table to GPT. There is no bootloader and the offset of the 1st partition is sufficient, but I never tested it. If you still have the SD card as a backup, you could do the conversion following this guide (from another Linux system!): https://recoverit.wondershare.com/partition-tips/convert-mbr-to-gpt-linux.html
EDIT2: Another “Ah”, as the PARTUUIDs change with this process. So you’d also need to edit
/boot/cmdline.txt(resp. cmdline.txt on the 1st partition) and/etc/fstab(on the 2nd partition) to contain the correct new PARTUUIDs of those two partitions. You can check them via:Thank you for this nice write up, worked flawlessly here and I am now running on a 128G emmc instead of SD. Yeah
Forgot to mention — this was on a RockPro64
when copying form SD card to emmc on orange pi 5 plus, the commands need to be dd if=(sd card) of=(emmc) using the commands listed in the article, you copy the emmc to the sd card, which is not helpful
Hello,
What I feel is missing in these instructions, is, how to get the U-Boot-Bootloader properly configured and installed on EMMC. Let me explain. I have a NanoPi NeoCore (Allwinner H3 chipset), and the vendor shipped it with a preinstalled, totally outdated Armbian, which uses 3 partitions on the EMMC. The first partition is a FAT partition and contains the /boot directory ; the second partition is the main Armbian linux partition; the third partition contains some other stuff like /var and swapfiles.
What I did is: I deleted this partition structure, made one ext4 partition only, copied Dietpi there, but that would not work, since the U-Boot bootloader still expects the first partition to be FAT32 and to contain the boot files.
How do I configure the U-Boot on EMMC from Dietpi properly so that it will simply boot from one EXT4 partition which contains everything?
I heard the Armbian people have a tool called “EFlasher” that does exactly this. Is is possible to convert EFlasher from Armbian to DietPi and use it to get DietPi and U-Boot to EMMC ?
Any advice greatly appreciated.
It boots up and runs Kodi as I have it set up. However, that and the dietpi dashboard are the only things working. No terminal, no ssh, no pihole etc and all of my processes are sleeping
I was also confused when you said “For example 1 and 2 this is done via:”
I am not sure what option 1, 2 or 3 is. I used the first method under this instruction.
I have an NVME drive that I am migrating the OS over to, so not a fresh install
isn’t the order in step 3 of dd wrong?
dd if=SOURCE of=TARGET
The article says:
Copy from eMMC to USB
dd if=/dev/mmcblk0 of=/dev/sda bs=1M status=progress
It should be the other way around.
No, the order is correct, mmcblk should be the SD-card. At least in my case.
USB-SSD was /dev/sda
I did not set filesystem into read-only mode. Or stopped any services.
I am using a Sabrent SATA to USB adapter for USB 3.0. Tried plugging it into Blue port, USB 3, did not find it. With either lsblk or sudo blkid. USB 2 port worked, black port. Followed parts of this guide, I am booting from SSD now. Resized the disk while I was at it. SD-card was 64 gigs, SSD is 128 gigs.