Want to have a better online experience without advertisements and sneaky tracking codes that invade your privacy and monitor your activities? Wouldn’t it be great that kids playing games on the tablet or phone will not see strange ads, and have a better and enjoyable experience?
Pi-hole helps you achieve this, being installed once and securing all devices in your home or the organization. This article will show a way to quick install & configure it using DietPi.
We have a newer blog post to this issue:
See DietPi and the new Pi-hole version 6

Topics covered
- Short intro to Pi-hole & Unbound, DietPi
- Install DietPi
- Install Pi-hole & Unbound
- Configuring Pi-hole as network ad-blocker
- What are Pi-hole lists and how we add them?
Pi-hole – Network-wide ad blocking
Pi-hole is an open source project, and you can install it for free, offering much more than a pleasant web browsing and gaming experience. It brings safety, and gives ways to avoid ransomware attacks. It may be tempting to open a disguised email, which seems to be received from the bank, school, or a close friend who invite you to click on a certain button or link. Pi-hole neutralizes these links making them ineffective.
Pi-hole web admin could be accessed from any web browser, and it provides an awesome dashboard to monitor various stats on ad blocking.
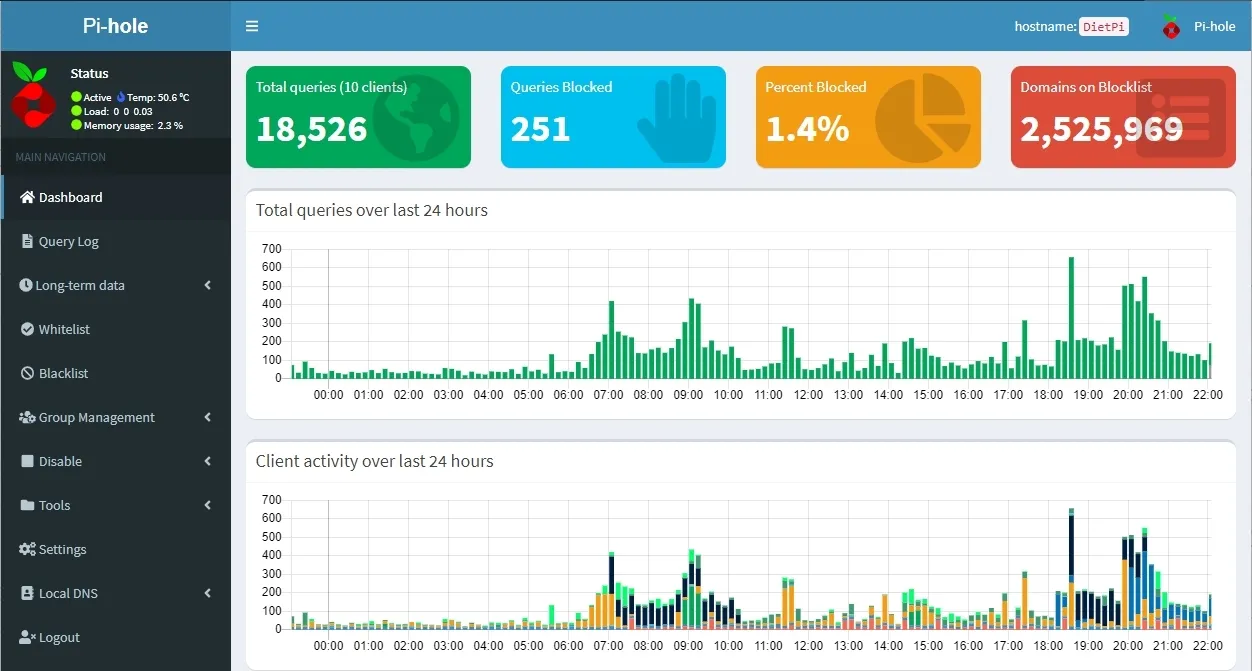
It relies on 3rd party lists, that block ads, trackers, malware link, and other not desired queries from your entire network without needing to install anything on your smartphone, laptop, media player, TV, tablet or any other devices. It improves privacy and security for all your network devices.
Unbound
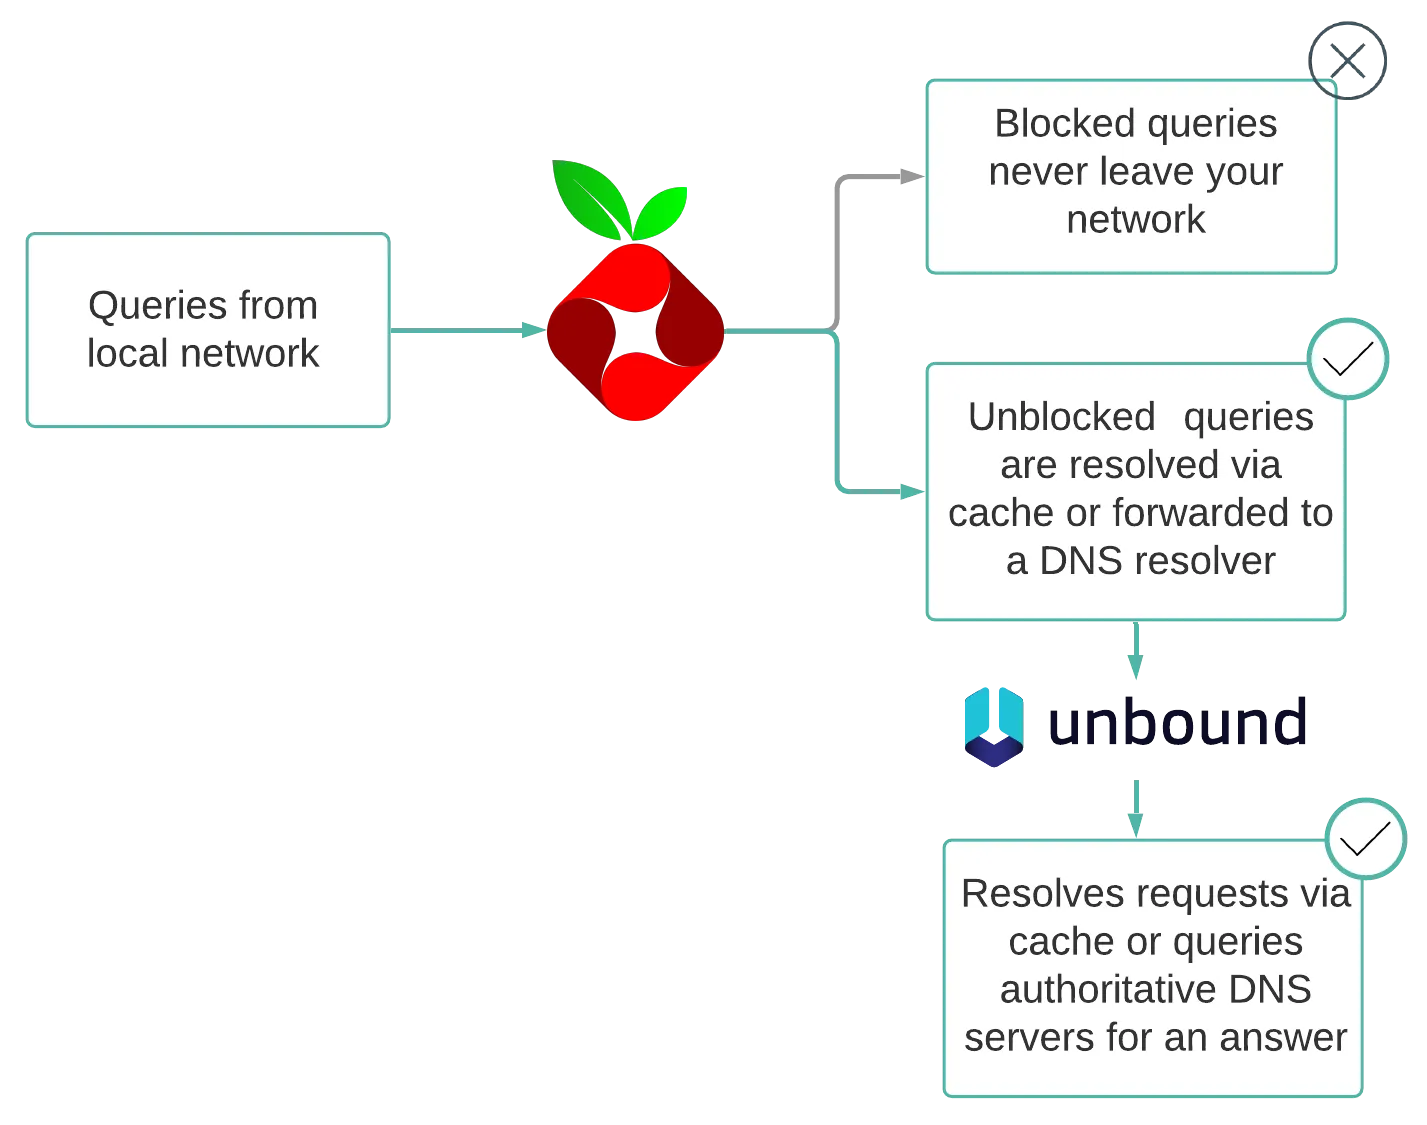
Unbound is a fast and secure DNS server, primarily developed by NLnet Labs.
Essentially Unbound will look up a DNS query by asking TLD servers for DNS in a recursive manner. The major benefit is more security; you do not have to trust an upstream provider with your DNS traffic.
Unbound is helpful in many ways, and here are a few advantages:
- Privacy – as you’re directly contacting the responsive servers, no server can fully log the exact paths you’re going. As a result you do not have to trust an upstream provider with your DNS traffic. Example: Google DNS servers will only be asked if you want to visit a Google website, and not that you want to see the website of your favorite news provider.
- Validation – When you want to check the hostname of your bank, you want to make sure that hostname matches you bank’s actual IP address and not some phishing site, somewhere in the world.
- Caching – A local DNS reduces the traffic across the Internet, by reducing load on authoritative name servers, particularly root name servers. DietPi configures both systems (Pi-hole & Unbound) to use caching, and all the DNS queries are answered quickly, increasing the performance of any application that use DNS.
The only drawback is performance for initial queries, as they need to traverse and this takes time. But with caching, the speed of running any additional query increases a lot!
Install DietPi
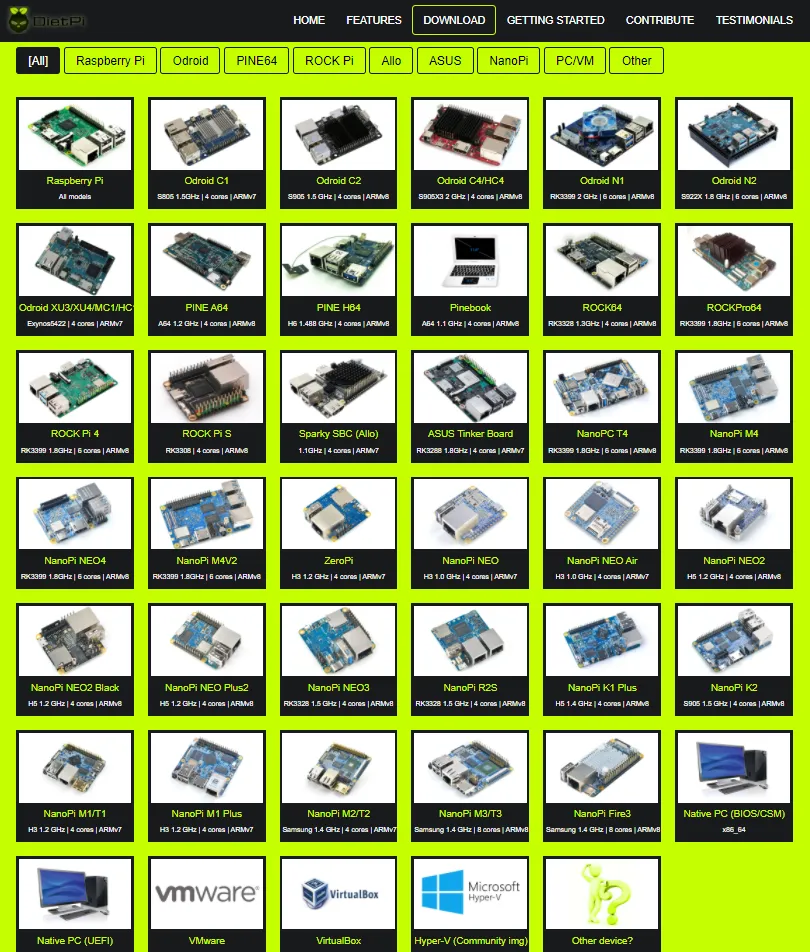
DietPi is a highly optimised & minimal Debian-based Linux distribution. It is extremely lightweight at its core, and also easy to install and use. You can install it:
- on Single Board Computers (SBC), such as RaspberryPi 4, Pi 400 and all the earlier models (Raspberry 1/2/3), Odroid, RockPi, Asus, NanoPi etc.
- on Virtual Machines using Virtual Box, Hyper-V or VMware
- on PC – maybe you have just purchased a mini PC (Intel NUC, Asus Minim PC etc.) or have an unused old laptop
This article assumes that you have installed DietPi OS already. If you have not done yet, start by opening DietPi.com and choose your favorite setup. Then follow the install tutorial, with only 4 steps to follow. It includes also a video tutorial, showing live how to make the installation.
Install Pi-Hole together with Unbound
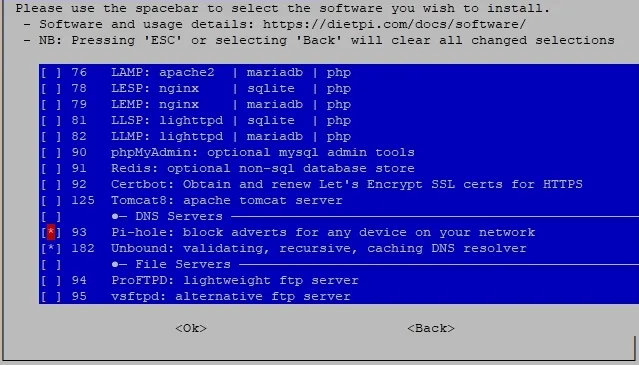
To install any of the DietPi Optimised Software run dietpi-launcher from the command line and select DietPi-Software or launch the tool dietpi-software.
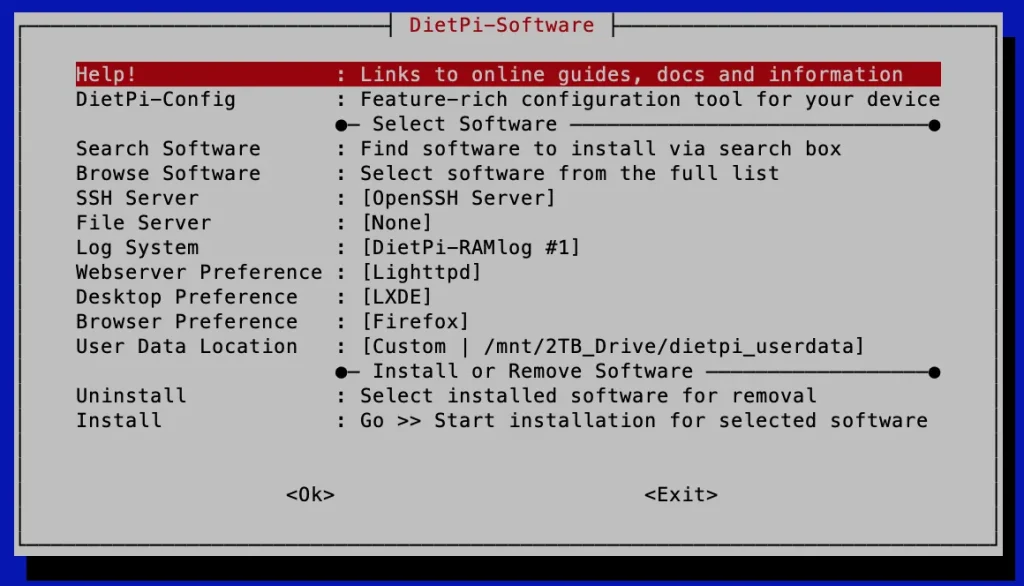
Choose Browse Software and select Pi-hole (or use the Search Software option). Once selected, press space to mark for installation.
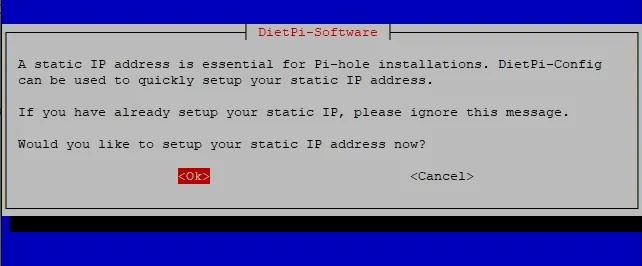
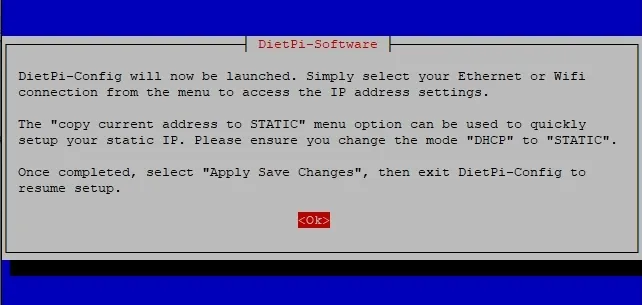
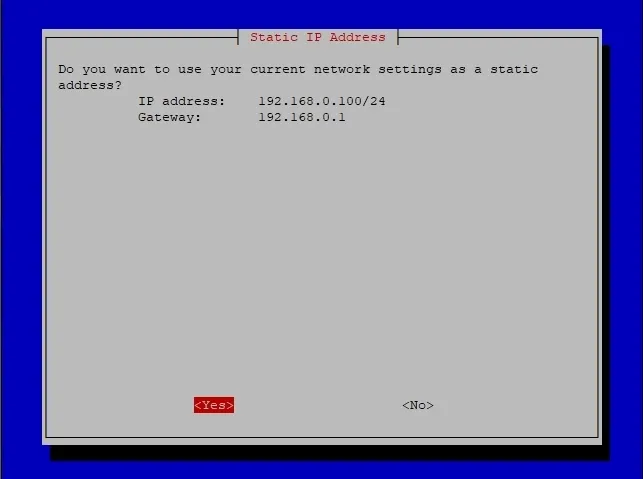
Pi-hole needs a static IP, and DietPi will help setting it. Unless it is not already enabled, select OK.
In addition to Pi-hole and Unbound you may select other software titles. Open the DietPi Documentation page to see the description, installation details, or even YouTube videos.
Installing Pi-hole
Most of the software is automatically configured by DietPi, and this applies also for Unbound. Pi-hole comes with a rich install guide, enabling different options based on your needs.
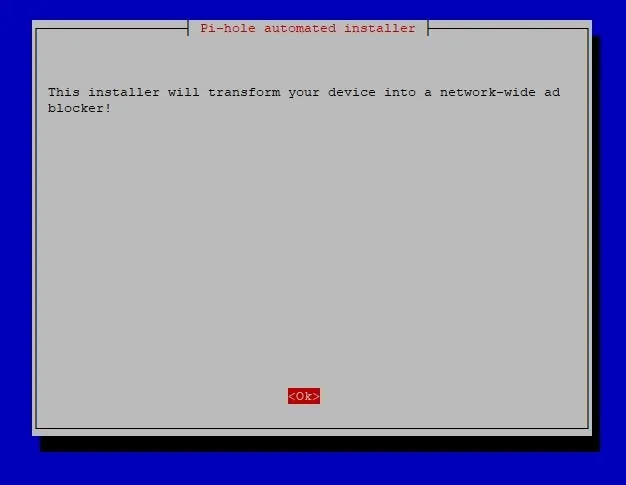
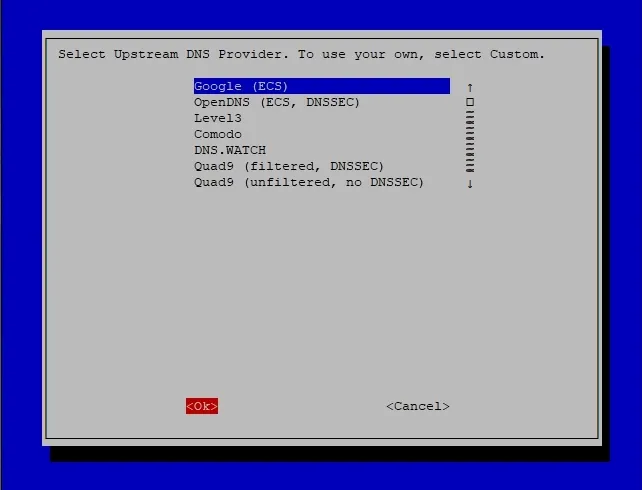
We’re going to change this later, so just hit <Ok>.
Hit <Yes>. We set a static address already.
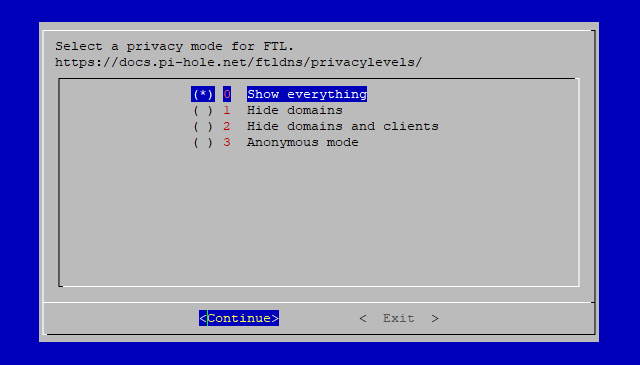
If this is a private network device, I recommend showing everything.
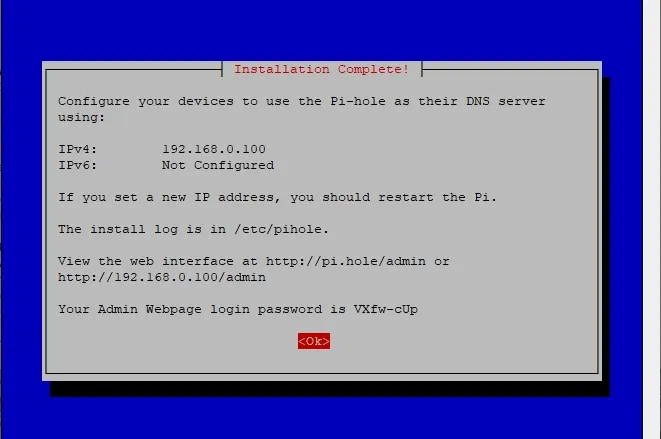
When the installation is complete you will get a final screen. Please note that the login password is your DietPi Global Software Password.
Installing Unbound
DietPi does the full installation of the Unbound automatically, without any user need. The same also with the initial configuration, as well as starting automatically the service. If you want to find out more about configuration directory, logs, check the documentation page (link).
Configuring devices to use Pi-Hole
To activate the DNS setting, connect to your router and set the DNS value. All your devices will be protected and you only need to change one setting.
The first step will be to open the router web page (or the administration console). If you are not sure which IP address the router has, check the next page – How to find your router IP address on any device.
The second step, once you are logged in on the router’s web-based administration console, set the DNS name server to the IP where Pi-hole is installed.
Changing the DNS server settings on your router may be difficult, since every manufacturer uses a custom interface. If you have issues on setting the DNS, here are the instructions for the most popular router brands – Lifewire article.
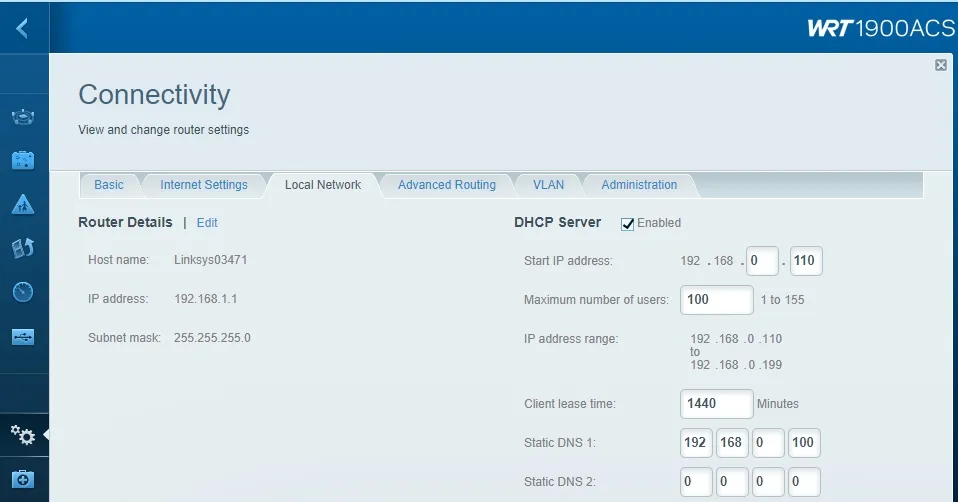
NOTE 1: Most devices provide at least two DNS name servers. Unless you have two Pi-hole instances running at home, you will provide one DNS IP address and leave the other (rest) blank as shown above. If you specify a second DNS IP that is not a Pi-hole server, then ad blocking won’t work on some devices.
NOTE 2: If you’re using an Amplifi HD or any “clever” router, you’ll want to change the setting “Bypass DNS cache” otherwise the Amplifi will still remain the DNS lookup of choice on your network.
Pi-Hole Administration console
Use the next URL http://pi.hole/admin/ to open the administration console. Alternatively you could also use the direct IP (example: http://192.168.0.100/admin/). Opening the web page you could view the status of the DNS queries allowed and those blocked.

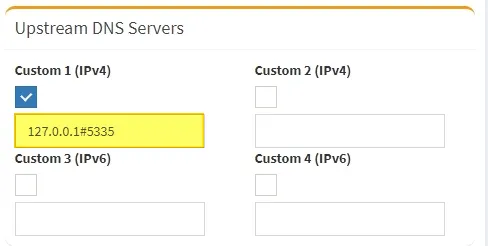
Click on Login and use your DietPi Global Software Password (default: dietpi). Go to Settings and select the Upstream DNS Servers.
Check if the upstream DNS is already set to 127.0.0.1#5335 (Unbound local address). If not, enable this setting and press Save.
Pi-hole lists
Now that you have a fast and private DNS setup, it’s time to look at block lists, whitelists, and blacklists.
Block lists are maintained lists of bad domains providing ads, malware, tracking, and other unwanted traffic. I have 2.5 million domains from my various block lists, and some overlap. After installing Pi-hole roughly 30% of the DNS queries heading out of my house were blocked.
As a good starting point, WaLLy3k’s Blocklist collection has several categories of lists. Steven Black’s hosts files does a good job in grouping blocking lists by topics, having them well maintained.
An issue with block lists is that unintended domains will get blocked, preventing you from accessing legitimate content. This is where whitelists come into play. A good resource for whitelists is the commonly whitelisted domain page: https://discourse.pi-hole.net/t/commonly-whitelisted-domains/212 and Anudeep’s whitelist project: https://github.com/anudeepND/whitelist
Sometimes will be needed to disable Pi-hole for a few minutes to test, then whitelist certain domains. In a short period you will have it nicely dialed in.

more secured
While blocking ads bring simplicity in the web browsing, with Pi-hole and Unbound you can achieve more security benefits. For me it’s less about advertising – it’s about just obnoxious tracking cookies and JavaScript.
As the point of entry for 91% of cyber attacks, email is the biggest vulnerability. From malware to malware-less attacks including impersonation attacks, a single malicious email can cause significant personal damage and financial losses.
Blocking certain sites will prevent you from accessing online scams (via emails, online gift cards or ads). Please ensure you have loaded at least one such list – extended list from phishing.army or Malicious Lists from firebog.net. You can read more in APWG’s Phishing Activity Trends Report for Q3 2019.
Updating Pi-Hole
If you need to update Pi-hole, run next command in the console:
pihole -up
More about DietPi
You can read more about Pi-hole and Unbound in the DietPi documentation website (link).
DietPi enables to quickly and easily install popular software! Ready to run and optimised for your system? Checkout the full list of applications here – DietPi Optimised Software,
Wrap up
Pi-hole and Unbound are great tools. You can use them to help keep your devices, your network, and your business or family safe and secure online.
You may be initially sceptical. Give it a try! Come back here and tell us about the before-and-after experience. I bet you’ll be amazed on how many requests are blocked!
A video (German language) about this can be seen within this blog entry from Holger Erbe: https://blog.login.gmbh/unbound-installation-fuer-pihole-unter-dietpi/.
thank you
Hi Petru,
Thanks for this step by step guide. I successfully set it up this way.
There’s one thing, though.
Before, I could reach my local machines with their internal name. That doesn’t work anymore.
I guess my router is no more in between for resolving the local machine names. I know their ip addresses, but still it would be more convenient to use the names.
Thanks
Jan
Hi,
I already found how to solve it:
By using Conditional Forwarding and filling in the
Local network in CIDR notation IP address of your DHCP server (router) Local domain name (optional)
192.168.144.0/24 192.168.144.1 village.papasmurf.nl
Jep exactly. When your router does not provide DNS anymore, but Pi-hole does, one needs to tell Pi-hole which network host is named how. Using Pi-hole as DHCP server works as well, but not everyone wants or can put that additional load onto the Pi-hole server machine.
Schöne Arbeit, gut weiter so !!
I think this is one of the most significant information for
me. And i am glad reading your article. But wanna remark on some general
things, The web site style is perfect, the articles is really nice :
D. Good job, cheers
Hi there! I know this is kind of off-topic however I had to ask.
Does managing a well-established website such as yours require a lot
of work? I’m brand new to operating a blog however I do write in my diary
everyday. I’d like to start a blog so I can share my own experience
and thoughts online. Please let me know if you have any suggestions or tips for new aspiring
blog owners. Appreciate it!
Hi,
nach Deiner E-Mail-Adresse gehe ich mal davon aus, dass Du meine Muttersprache verstehst. 🙂
Ich würde Dir dann WordPress empfehlen, dafür gibt es Zillionen an Videos und Anleitungen. Zudem wird das in DietPi unterstützt: https://dietpi.com/docs/software/social/#wordpress.
Einfach den Single Board Computer Deiner Wahl nehmen (den wir unterstützen: https://dietpi.com/docs/hardware/), DietPi drauf (https://dietpi.com/docs/install/), WordPress installieren (lassen: https://dietpi.com/docs/dietpi_tools/#dietpi-software) und dann losstarten mit dem Blog.
Oh my goodness! Amazing article dude! Thank you, However I am
going through troubles with your RSS. I don’t know why
I can’t subscribe to it. Is there anybody else having the same RSS issues?
Anybody who knows the solution will you kindly respond?
Thanx!!
This URL should work: https://dietpi.com/blog/?feed=rss2
I’m curious…what’s the purpose for installing unbound? Isn’t PiHole covering all the DNS services?
Hello Chris,
in the article we described the benefits of Unbound from our point of view.
See above, section “Unbound” at the top. Hope this helps. 🙂
I’ve got one question regarding the upstream dns server that is set in dietpi.
What is your opinion regarding the dns server that is set in the network device settings of dietpi?
Should I also set this to 127.0.0.1#5335?
Because otherwise the pi itself would send queries to upstream servers like dns.watch.
Or can I simply ignore these settings in the network device area?
You could do that, though AFAIK it needs to be
127.0.0.1:5335with colon instead of hash. But it can bear some risk, e.g. making the server unavailable when Unbound fails for some reason when e.g. you connect via DDNS domain and due to DNS resolver failure the DDNS update fails. Also you then cannot stop Unbound for maintenance without first changing to an upstream DNS etc. So use it with caution, when you really need that extra bit of privacy for the network requests which the server itself does.Great guide.
How can we automate the update of the pihole engine(s) using this command “pihole -up”
Would be useful to have the command autorun once a week.
The Pi-hole team explicitly not recommends to do unattended updates of Pi-hole and I agree with the reasons. See the following and many similar statements on their forum: https://discourse.pi-hole.net/t/automatic-update-of-pi-hole/47765
Some thoughts on this excellent guide:
– in ‘/etc/resolv.conf’ of DietPi you may want to set ‘options trust-ad’
See ‘man resolv.conf’ for reason.
– you’ll have to change the nameserver in dietpi-config or resolv.conf will be overwritten on every boot if you have changed it there.
– as unbound already does caching you’ll have to set
‘CACHE_SIZE=0’ in ‘/etc/setupVars.conf’
and
‘cache-size=0′ in’/etc/dnsmasq.d/01-pihole.conf’
or you’ll get double DNS-caching which is superflous.
Both settings needed as one tends to overwrite the other on reboot.
– in order to forward the dnssec-validation to the clients you’ll have to create
#vi /etc/dnsmasq.d/10-pihole-extra.conf
and put
proxy-dnssec
in it.
Hello! Once Unbound is installed how do I access it to maintain it (like dump its cache, whitelist/blacklist, etc) I am having an issue I cannot reach 1 specific website. If I set my Mac’s dns to my Pihole server it will not load. If I set it to my router (the router has the Pihole as dns) it loads. I have other computers in my network with their dns set to my Pihole and the website loads just fine. This is also present on a Windows laptop – I had to manually se the dns to my router and it worked again. I have another Mac that has Pihole set as its DNS but it loads the website just fine. In PiHole logs when I go to the website on the affected devices nothing shows up so its making me think that Unbound is doing something and I cannot for the life of me figure out how to connect to it to make changes like I can by SSH’ing into the DietPi when I type in unbound terminal commands Diet-Pi doesn’t recognize them
Check out
unbound-control: https://www.nlnetlabs.nl/documentation/unbound/unbound-control/You first need to enable the control interface via config file, e.g. in
/etc/unbound/unbound.conf.d/dietpi.conf: https://www.nlnetlabs.nl/documentation/unbound/unbound.conf/#control-enableRestart the service for the change to take effect:
Then you can e.g. dump the cache like this:
I have not tested it, but this seems to be the correct way to connect to the locally running Unbound API.
Thank you