This blog post gives an overview about what can actually be done with a system consisting of the brand new RISC-V single board computer VisionFive 2 from StarFive.
The article will be updated whenever new insights and findings are present.
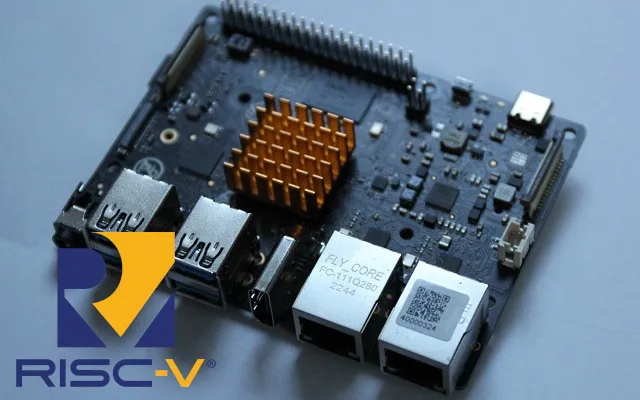
Table of contents
- RISC-V and the VisionFive 2 Kickstarter project
- Installation of DietPi on the VisionFive 2
- 2.1 DietPi system
- 2.2 Bootloader update
- 2.2.1 Update image
- Unsupported software titles
- References
1. RISC-V and the VisionFive 2 Kickstarter project
A new star was born on the open source CPU firmament about 2010, the RISC-V platform. Open source in this area means open source ISA (instruction set architecture), there are no roalty fees to pay when selling CPU or SoC devices using this technology inside and internals of the CPU core are transparent. This makes the technology interesting for combining it within the open source Linux orbit.
Since a couple of months, a promising RISC-V board from StarFive, the VisionFive 2 is available as a Kickstarter project with an achievable price: The board contains a quad-core RISC-V JH7110 system with 2/4/8 GiB of RAM and many other bells and whistles of the Raspberry Pi type world (see the datasheet for details).
Since a preliminary Debian Bookworm/Sid version was ported to the board, it was exciting to generate a DietPi version from this.
Spoiler: All that glitters is not gold, which means that there is much work to do in the future to achieve a fool proof DietPi system. The actual status should be seen as “testing”, also not all DietPi functionalities are working on the board yet (e.g. the X11 HDMI output, read below).
But, let’s go ahead with our first steps.
2. Installation of DietPi on the VisionFive 2
The installation of a board should be done in these two steps:
2.1 DietPi system
You can download and flash the DietPi VisionFive 2 images from our download page: https://dietpi.com/#download
Boot your system with this image … and off we go!
In case the system does not boot, try to update the bootloader first with a dedicated image provided by StarFive, as described below.
2.2 Bootloader update
The bootloader typically does not need to be updated so often, but in this early development stage it is a good idea to check for a newer bootloader from time to time at the StarFive GitHub repository.
To update the bootloader in DietPi, either use dietpi-config > Advanced Options > Update bootloader, or run the following console command:
/boot/dietpi/func/dietpi-set_hardware vf2-spi-update2.2.1 Update image
In case DietPi does not boot on your VisionFive 2, you may need to update the bootloader first.
The basic description is given there: You need to download three files from the VisionFive 2 GitHub repository:
JH7110_VF2_*.zipu-boot-spl.bin.normal.outvisionfive2_fw_payload.img
The update can be done with the following steps:
- Flash the
.imgfile from the.zipthe to a free SD card, e.g. via Rufus or balenaEtcher - Plug the SD card to the VisionFive 2 board and power on (no need to connect a monitor and keyboard)
- Wait for the green LED to blink
- Login to the board via SSH (find out the IP address or just use “buildroot” as hostname):
ssh root@buildroot
Usestarfiveas password.
- Place the other two files on a USB stick and plug it into the board. In the following is assumed, that the USB stick partition with the two files will be
/dev/sda1, which can be checked vialsblkcommand. - Mount the USB stick and check for the two files

- Navigate to the files location with
cd /mnt - Flash the two files with
flashcp -v u-boot-spl.bin.normal.out /dev/mtd0flashcp -v visionfive2_fw_payload.img /dev/mtd2(yes it ismtd2now!)
and wait until all is finished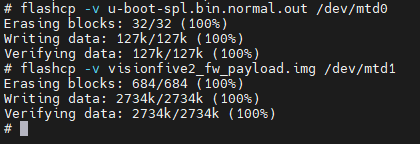
- Power off the system with
poweroff
Now, the bootloader is updated and the DietPi system should successfully boot, following the instructions above.
3. Unsupported software titles
The following list shows software titles which are known to not (yet) supported RISC-V. We are regularly review and updating this list try to help developers adding RISC-V support to their build systems. You are invited to share your experiences on GitHub: https://github.com/MichaIng/DietPi/issues/6212
- BirdNET-Go
- Chromium
- Cuberite
- Emby
- Folding@Home
- Forgejo
- FuguHub
- Grafana
- Homebridge
- Jackett
- Jellyfin
- K3s
- Kavita
- Kubo
- Lidarr
- Lyrion Music Server
- MicroK8s
- MinIO
- Mono
- myMPD
- NAA Daemon
- NoMachine
- ownCloud Infinite Scale
- Plex Media Server
- Prowlarr
- Radarr
- Readarr
- Remote.It
- Roon Bridge
- Roon Server
- RustDesk Server
- Sonarr
- Spotifyd
- Uptime Kuma
- UrBackup Server
- VirtualHere
- VSCodium
4. References
- https://en.wikipedia.org/wiki/RISC-V
- StarFive: New-Generation of Intelligent Vision Processing Platform-JH7110
- Kickstarter project VisionFive 2
- StarFive JH7110 Datasheet
- Basic description how to update the bootloader
- VisionFive 2 Single Board Computer Quick Start Guide
root@DietPi:~# uname -a
Linux DietPi 5.15.117 #1 SMP Fri Jun 16 15:27:45 UTC 2023 riscv64 GNU/Linux
try cat /proc/meminfo
root@DietPi:~# cat/proc/meminfo
-bash: cat/proc/meminfo: No such file or directory
root@DietPi:~# cat /proc/meminfo
MemTotal: 3987268 kB
MemFree: 2505276 kB
MemAvailable: 3788404 kB
on an 8MB board, Armbian has picked up the same problem
Thanks for the info. It indeed requires a device tree patch to enable 8 GiB support. The new bootloader version supports device tree overlays and I already tested it successfully. We will provide an updated kernel package which adds overlays for 8 GiB and as well the revision A1.2 Ethernet and adds a default U-Boot environment with better generic boot order, a way to change boot priority and a way to force boot from SD card, eMMC, NVMe, USB or network. Next DietPi update will apply the 8 GiB and A1.2 overlays automatically, and new images on first boot, depending on device serial number, which contains all the info.
Using the most recent VisionFive2 u-boot
I have modified the Visionfive2 flash u-boot scripts to boot Dietpi from SD, USB and NVME.
EMMC should also work (needs checking, I don’t have a spare emmc chip).
at uboot prompt StarFive #
eraseenv
env edit bootcmd_nvme0
edit: setenv devnum 0; run nvme_boot
env edit bootcmd_usb0
edit: pci enum; usb reset; setenv devnum 0; run usb_boot
env edit bootcmd_mmc1
edit: setenv devnum 1; run mmc_boot
env edit bootcmd
edit: run distro_bootcmd
env edit boot_targets
edit: mmc1 usb0 nvme0 mmc0 dhcp
env edit kernel_comp_addr_r
edit: 0x90000000
env edit kernel_comp_size
edit: 0x10000000
saveenv
after dd image to device
edit /boot/extlinux/extlinux.conf to point to the root partition
e.g.
usb /dev/sda1
nvme /dev/nvme0n1p1
sd /dev/mmcblk1p1
emmc /dev/mmcblk0p1
Many thanks. The U-Boot env I am currently using here looks similar, but I did no have the USB boot target added yet. I am working on implementing this into our kernel package over the weekend. Switch to Linux 6.1 is done already.
kernel_comp_*parameters are btw set already with default U-Boot env, as I managed to get this merged into StarFive repo. Andextlinux.confuses the PARTUUID as rootfs, which is always correct, independent of the storage device. So the only needed changes are indeed only the boot targets (or the needed one) in U-Boot env.Do you plan on extending this platform to any other RISC-V JH7110 based SBCs, like the Milk-V Mars or Pine64 Star64?
Can the community assist with testing/debugging?
I’m awaiting a Star64 sample for implementation and of course would be happy for anyone testing and debugging it.
I can confirm the current dietpi image for visionfive2 works for Milk-V Mars.
You just need to update u-boot script as mentioned by Colin.
Star64 8 gig. Got boot both EMMC and SD. Finds an IP. “Press return to log in” (so, yes HDMI) I have no USB on any of the 4 plug-ins. That’s quite a lot working. Sorry, I’m more of a tinkerer who grabbed a unit than a developer but it is something to report.
thanks for the info
I recently tried DietPi, and it’s fantastic! The lightweight nature and extensive software options make it perfect for both beginners and advanced users. The easy-to-follow setup guide was particularly helpful, ensuring a smooth installation process. Additionally, the DietPi community is incredibly supportive, offering quick responses and valuable advice. I’ve seen a noticeable improvement in my device’s performance. Highly recommend DietPi to anyone looking to optimize their system! Thank you for this amazing tool