Could we please get UEFI versions of DietPi_VM-x86_64-Bookworm_Installer.iso and DietPi_Proxmox-x86_64-Bookworm.qcow2? Alternatively, is it possible to convert these to UEFI?
DietPi_NativePC-UEFI-x86_64-Bookworm_Installer.iso does work on Proxmox, but it’s missing the QEMU guest agent, and I’m assuming there are other differences that don’t make it an ideal installer for a VM.
Did you use the latest .iso image and installed it like described there: How to install DietPi - DietPi.com Docs ?
(We updated this section in our docs a couple of weeks ago.)
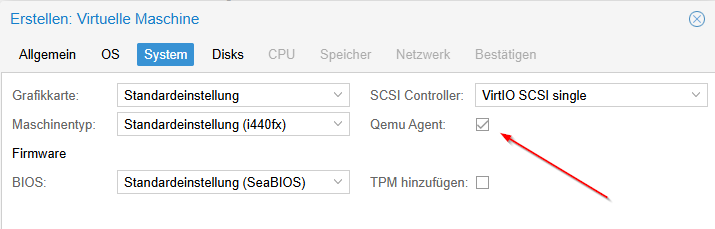
Especially, if you set the checkbox “Qemu agent”, dbus und qemu-guest-agent should be installed at the first run setup.
Yes the VM installer ISO and the Proxmox qcow2 both work great and the QEMU agent is installed and working correctly afterwards. However, my ask was if we could please get UEFI versions of both of those. I had to use the native PC installer ISO to use UEFI on Promox.
Can you tell some about the benefits of an UEFI based system? I am not familiar with UEFI functions.
As I tested it, the ressources for the UEFI storage is more than a BIOS based system.
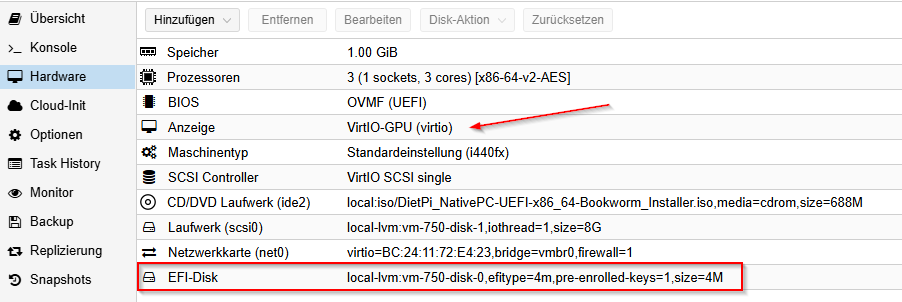
Additionally, the display option of the VM needs to be set different to its default value.
@StephanStS@HolgerTB
FYI since DietPi v9.9, dbus is installed OOTB and systemd-logind unmasked on all DietPi VM images. Furthermore, for basic ACPI functionality (poweroff/reboot/… from VM host/GUI) works without QEMU Guest Agent, hence the checkbox does not need to be set either.
Or does anyone know a particular benefit/feature the QEMU Guest Agent has? In any case, with the checkbox set, the guest package is still installed automatically on all VMs.
Means: There is nothing left anyone needs to manually change or install on VM images. Only, if one makes use of particular QEMU Guest Agent features, beyond of basic ACPI, then just hit the checkbox before fist boot, or install qemu-guest-agent if first boot has been done already without the checkbox set.
The last time I tested EFI VM images, they were actually slower, which I explained myself with: they are larger, larger bootloader image, larger partition table, more dedicated/complex boot steps, overall more firmware/features loaded. However, more VirtIO-GPU driver with GPU pass-through is an argument. And as we have VM installer images now, trivial to additionally add those with EFI. Hang on …
Its always recommended to install the qemu-tools. The QEMU Guest Agent (QGA) is a service that runs inside a virtual machine (VM) and enables better communication between the host (Proxmox VE) and the guest operating system. It provides capabilities such as retrieving the guest’s IP addresses, synchronizing filesystem writes during backups, and automating TRIM operations on thin-provisioned storage.
To use QGA, you must:
Install the QEMU Guest Agent: inside the guest and ensure it is running.
Enable the guest agent in Proxmox VE’s VM Options panel and reboot the VM.
Why It Is Recommended to Install the QEMU Guest Agent?
Accurate Guest Information: QGA lets Proxmox VE fetch real-time IP addresses and guest details, providing a more seamless management experience.
Consistent Backups Using QGA’s fs-freeze and fs-thaw commands helps ensure the guest’s filesystem is in a consistent state before snapshots or backups, reducing the risk of data corruption.
Automated TRIM: When moving or migrating VMs on thin-provisioned storage, QGA triggers TRIM commands to reclaim unused disk space, optimizing storage usage.
Configurable Freeze/Thaw Behavior: In special cases (e.g., Windows VSS or databases like SQL Server), you can customize how freeze/thaw operates so it doesn’t interfere with application-specific backup routines.
Overall, installing QEMU Guest Agent streamlines VM management and maintenance, improves data consistency for backups, and helps optimize storage resources.
You took SPICE display, I used VirtIO-GPU (with xrdp in the VM and Remote Desktop an my Windows PC).
Do you know, what is the better solution? Is in your opinion the SPICE virt-viewer the better solution for an X11 based VM?
I never use SPICE if I don’t need to. I prefer the simplicity of the default display adapter since I only connect via SSH or RDP. Ideally Clonezilla could support the default display, as well as Dietpi booting without the initial distortion with the default display.
Nice ChatGPT answer , or is this from Proxmox docs?
Any idea why it is not enabled by default in Proxmox? It does not break anything even when QGA is missing in the guest, just provides an additional communication node in sysfs . But as said, it should work now without any manual step, when setting the QGA option in Proxmox before first boot.
Btw, the TRIM part is misleading: The guest can and does trigger TRIM by itself once a week (Debian default), as long as the disk at Proxmox end has “Discard” enabled/tick set. Is that enabled by default? QGA automates TRIM only, when VMs are moved at Proxmox end on the underlying host-side volume. The fs-freeze when doing host-side backups (I assume?) is indeed not bad, but of course can also lead to data loss, e.g. when a database write is done while the filesystem is frozen. Or are things somehow kept back in RAM for that time, and written back after fs-thaw. Well, I should just read the docs .
If this is present in Proxmox docs, we can link it. Otherwise max as expandable box, as it is much too much text. As said, it is just an additional communication node, and Proxmox gracefully handles it, if the guest does not answer on it. Really no downside, just an additional install step, which I wanted to avoid if no real benefit. It was previously needed to have ACPI enabled OOTB, but now not anymore, hence my suggestion to remove that step and keep Proxmox defaults.
Thanks for testing. When we tried to provide UEFI images for x86_64 initially (years ago), it just did not work. It was needed to redo the partitioning on the final hardware, which is what Clonezilla does: it does not only bit-by-bit copy the embedded image, but sets up the partitions, including EFI partition with needed flags and such. I never really understood why this was needed, and it could be tested again. Maybe also on VMs, things are different. Let me just remove the restriction from our build script and redo some images for testing.
This seems to be the default GRUB graphics settings . For Clonezilla, there is a menu to switch those. I already thought about removing all this, including the Clonezilla Live sub menu, and apply “safe graphics” by default. For the 3 clicks and the small final dialog there is really no point of large resolution, and even less point to have options to change it. However, I am not keen to touch the default GRUB settings on a fresh GRUB installation, especially since this is a display specific issue most likely, where the display tell GRUB (videoinfo or vbeinfo in GRUB console) the wrong preferred mode. I guess the same initial distortion is then present on a regular fresh Debian VM as well?
In /etc/default/grub there is GRUB_GFXMODE. You can play around with that, and run update-grub afterwards to build the new config. And if you find time to enter the GRUB console: Change GRUB_TIMEOUT to 5 or so, then press ESC during the 5 seconds GRUB is waiting. From there AFAIK you can press “c” to enter the console, and run videoinfo and/or vbeinfo to see which supported display modes it detects, and most importantly the preferred one. This is then most likely wrong and causing the issues.