Hi,
edit by k-plan:
This Tutorial is outdated!
You can now use DietPi-Drive Manager.
It’s more simple and do all the steps for you with more options.
System:
DietPi V117 | ODROID-C1+ (e.g. in my case a fresh installation)
Micro SD-Card: - Verbatim 8GB Class 10 Micro SDHC
USB Device: - SanDisk Ultra Fit 64GB USB 3.0 drive
Boot up time: - ca. 25 sec
Note:
- should work on Hardkernel ODROID devices like: C0, C1, C1+, C2 (tested) and XU4, XU3 (tested by user)
Why to use this “extended version”?
Because it’s possible to use more than only one drive attached to your device.
# Preparation
- Install some tools we’ll need later:
root@oDroid-C1-TEST:~# apt-get install rsync
- Insert USB drive and check to see if usb is recognized:
rroot@oDroid-C1-TEST:~# lsusb
Bus 001 Device 003: ID 0781:5583 SanDisk Corp.
Bus 001 Device 002: ID 05e3:0610 Genesys Logic, Inc. 4-port hub
Bus 001 Device 001: ID 1d6b:0002 Linux Foundation 2.0 root hub
Bus 002 Device 001: ID 1d6b:0002 Linux Foundation 2.0 root hub
- Locate the USB device name ( /dev/sdx ):
root@oDroid-C1-TEST:~# lsblk
NAME        MAJ:MIN RM   SIZE RO TYPE MOUNTPOINT
sda           8:0    1  57.9G  0 disk
└─sda1        8:1    1  57.9G  0 part
mmcblk0     179:0    0   7.4G  0 disk
├─mmcblk0p1 179:1    0 128.5M  0 part /boot
└─mmcblk0p2 179:2    0   7.3G  0 part /
In this example, USB device is on sda. From this point on we use /dev/sda for the USB drive.
\
- Formatting the USB drive:
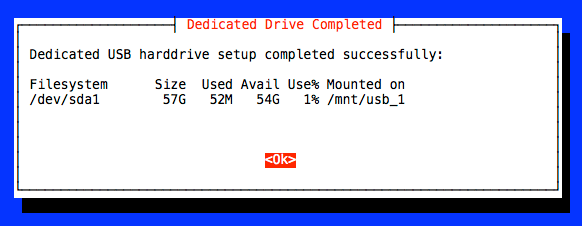
root@oDroid-C1-TEST:~# /DietPi/dietpi/dietpi-external_drive_setup
--------------------------------
 D I E T - P I
 External Drive Setup
 --------------------------------
 An Existing ext4 Drive has Been Found

Filesystem      Size  Used Avail Use% Mounted on
/dev/sda1        57G  584M   54G   2% /mnt/usb_1

 Would you like to format this drive? [y/N] y
--------------------------------
 D I E T - P I
 External Drive Setup
 --------------------------------
 Drive ready to be formatted to EXT4

 WARNING: This will delete all data on the USB drive


 Do you wish to Format this drive? [y/N]   y

root@RPi-B-Plus:~# mount /dev/sda1 /mnt/usb_1/
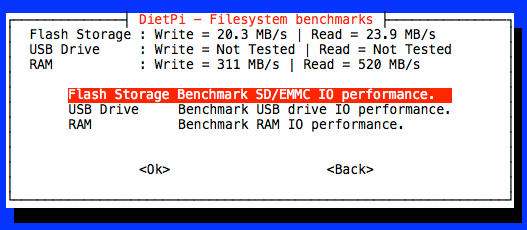
- Benchmark Filesystem and RAM IO performance
root@oDroid-C1-TEST:~# dietpi-config
10 Tools => Benchmarks Filesystem and RAM benchmarks => Flash Storage, USB Drive, RAM => Benchmark IO performance.

# Preparing to change root device (system)
- Now we need Partition unique UUID (UUID) of the USB device:
root@oDroid-C1-TEST:~# lsblk -f
NAME        FSTYPE LABEL  UUID                                 MOUNTPOINT
sda
└─sda1      ext4          abe28749-d59f-415b-9b60-75b1007eeee9 /mnt/usb_1
mmcblk0
├─mmcblk0p1 vfat   BOOT   6E35-5356                            /boot
└─mmcblk0p2 ext4   rootfs e139ce78-9841-40fe-8823-96a304a09859 /
e.g. Partition unique UUID: abe28749-d59f-415b-9b60-75b1007eeee9
- Backup your boot.ini file and edit it to include your new partition:
root@oDroid-C1-TEST:~# cp /DietPi/boot.ini /DietPi/boot.ini.sdcard
root@oDroid-C1-TEST:~# nano /DietPi/boot.ini
- Edit the file and change your root=UUID=… to point to new filesystem partition with the find out Partition unique UUID (UUID)
# Boot Arguments
## Boot from SD-Card
## setenv bootargs "root=UUID=e139ce78-9841-40fe-8823-96a304a09859 rootwait ro ${condev} no_console_suspend vdaccfg=0xa000 logo=osd1,loaded,0x7900000,720p,full dmfc=3 cvbsmode=576cvbs hdmimode=${m} m_bpp=${m_bpp} vout=${vout_mode} ${disableuhs} ${hdmi_hpd} ${hdmi_cec} ${enabledac}"

## Boot from USB device
setenv bootargs "root=UUID=abe28749-d59f-415b-9b60-75b1007eeee9 rootwait rootdelay=10 ro ${condev} no_console_suspend vdaccfg=0xa000 logo=osd1,loaded,0x7900000,720p,full dmfc=3 cvbsmode=576cvbs hdmimode=${m} m_bpp=${m_bpp} vout=${vout_mode} ${disableuhs} ${hdmi_hpd} ${hdmi_cec} ${enabledac}"
Watch for "rootdelay=10 " and save the file!
# Boot Arguments
## Boot from SD-Card
## setenv bootargs "root=UUID=e139ce78-9841-40fe-8823-96a304a09859 rootwait rw ${condev} no_console_suspend hdmimode=${m} m_bpp=${m_bpp} vout=${vout} fsck.repair=yes net.ifnames=0"

## Boot from USB device
setenv bootargs "root=UUID=abe28749-d59f-415b-9b60-75b1007eeee9 rootwait rootdelay=10 rw ${condev} no_console_suspend hdmimode=${m} m_bpp=${m_bpp} vout=${vout} fsck.repair=yes net.ifnames=0"
- - - - XU4 / XU3 (tested by user) - - -
 #------------------------------------------------------------------------------------------------------
# Basic Ubuntu Setup. Don't touch unless you know what you are doing.
# --------------------------------
## Boot from SD-Card
## setenv bootrootfs "console=tty1 root=UUID=e139ce78-9841-40fe-8823-96a304a09859 rootwait ro fsck.repair=yes"

## Boot from USB device
setenv bootrootfs "console=tty1 root=UUID=abe28749-d59f-415b-9b60-75b1007eeee9 rootwait rootdelay=10 ro fsck.repair=yes"
As well watch for “ root=UUID= … ” and " rootdelay=10 " !
root@oDroid-C1-TEST:~# /DietPi/dietpi/dietpi-services stop

 DietPi-Services
 Mode: stop
 Please wait...
 Completed
- Copy the filesystem over to your new partition:
root@oDroid-C1-TEST:~# rsync -axv / /mnt/usb_1/
...
sent 485,999,479 bytes  received 431,075 bytes  7,314,745.17 bytes/sec
total size is 484,388,706  speedup is 1.00
Be patient - this will take some time!
- Get your partition UUID for fstab:
root@oDroid-C1-TEST:~# lsblk -f
NAME        FSTYPE LABEL  UUID                                 MOUNTPOINT
sda
└─sda1      ext4          abe28749-d59f-415b-9b60-75b1007eeee9 /mnt/usb_1
...
e.g. UUID=abe28749-d59f-415b-9b60-75b1007eeee9
- Backup and edit the fstab file on your new filesystem:
root@oDroid-C1-TEST:~# cp /mnt/usb_1/etc/fstab /mnt/usb_1/etc/fstab.sdcard
root@oDroid-C1-TEST:~# nano /mnt/usb_1/etc/fstab
- Comment out the old filesystem at /dev/mmcblk0p2 and add the new line pointing to your new filesystem and add your UUID as indicated.
#Internal Drives---------------------------------------------------
proc            /proc           proc    defaults                                                                        0 0
/dev/mmcblk0p1  /boot           vfat    defaults,noatime,discard                                                        0 2
## rootfs on SD-Card
### /dev/mmcblk0p2  /               ext4    defaults,noatime,discard                                                    0 1
## rootfs on USB device
/dev/disk/by-uuid/abe28749-d59f-415b-9b60-75b1007eeee9    /        ext4    defaults,noatime,nodiratime                  0 1
tmpfs                   /tmp                    tmpfs   defaults,noatime,nodev,nosuid,mode=1777                         0 0
tmpfs                   /var/log                tmpfs   defaults,size=20m,noatime,nodev,nosuid,mode=1777                0 0
tmpfs                   /DietPi                 tmpfs   defaults,size=10m,noatime,nodev,nosuid,mode=1777                0 0
- Comment out External Drives at /dev/sda1 ___ /mnt/usb_1 :
#External Drives---------------------------------------------------
# - Try and use only ext4 for USB drives
# - Faster performance than NTFS, espically on RPi v1
## /dev/sda1       /mnt/usb_1      ext4    defaults,noatime,nofail                    0       0
#/dev/sda1       /mnt/usb_1      ntfs-3g    defaults,permissions,noatime,nofail       0       0
and save the file!
root@oDroid-C1-TEST:~# umount /dev/sda1
- Cross the fingers and reboot your ODROID:
root@oDroid-C1-TEST:~# reboot
If your USB device have a activity LED, you can check here R/W activity.
Boot up time is now: ca. 20 sec
- After your device has booted up, check the filesystem information:
root@oDroid-C1-TEST:~# df -h
Filesystem      Size  Used Avail Use% Mounted on
/dev/sda1        57G  581M   54G   2% /
udev             10M     0   10M   0% /dev
tmpfs           190M  5.4M  185M   3% /run
tmpfs           475M     0  475M   0% /dev/shm
tmpfs           5.0M     0  5.0M   0% /run/lock
tmpfs           475M     0  475M   0% /sys/fs/cgroup
tmpfs            10M  1.1M  9.0M  11% /DietPi
tmpfs            20M   12K   20M   1% /var/log
tmpfs           475M     0  475M   0% /tmp
/dev/mmcblk0p1  129M   25M  104M  20% /boot
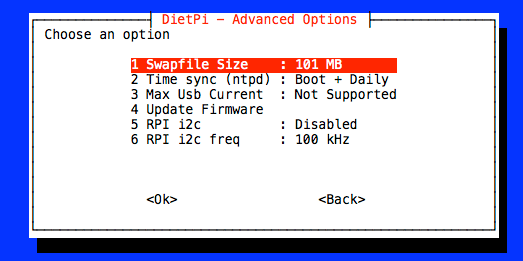
- Create a new swap file (e.g. 101 MB):
root@oDroid-C1-TEST:~# dietpi-config
dietpi-config => 4 Advanced Options => 1 Swapfile Size

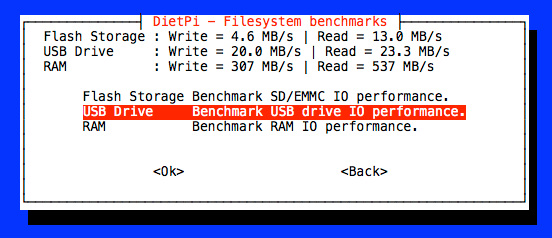
- Now benchmark filesystem and RAM IO performance again:

… and reboot.
Note:
- To boot your device, you must have insert SD-Card any time. Without it will not boot.
- If somethings goes wrong or your device doesn’t boot, power off your device, put SD-Card into your PC and restore "boot.ini.sdcard " to "boot.ini " on the DOS (FAT) partition named "boot "
Put edited SD-Card back into your device and power on. It will boot and run the system (DietPi) now from SD-Card like before your modifications.


