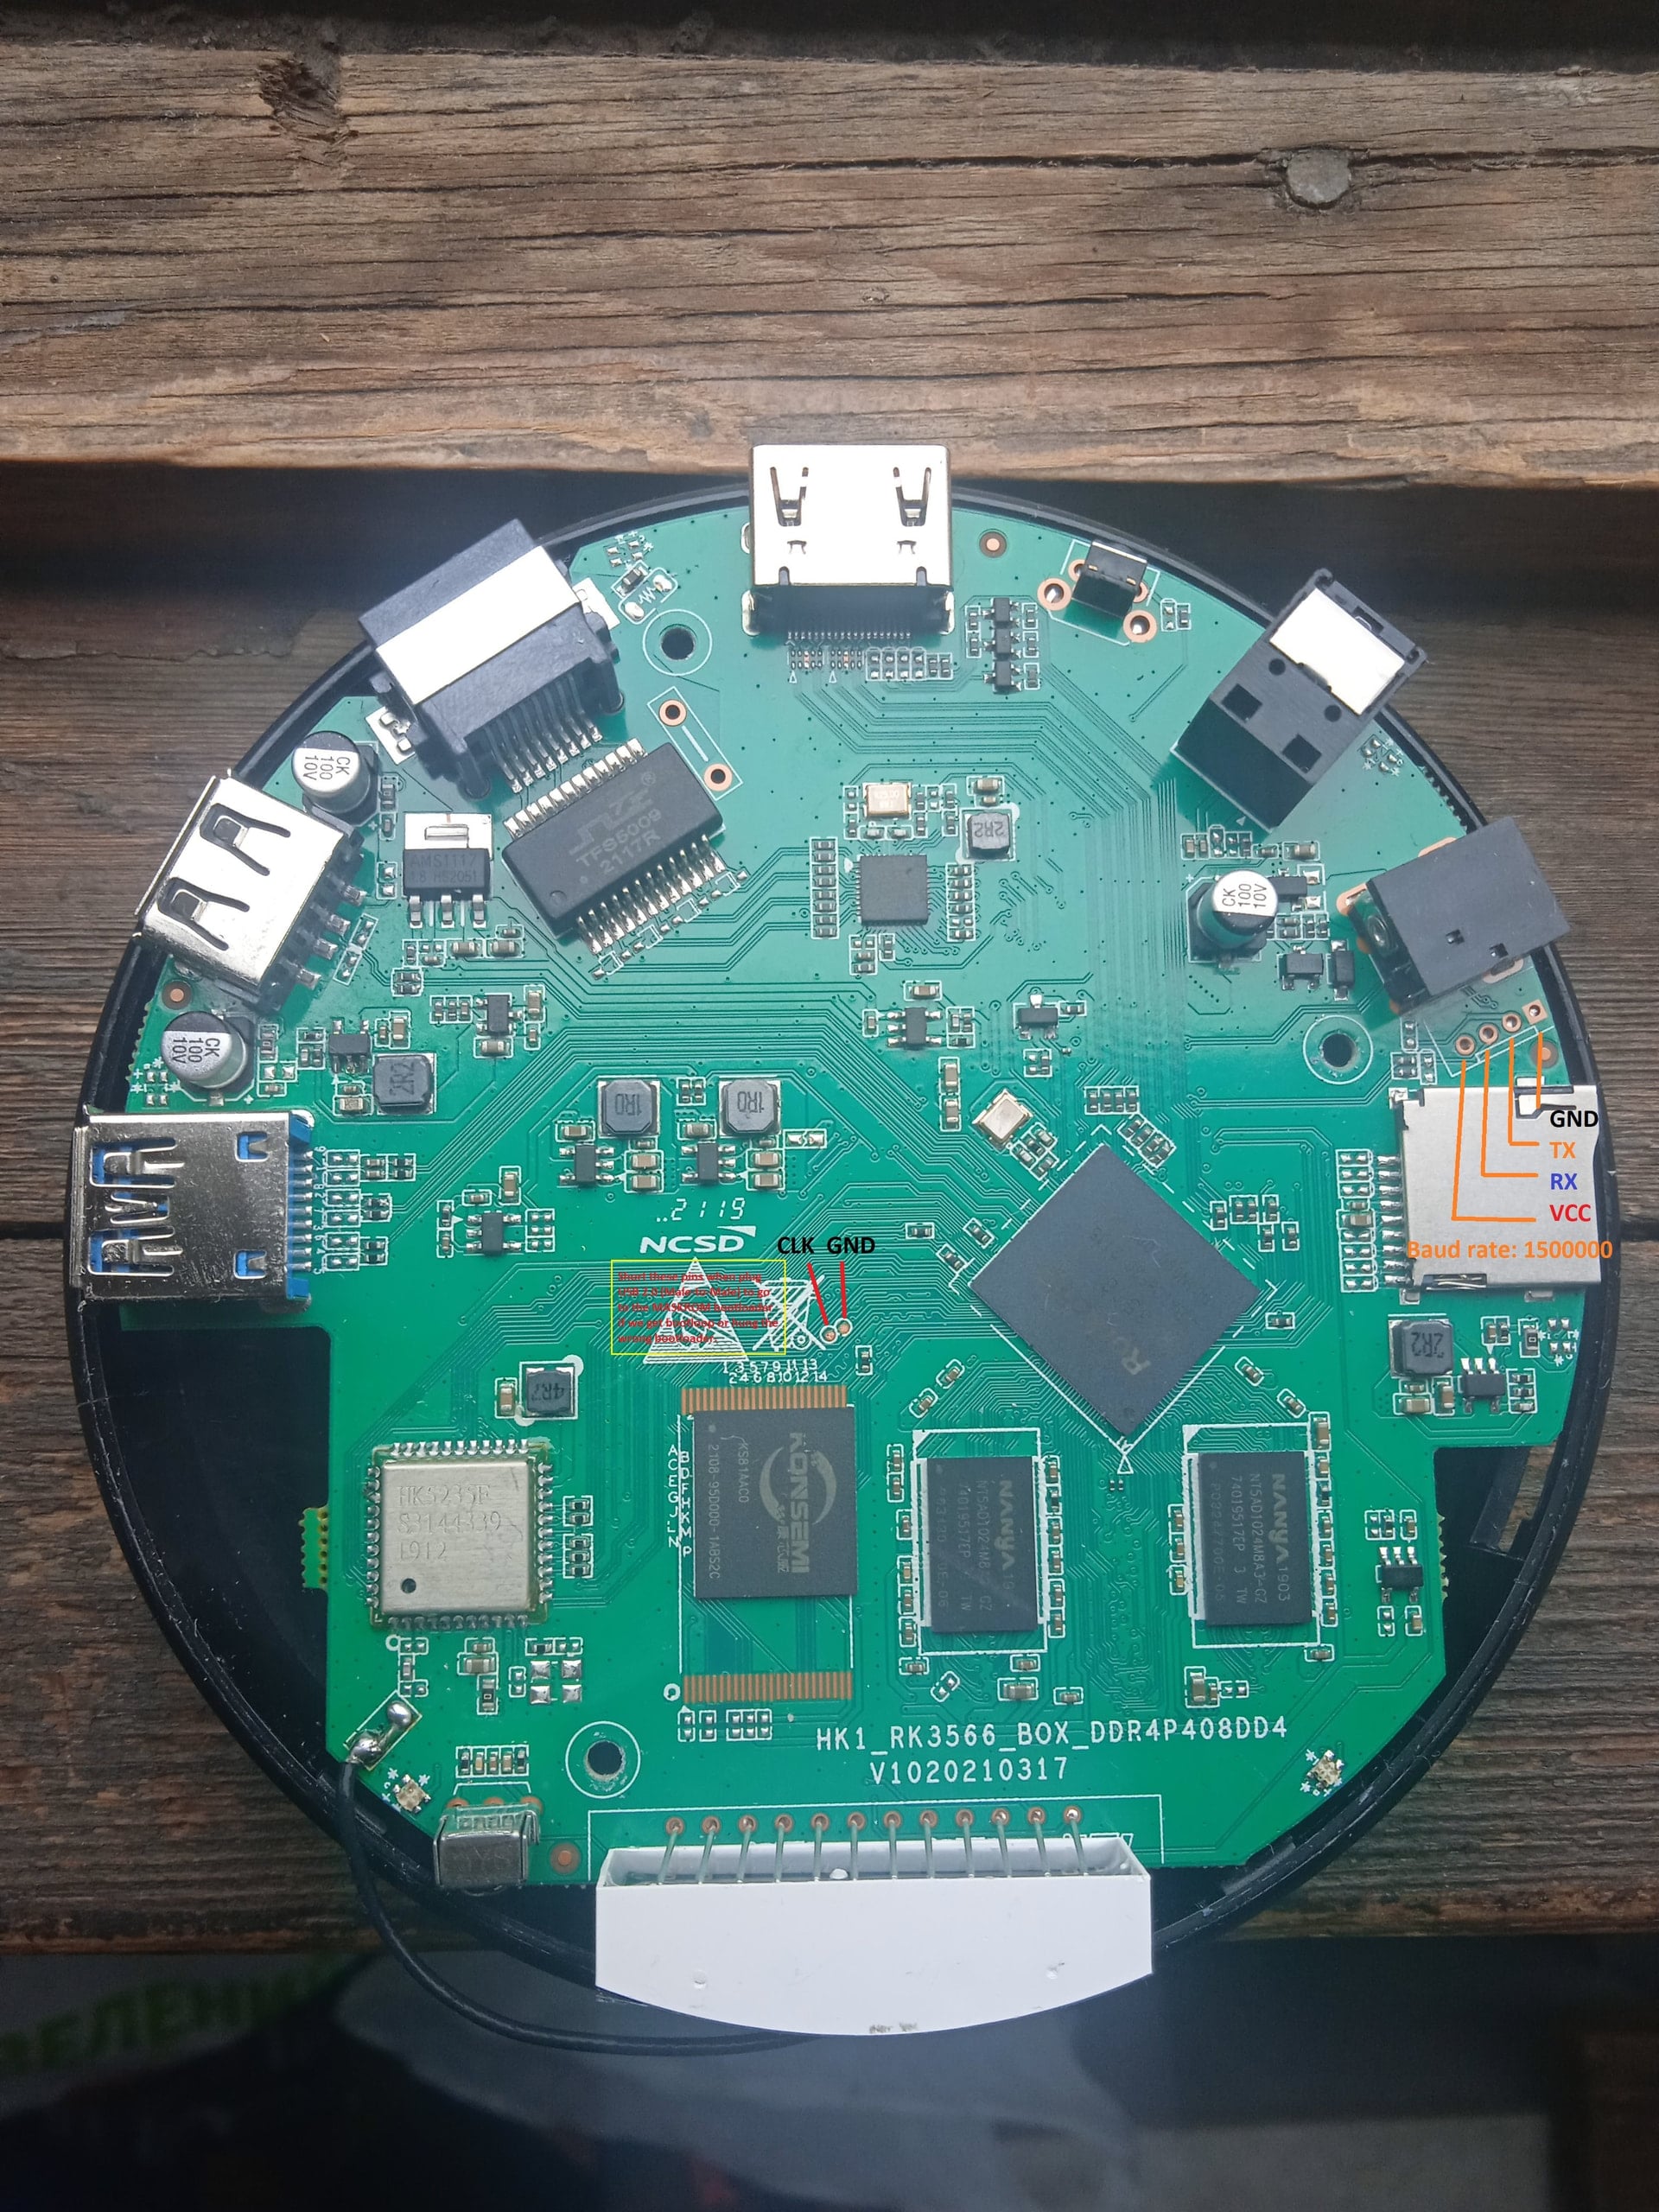
The one of this box itself is HK1 RBOX R3, the photo shows the pins for short to go to the Maskrom bootloader and UART pins
2.
Need to flash the loader to support dualboot without touching the original Android(or other OS) image on eMMC - priority is given to SD-Card.
Boot will be from SD-Card if there is on boot partition exist folder and file \boot.scr or extlinux\extlinux.conf - uboot (both: original Android and compiled for Armbian) searches for this path and file if it found this file, it will load from device which contains this file. mmc1(SD-Card) - first, mmc0(eMMC) - second.
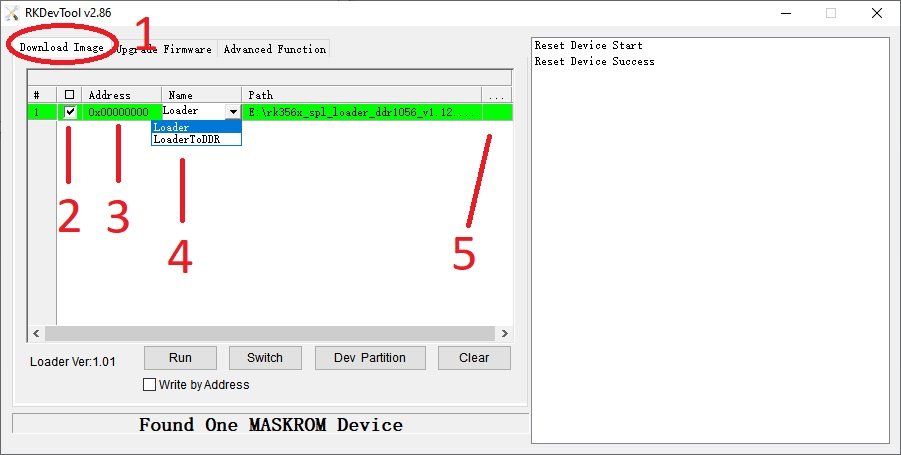
For correct priority loading it is necessary to replace the main bootloader which is in the archive Loader.zip - if you have an Android it is enough to flash only this bootloader as Loader at 0x0 offset using RKDevTool utility, the rest of the eMMC part should not be touched if the OS and settings we need are there. U-boot on eMMC must be original or DietPi or other and preinstalled at offset 0x4000
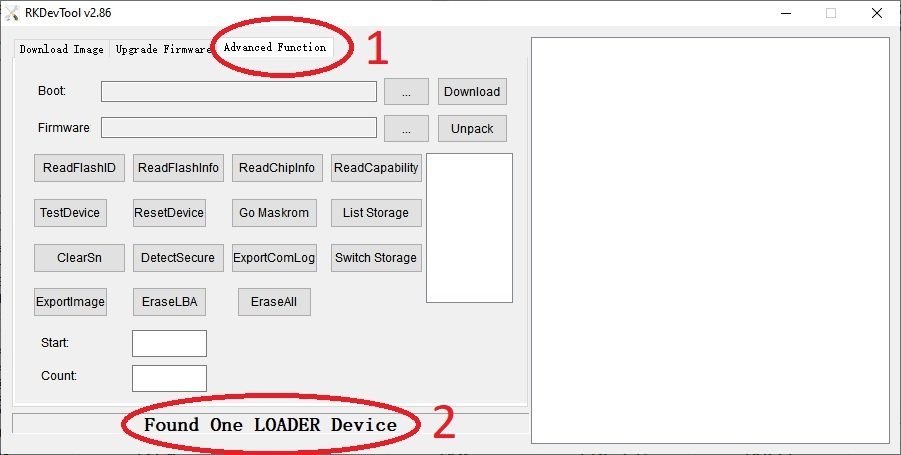
A working bootloader(supports dualboot) on this hardware for RKDevTool tool just in case:
Loader.zip
Instructions
-
Unplug power of TVBox and any SD-card
-
Press the reset(upgrade) button on the box with a paper clip and same time plug USB-A-USB-A(Male-to-Male) to USB 2.0 of TVBox
Then sequentially:
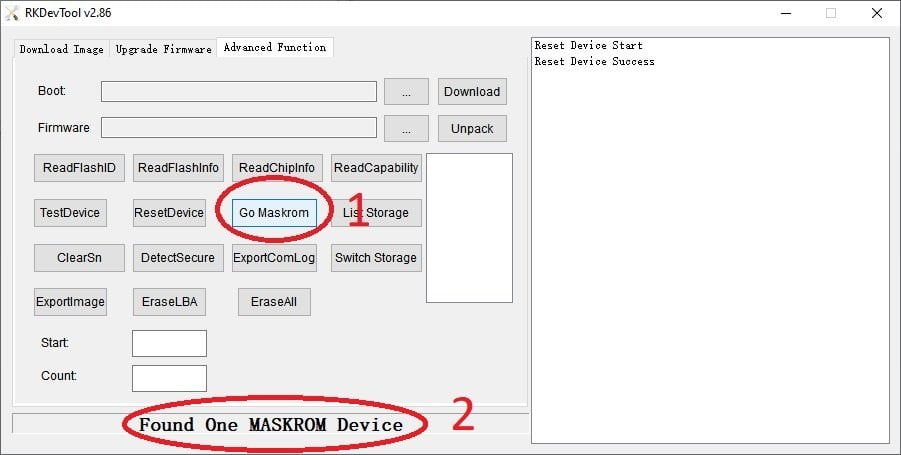
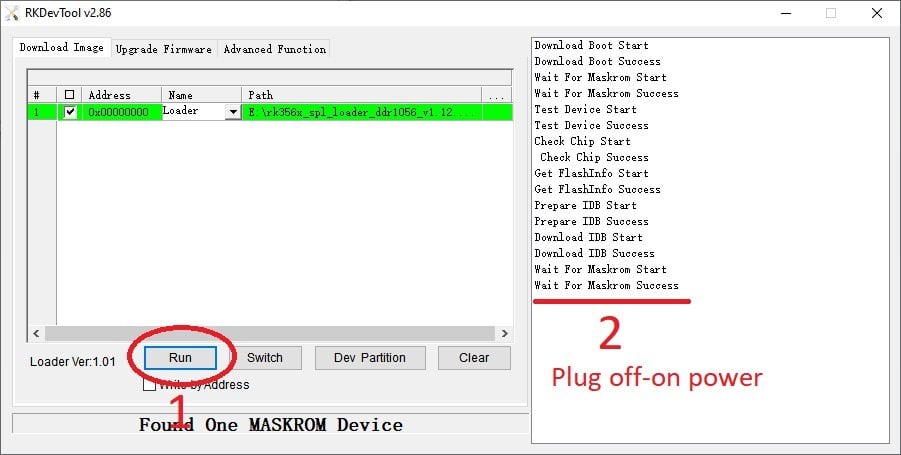
(remember, uboot must be on eMMC (even the original Android or DietPi, i.e. if you erase the eMMC - the boot will not work) and this is relevant if you have installed the original MiniLoaderAll.bin, which does not support booting from SD-Card, but only from eMMC. Some TVBoxes may already have a bootloader that supports SD-card booting.).
A modified image of the same Radxa Zero 3 => HK1-RBox-R3
DietPi_HK1-RBox-R3-ARMv8-Trixie.img.xz
MD5:
f2bd2cb5615dcb973e2a7ffca5e53296 *DietPi_HK1-RBox-R3-ARMv8-Trixie.img.xz
Unlike the others, here you can switch the kernel from Current (6.18*) to Vendor (6.1.*) during the initial setup without any issues.
The Desktop GUI is installed via the dietpi-software (or dietpi-launcher) menu command.
How to install the Vendor (6.1.*) kernel
- After the basic DietPi setup (before installing any packages that depend on the kernel version) and connecting to the internet, run:
cd /tmp
wget https://dietpi.com/downloads/binaries/linux-{dtb,image}-vendor-rk35xx.deb
dpkg -i linux-{dtb,image}-vendor-rk35xx.deb
- Copy the /Vendor/rk3566-hk1-rbox-r3.dtb file from the archive hk1-rbox-r3-bootloaders.zip to /boot/dtb-6.1.115-vendor-rk35xx/rockchip/
- To prevent it from updating the dtb and u-boot and replacing the working bootloader and our dtb:
sudo apt-mark hold linux-u-boot-radxa-zero3-current linux-dtb-current-rockchip64 linux-dtb-vendor-rk35xx
- Reboot:
reboot
- From here on, you can start fully using DietPi.
Ignore the fact that it shows up as Radxa Zero 3 on the main login page - the main thing is that it will be an updatable and compatible OS for the HK1-RBox-R3 box.
P.S.
Potentially, hardware playback for the RK3566 is not yet available on the Current (6.18*) kernel - they are doing this optimization only for the RK3588, and even then it is currently WiP
IMHO, for proper operation on the RK3566, you still need the Vendor (6.1.*) kernel as of today.
Guide on how I modified DietPi
Inserting the dtb file
- We need a Linux machine or WSL (on Windows) - I did it in WSL
- Download the archive hk1-rbox-r3-bootloaders.zip
- In Linux/WSL, install the util-linux package
- Download the image you want to modify, for example, with the img.xz extension
- Decompress the img.xz (Linux - unxz name.img.xz, Windows - use 7zip)
- Mount the decompressed image using losetup:
sudo losetup -f -P /mnt/c/Users/Dima/Downloads/DietPi_RadxaZERO3-ARMv8-Trixie.img
Mount /dev/loop0p1 to the /mnt/ext folder:
sudo mkdir /mnt/ext
sudo mount /dev/loop0p1 /mnt/ext/
Copy our /Current/rk3566-hk1-rbox-r3.dtb (from archive) to /mnt/ext/boot/dtb/rockchip/
7. Unmount /mnt/ext/
sudo umount /mnt/ext/
- Close the image
sudo losetup -D
Replacing the bootloader
In the exact same .img file, we replace the bootloader, run the following sequentially:
sudo dd bs=1k seek=32 conv=notrunc if=./u-boot-rockchip-current-seek-64.bin of=/mnt/c/Users/Dima/Downloads/DietPi_RadxaZERO3-ARMv8-Trixie.img
Source: 4PDA