I want to install an DietPi Intel image onto a single partition on a spare laptop.
The laptop already has 4 partitions, used as test Linux environments.
I want to replace one of the partitions with DietPi.
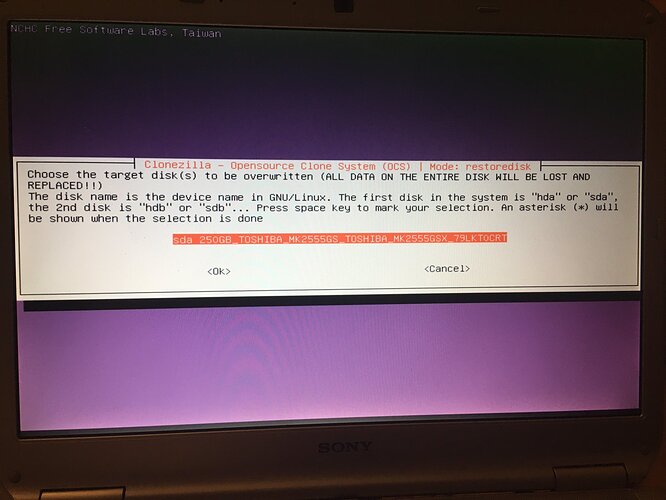
However, both Intel images offer to completely overwrite the whole disk. (See attachment )
I can not find an option to restore that image to a single partition, as would make sense.
Please can this option be added in the future?
Thanks, Brian
PS: Yes, I know I can install Buster then apply the Prep script, etc. Done that before, but I want a simple way of getting DietPi on laptops, without much hassle, etc 
I fixed it manually, a few stumbles but it works well enough now.
Broadly these are the steps:
1, Make space for DietPi, zap a hard drive partition and leave as plain ext4.
2. Restore the image to the partition
3. update-grub (and check if it finds the correct partition)
4. Boot to DietPi**
5. Goes into emergency mode, manually access dietpi-config, setup wireless correctly
6. Finish off the initial setup.
**Need to boot up gparted, first, to fix the image to use full partition size, otherwise minor errors (as disk partition is erroneously seen as full) and initial setup appears to fail. Once done, even after step 6, boots OK.
Sorted!
Hi Brian, thanks for sharing it here.
As stated on Twitter: Generally the image is a full drive image with root and EFI partition, so I’m not sure if Clonezilla can be configured to use an existing GPT partition table. And if so, there are some scripts which expect grub and initramfs to be configured and available to the DietPi OS. So we’d need to disable a few settings and setup steps before we can ship and officially support such images.
Generally great would be a single root partition image without bootloader and initramfs, so that it does not expect and does not overwrite an existing bootloader and initramfs but can be selected from an already installed bootloader. I’m gonna create a container image soon, which similarly excludes these (and additionally kernel, firmware etc), so adjusting settings and setup steps need to be done for this anyway.
No worries, Micha, I just skipped around Clonezilla and restored directly.
As I knew if the ex4t image was valid then an update grub would pick up enough bits to enable it to boot.
That was the case.
I hit a few minor issues during the first run, as space was very short (I hadn’t expanded the image to fit the full 20Gb partition yet, but once done then things improved.)
After that, wasn’t really too many issues after I install xfce, need to get the audio working but otherwise 90% there (a bug with synaptic crashes it).
I want to upgrade to sid at some point to get 4.16 XFCE but that will hold.
Very fast and about 170 Mb, when other Debian-based XFCE implementations are 350-380 Mb.
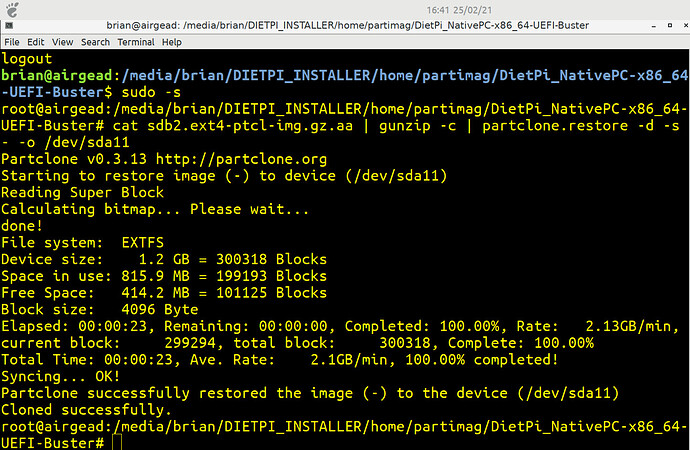
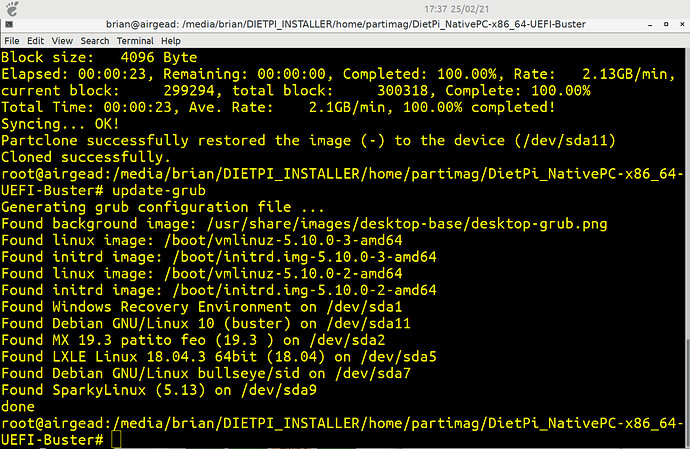
The attachments show the first part of what I did, I was already booted in Xebian (an XFCE debian distro of sorts)
- I had cleared down sda11
- cd to the USB stick directory
- Restored
- Ran the update for grub, so the primary distro knew where DietPi was.
- Rebooted and selected DietPi entry (a minor mistake, would have been wiser to expand sda11, then boot into it properly, less chance of space errors, etc)
- Hit the network error but was fixable once I enabled wifi properly.
Awesome! Please keep us updated when facing any issues that seem to be related to Bullseye + DietPi. I’m doing tests on a Bullseye VM with all changes/implementations and run my production and the DietPi website server on Bullseye already, but some simply slip though, when I remember the first stable Buster images that time  .
.
![]()


