I’m a novice ![]()
ownCloud: Configure Strict Transport Security
what are the instructions to configure on dietpie with a Simplified Solution.
my goal is to get http to https://192.168.1.200/owncloud/ for any ipad iphone device
I’m a novice ![]()
ownCloud: Configure Strict Transport Security
what are the instructions to configure on dietpie with a Simplified Solution.
my goal is to get http to https://192.168.1.200/owncloud/ for any ipad iphone device
That is a LAN IP address
In your home network it should connect just fine
I use OpenVPN to connect to my home network when I am out and about…and thru the VPN I can still use my LAN IP to do backups
If you want to open it thru your firewall you will have to open a port on your firewall/router and have it port forward from WAN → LAN
Not entirely safe to open the door to the web.
Okay, but it doesn’t tell me how I’m supposed to do it ![]()
Shall the server be available just via local network or are you planning to use letsencrypt/certbot to prepare for access via internet?
In the latter case I would recommend to use the current letsencrypt script from out testing branch. It contains a fix/workaround for a quite fresh security related issue on letsencrypt side, so the current (v6.1) version will not work with most webservers, their authentication requests get simply blocked by letsencrypt servers. Thus do:
dietpi-software install 92 to install CertBot,
then
wget https://github.com/Fourdee/DietPi/raw/testing/dietpi/dietpi-letsencrypt -O /DietPi/dietpi/dietpi-letsencrypt
then
dietpi-letsencrypt
and there you can enable HSTS (HTTP Strict Transport Security), which will be automatically configured by certbot in Apache and Nginx. On Lighttpd I am actually not sure right now. Will check and in case add tomorrow ![]() .
.
If you just want access in local network via IP or for some reason don’t want/need to use certbot for SSL certificate, then please provide the webserver you use and I will give you a quick solution with self-signed certificates or in case you have some from other CA.
There is no automatic way yet included in DietPi to switch to https outside of letsencrypt/certbot.
wget https://github.com/Fourdee/DietPi/raw/testing/dietpi/dietpi-letsencrypt O / DietPi / dietpi / dietpi-letsencrypt
I have been on this link and what should I do and how to put your script and what is the order? ![]()
Just copy the orange wget line I posted into your terminal. It will download (wget) the raw dietpi-letsencrypt file from testing branch and move/overwrite (-O) the one on your system.
Awesome!
@ludji:
Looks like you didn’t enable HSTS within dietpi-letsencrypt? Can you check your /etc/apache2/sites-available/000-default-le-ssl.conf about it, just to be sure.
But otherwise no problem, just copy&paste those lines into your terminal:
a2enmod headers
sed -i '\|DocumentRoot|aHeader always set Strict-Transport-Security "max-age=15552000; includeSubDomains; preload"' /etc/apache2/sites-available/000-default-le-ssl.conf
systemctl apache2 restart
I have this mistake today how to fix it. ![]()

Did you manually move your data directory?
no but I write and everything is back in the order by following the links of your sites Raspberry Pi OwnCloud Install with Diet Pi - Novaspirit
![]()
$ mkdir /datastore
$ chown www-data:www-data /datastore
$ chmod 0770 /datastore
mysql -u root -pdietpi
create database nextcloud;
rm /var/www/nextdcloud/config/config.php
Hmm what you did, should have been done automatically by Nextcloud installation script actually. But okay if it now works for you. Note that you can adjust the data directory prior to automated installation by edit in /DietPi/dietpi.txt. Moving it afterwards is not supported and can cause errors, if not some manual database adjustments are done also.
it’s all right
there’s just the cache memory to solve.

then I will install samba it won’t cause any problems afterwards
Samba and Nextcloud should not interact, but do not place Nextcloud data into Samba folder, that will not work due to permission issues.
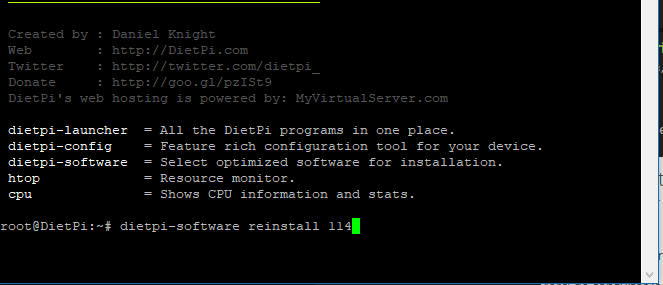
To apply memory caching and some other enhancements to Nextcloud, run our installation script on top of your existing instence:
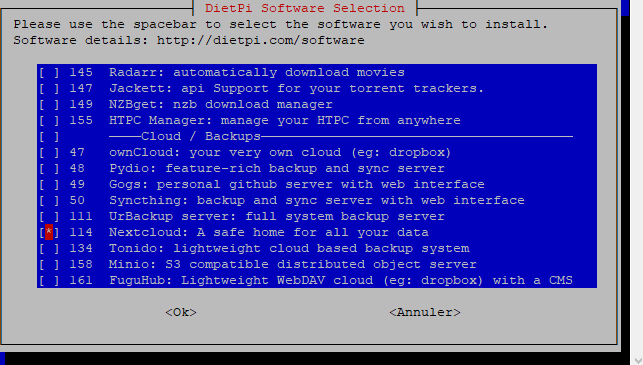
dietpi-software reinstall 114
It will not overwrite your current installation (if placed within /var/www/nextcloud) nor database (if named nextcloud), but will apply memory caching via APCu, Redis for transactional file locking and some other enhancements to your configuration.
I reinstall over it like this if or by your software because it already checked and I can’t reinstall it?
I must have misunderstood
Jep typing the following into your terminal is the right way:
dietpi-software reinstall 114
Reinstalling via dietpi-software gui is not possible, that’s true. The command above is more a developer tool so far, to allow us applying configuration changes to already installed software.
We did not (yet) allow this within gui for end users, as it might delete existing configs, in case even data, of software installations. But in case of ownCloud/Nextcloud it preserves existing data and manual config changes, just injecting certain enhancements to cloud and PHP.
Okay, thank you
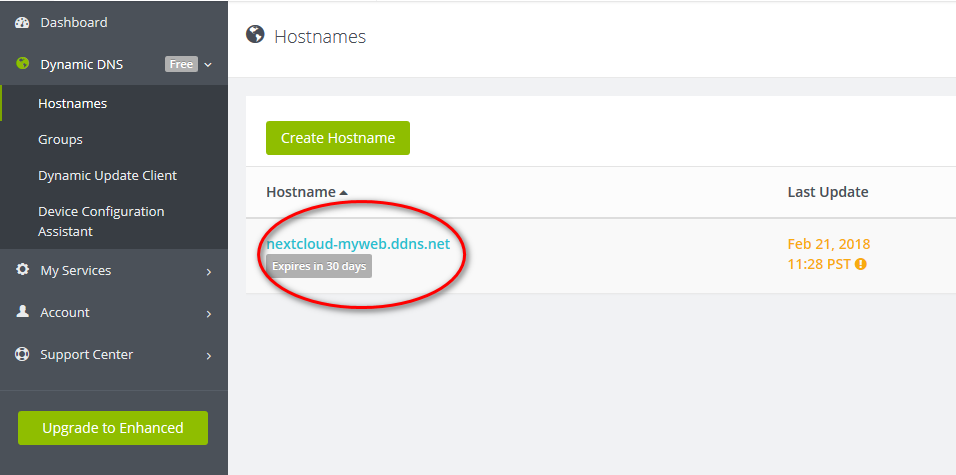
I would like to change my external ip by a web address through this site https://www.duckdns.org/index.jsp.
Is it possible and how to modify it while I’m in https? ![]()
right now I have my ip https:// 78. **. ./nextcloud
So you have a dynamic (~daily chaning) IP address right now? Yes a dyndns + domain provider makes sense then. https://www.noip.com/ is an alternative for this, implemented in DietPi. You need to change some config line in webserver and Nextcloud afterwards, but you can already set it up and try general access via the new external IP/domain.
I will reply later with details, am at work right now ![]() .
.