Media Systems
Overview
- Kodi - Media Centre / Player
- ympd - Lightweight web Interface audio player for MPD
- myMPD - Lightweight web Interface audio player for MPD
- O!MPD - Feature-rich web Interface audio player for MPD
- CAVA - Optional: Console-based audio visualizer for MPD
- Mopidy - Web Interface Music /Radio Player for MPD
- Airsonic-Advanced - Feature rich media streaming server with web interface
- Lyrion Music Server - aka Logitech Media Server, LMS, Squeezebox Server
- Squeezelite - Audio player for Lyrion Music Server
- Shairport Sync - AirPlay audio player with multiroom sync
- ReadyMedia - (MiniDLNA) Media streaming server (DLNA, UPnP)
- Ampache - Web interface media streaming server
- Emby - Web interface media streaming server
- Plex Media Server - Web interface media streaming server
- Tautulli - Monitoring and tracking tool for Plex Media Server
- Murmur - Mumble VoIP Server
- Roon Bridge - Turns your device into a Roon capable audio player
- Roon Server - Turns your device into a Roon capable audio player and Roon core
- Roon Extension Manager - Manage extensions from within Roon
- NAA Daemon - Signalyst Network Audio Adaptor (NAA)
- Icecast - Shoutcast Streaming Server, including DarkIce
- Koel - Web interface streaming server
- GMediaRender - Resource efficient UPnP/DLNA renderer
- Ubooquity - Free home server for your comics and ebooks library
- Komga - Free and open source comics/mangas media server with web UI
- Raspotify - Spotify Connect client
- Spotifyd - Lightweight FOSS Spotify client
- Jellyfin - Media streaming server including live TV
- Beets - Music organizer and manager
- Snapcast Server - Multi room audio server
- Snapcast Client - Multi room audio client
- Navidrome - Web interface media streaming server
- Kavita - Your digital library in one place (manga, comics, and books)
How do I run DietPi-Software and install optimised software items?
To install any of the DietPi optimised software items listed below run from the command line:
dietpi-software
Choose Browse Software and select one or more items. Finally select Install.
DietPi will do all the necessary steps to install and start these software items.

To see all the DietPi configurations options, review the DietPi Tools section.
Return to the Optimised Software list
Kodi
The only media centre/player you’ll ever need.

If you did not select Kodi to start from boot, you can modify the autostart options in dietpi-autostart:
- Desktop: Kodi is available via the LXDE start menu, and, desktop.
- Console: Kodi can also be run by typing
startkodi.
Website: https://kodi.tv/
Quick start guide: https://kodi.wiki/view/Quick_start_guide
Documentation: https://kodi.wiki/view/Main_Page
Source code: @xbmc
ympd
A lightweight, bare-bones, no frills HiFi music player with a web based interface. ympd is a front end for MPD.
Also installs:
- MPD (music player daemon)

The web interface is accessible via port 1337:
- URL:
http://<your.IP>:1337
Using <hostname>.local instead of using <your.IP> (Avahi-Daemon)
By installing Avahi-Daemon, the web interface can be accessed with <hostname>.local (default: dietpi.local) instead of using <your.IP>. See the Avahi-Daemon documentation for details.
Make sure you have one of DietPi’s File Servers installed.
Default music directory:
/mnt/dietpi_userdata/Music,/Musicfrom NFS/Samba
Simply select the Update DB button from the settings menu in ympd.
Additional to the ympd configuration via the web interface the underlying MPD can be configured via the file
/etc/mpd.conf
See also the MPD user’s manual for details. The MPD configuration might be used e.g. to set a different music library directory like a USB disk or an NFS mounted share.
For changes to take effect, the service needs to be restarted:
systemctl restart mpd
- Tweak audio options on the fly with the panel.
Simply run
dietpi-justboomfrom the command line to launch it.
Logs can be viewed with the following command:
journalctl -u ympd
As ympd is installed via APT, it can be update with the following commands:
apt update
apt install ympd
myMPD
A lightweight, bare-bones, no frills HiFi music player with a web based interface. myMPD is a front end for MPD, and a recent fork of ympd.
Also installs:
- MPD (music player daemon)

The web interface is accessible via HTTPS on port 1333:
- URL:
https://<your.IP>:1333
Using <hostname>.local instead of using <your.IP> (Avahi-Daemon)
By installing Avahi-Daemon, the web interface can be accessed with <hostname>.local (default: dietpi.local) instead of using <your.IP>. See the Avahi-Daemon documentation for details.
Make sure you have one of DietPi’s File Servers installed.
Default music directory:
/mnt/dietpi_userdata/Music,/Musicfrom NFS/Samba
Simply select the Update database option from the settings menu in myMPD.
- Tweak audio options on the fly with the panel.
Simply run
dietpi-justboomfrom the command line to launch it.
myMPD can be configured via individual config files, one for each setting within the config directory:
/var/lib/mympd/config/
Details about available settings can be found in the official docs: https://jcorporation.github.io/myMPD/020-configuration/configuration-files.html
For changes to take effect, the service needs to be restarted:
systemctl restart mympd
Additional to the myMPD configuration via the configuration files the underlying MPD can be configured via the file
/etc/mpd.conf
See also the MPD user’s manual for details. The MPD configuration might be used e.g. to set a different music library directory like a USB disk or an NFS mounted share.
For changes to take effect, the service needs to be restarted:
systemctl restart mpd
Since myMPD runs as systemd service, it can be controlled with the following commands:
systemctl status mympd
systemctl start mympd
systemctl stop mympd
systemctl restart mympd
Logs can be viewed with the following command:
journalctl -u mympd
As myMPD is installed via APT, it can be update with the following commands:
apt update
apt install mympd
Official documentation: https://jcorporation.github.io/myMPD
Source code: jcorporation/myMPD
License: GPLv3
O!MPD
A feature-rich web interface audio player for MPD. Includes song/album scraping, ideal for music catalog browsing.
Also installs:
- MPD (music player daemon)
- Web server

- URL:
http://<your.IP>/ompd - Username:
admin - Password:
admin
Using <hostname>.local instead of using <your.IP> (Avahi-Daemon)
By installing Avahi-Daemon, the web interface can be accessed with <hostname>.local (default: dietpi.local) instead of using <your.IP>. See the Avahi-Daemon documentation for details.
Make sure you have one of DietPi’s File Servers installed.
Default music directory:
/mnt/dietpi_userdata/Music,/Musicfrom NFS/Samba
Additional to the O!MPD configuration via the web interface the underlying MPD can be configured via the file
/etc/mpd.conf
See also the MPD user’s manual for details. The MPD configuration might be used e.g. to set a different music library directory like a USB disk or an NFS mounted share.
For changes to take effect, the service needs to be restarted:
systemctl restart mpd
Click the settings button (cog, top right).
Click update.
CAVA
Console-based Audio Visualizer for MPD. Can be displayed in SSH terminals, consoles and LCD HATS.
Also installs:
- MPD (music player daemon)
If you did not select CAVA to start from boot:
- CAVA can also be run by typing
cava. Use Ctrl+C to terminate. - You can modify the autostart options in
dietpi-autostart.
- Tweak CAVA options on the fly with the panel.
Simply run
dietpi-justboomfrom the command line to launch it.
Mopidy
Mopidy is a Python based music player web based user interface for MPD.

The web interface uses port 6680:
- URL:
http://<your.IP>:6680/musicbox_webclientor justhttp://<your.IP>:6680
Using <hostname>.local instead of using <your.IP> (Avahi-Daemon)
By installing Avahi-Daemon, the web interface can be accessed with <hostname>.local (default: dietpi.local) instead of using <your.IP>. See the Avahi-Daemon documentation for details.
Make sure you have one of DietPi’s File Servers installed.
Default music directory:
/mnt/dietpi_userdata/Music,/Musicfrom NFS/Samba
This is done automatic, however, you can force an update using the command
mopidyctl local scan
Additional to the Mopidy configuration (extensions configuration) via the web interface the underlying MPD can be configured via the file
/etc/mpd.conf
See also the MPD user’s manual for details. The MPD configuration might be used e.g. to set a different music library directory like a USB disk or an NFS mounted share.
For changes to take effect, the service needs to be restarted:
systemctl restart mpd
Mopidy is highly customisable and supports various extensions from alternative web clients to backend extensions. See Extensions for a list.
Those can be installed via pip, e.g.:
pip3 install --break-system-packages -U Mopidy-Jellyfin
For changes to take effect, the service needs to be restarted:
systemctl restart mopidy
Enable support for vast number of codecs like .m4a. Execute the following installation procedure:
apt-get install -y gstreamer1.0-plugins-bad
Many thanks to Roth for this hint.
Airsonic-Advanced
Feature rich media streaming server with a web interface, coded in Java.
![]()
The web interface uses port 8080:
- URL:
http://<your.IP>:8080/airsonic - Username:
admin - Password:
admin
Using <hostname>.local instead of using <your.IP> (Avahi-Daemon)
By installing Avahi-Daemon, the web interface can be accessed with <hostname>.local (default: dietpi.local) instead of using <your.IP>. See the Avahi-Daemon documentation for details.
The web interface may feel sluggish on first access.
This is normal on first access after service start. Once a page has been viewed, respectively an element selected the first time, subsequent accesses will perform much faster.
Once connected to the web interface for the first time, we recommend to do the following setup steps:
First we check off the Getting started page and head over to Settings:

On the Media folders tab we change the path to DietPi’s default music directory /mnt/dietpi_userdata/Music, save and scan the new media directory:

On the Credentials tab we add a new admin password, the default bcrypt encoding is very good for secure password storage. Then we delete the initial default password:

The install, config and data directory is located at:
/mnt/dietpi_userdata/airsonic
Since Airsonic-Advanced runs as systemd service, it can be controlled with the following commands:
systemctl status airsonic
systemctl start airsonic
systemctl stop airsonic
systemctl restart airsonic
Since Airsonic-Advanced runs as systemd service, its logs can be viewed via:
journalctl -u airsonic
Airsonic-Advanced can be updated by simply reinstalling it:
dietpi-software reinstall 33
Source code: airsonic-advanced/airsonic-advanced
License: GPLv3
Lyrion Music Server
Lyrion Music Server (aka. Logitech Media Server, LMS, fka. SlimServer, SqueezeCenter, SqueezeboxServer, SliMP3) is the server software that enables web interface control of:
- Software audio players: Squeezelite
- Hardware audio players from Logitech: Squeezebox, SlimDevices
Remark: If you do not own a hardware player, you can turn your DietPi system into a Squeezebox audio capable player, by selecting Squeezelite for installation in dietpi-software.

The web interface is accessible via port 9000:
- URL:
http://<your.IP>:9000
Using <hostname>.local instead of using <your.IP> (Avahi-Daemon)
By installing Avahi-Daemon, the web interface can be accessed with <hostname>.local (default: dietpi.local) instead of using <your.IP>. See the Avahi-Daemon documentation for details.
Make sure you have one of DietPi’s File Servers installed.
Default music directory:
/mnt/dietpi_userdata/Music,/Musicfrom NFS/Samba
Logs can be viewed with the following command:
journalctl -u lyrionmusicserver
Additionally, log files can be found in:
/var/log/squeezeboxserver
Lyrion Music Server can be updated to the current version with the following command:
dietpi-software reinstall 35
Official Website: https://lyrion.org/reference/lyrion-music-server/
Wikipedia: https://en.wikipedia.org/wiki/Lyrion_Music_Server
Source code: LMS-Community/slimserver
Squeezelite
Squeezelite is a software audio player/client for the Lyrion Music Server.
- Edit
/etc/default/squeezelite Restart the service:
systemctl restart squeezelite
Installs on DietPi prior to v8.10
On earlier Squeezelite installs, this config file didn’t exist yet. If you applied command-line options via dietpi-services, you can migrate them to the new config file:
- Assure Squeezelite has been updated to latest version:
dietpi-software reinstall 36
- Migrate options from
/etc/systemd/system/squeezelite.service.d/dietpi-services_edit.confto/etc/default/squeezelite. - Remove obsolete config and restart service:
rm /etc/systemd/system/squeezelite.service.d/dietpi-services_edit.conf
rmdir --ignore-fail-on-non-empty /etc/systemd/system/squeezelite.service.d
systemctl daemon-reload
systemctl restart squeezelite
Logs can be viewed with the following command:
journalctl -u squeezelite
As Squeezelite is installed via APT, it can be update with the following commands:
apt Update
apt install squeezelite
Wikipedia: https://en.wikipedia.org/wiki/Squeezelite
Source code: ralph-irving/squeezelite
Shairport Sync
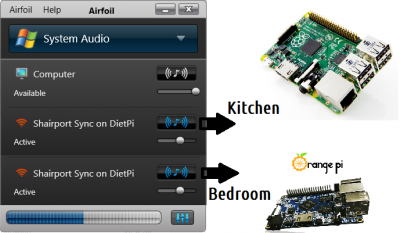
Shairport Sync is an AirPlay audio player which plays audio streamed from iTunes, iOS devices and third-party AirPlay sources such as ForkedDaapd and Airfoil.
Audio played by a Shairport Sync-powered device stays synchronised with the source and hence with similar devices playing the same source. This allows for synchronised multi-room audio on multiple devices.
You can configure Shairport Sync with its config file: /usr/local/etc/shairport-sync.conf
To apply changes, restart the service:
systemctl restart shairport-sync
When searching for an AirPlay device, execute shairport-sync on DietPi.
There are many AirPlay players available for Android and iOS, e.g. AirPlay For Android & TV and AirPlay on iOS.
Download and use the player of your choice.
Airfoil is an application that will let you stream audio playback directly to any Shairport Sync device. Press play on your favourite music player (e.g.: Winamp/Spotify) and click the speaker next to the DietPi device.
By using Airfoil, you can master the music in real time using the CPU. This will allow all your Shairport Sync devices to sound even better without any performance hit on the device.
Airfoil for Windows has been retired
From End of 2019 on, sadly Airfoil isn’t developed and supported anymore for Windows: https://www.rogueamoeba.com/airfoil/windows/
There is however an official legacy download available: https://www.rogueamoeba.com/legacy/#retired
If you are planning to use multiple Shairport devices on the same network, please make sure the hostname of each device is unique. The hostname will also effect the shairport-sync name, if you do not actively set the name setting in the general block of the config file.
This can be completed in dietpi-config > Security Options > Change Hostname.
Soxr interpolation will improve the output audio quality on Shairport. However, it is extremely CPU intensive.
Enable Soxr:
sed -i '/interpolation = /c\interpolation = "soxr";' /usr/local/etc/shairport-sync.conf
systemctl restart shairport-sync
Disable Soxr:
sed -i '/interpolation = /c\\/\/interpolation = "soxr";' /usr/local/etc/shairport-sync.conf
systemctl restart shairport-sync
If you have choppy playback using Soxr:
Increasing the shairplay-sync process priority (nice) may resolve the issue.
- Run
dietpi-servicesfrom the terminal - Select
shairport-syncvia up/down buttons then press Enter - Select
CPU Nicevia up/down buttons then press Enter - Select
-20 : (Highest priority)via up button, then press Enter
DietPi will then automatically apply and set the nice level.
If the choppy playback continues, the CPU most likely is insufficient for the processing required for Soxr. Then Soxr should be disabled.
Logs can be viewed with the following command:
journalctl -u shairport-sync
As Shairport Sync is installed via APT, it can be update with the following commands:
apt Update
apt install shairport-sync
ReadyMedia
Stream your shared media to any DLNA/UPnP capable device.
The web interface is accessible via port 8200:
- URL:
http://<your.IP>:8200
Using <hostname>.local instead of using <your.IP> (Avahi-Daemon)
By installing Avahi-Daemon, the web interface can be accessed with <hostname>.local (default: dietpi.local) instead of using <your.IP>. See the Avahi-Daemon documentation for details.
You can configure ReadyMedia with its config file: /etc/minidlna.conf
To apply changes, restart the service:
systemctl restart minidlna
Make sure you have one of DietPi’s File Servers installed.
Default media directories:
- Audio:
/mnt/dietpi_userdata/Music,/Musicfrom NFS/Samba - Video:
/mnt/dietpi_userdata/Video,/Videofrom NFS/Samba - Images:
/mnt/dietpi_userdata/Pictures,/Picturesfrom NFS/Samba
The database can be refreshed with these commands:
rm -R /mnt/dietpi_userdata/.MiniDLNA_Cache/*
systemctl restart minidlna
Available UPnP clients: https://www.wikipedia.org/wiki/List_of_UPnP_AV_media_servers_and_clients#UPnP_AV_clients
Ampache
A web based audio/video streaming application and file manager allowing you to access your music & videos from anywhere, using almost any internet enabled device.
Also installs:
- Webserver stack

- URL:
http://<your.IP>/ampache - Username:
dietpi(DietPi v8.24 and earlier:admin) - Password:
<your global password>(default:dietpi)
Using <hostname>.local instead of using <your.IP> (Avahi-Daemon)
By installing Avahi-Daemon, the web interface can be accessed with <hostname>.local (default: dietpi.local) instead of using <your.IP>. See the Avahi-Daemon documentation for details.
Make sure you have one of DietPi’s File Servers installed.
Default media directories:
- Audio:
/mnt/dietpi_userdata/Music,/Musicfrom NFS/Samba - Video:
/mnt/dietpi_userdata/Video,/Videofrom NFS/Samba
DietPi will automatically add various catalogue directories to Ampache during installation. You can modify these directories as needed before running your first scan.
To start the scan and import your media into Ampache:
- Select the
adminbutton. - Select
show cataloguesfrom the left hand side. - Select
Update all.

- Select the
adminbutton. - Select
add a cataloguefrom the left hand side. - Enter the details of your path.
- Select the
add cataloguebutton.

Access permissions on local directories
If Ampache fails to add a directory, assure it has read permissions, e.g. by adding global read permissions:
chmod -R a+r /my/directory
Access permissions on remote mounts (e.g. NFS, Samba)
In case you want to access a remote mount, also read permissions for Ampache need to be assured.
For NFS, you can grant global read permissions like you would do with a local directory, e.g. via:
chmod -R a+r /my/nfs/directoryIn case the the NFS client has no write permissions, this needs to be done at the NFS server.
For Samba, edit
/etc/fstaband add or set the mount optionsfile_mode=0644,dir_mode=0755. Important is the last digit of each mode, which indicates read (and execute) permissions for all users.
Then remount the the Samba share for the change to take effect:mount -o remount /my/samba/directory
Since Debian Bullseye (Ampache v6), the main configuration file is located at:
/mnt/dietpi_userdata/ampache/config/ampache.cfg.php
Until Debian Buster (Ampache v4), the main configuration file is located at:
/var/www/ampache/config/ampache.cfg.php
E.g. to allow .m4a playback:
Since Debian Bullseye (Ampache v6):
G_CONFIG_INJECT 'transcode_m4a[[:blank:]]' 'transcode_m4a = allowed' /mnt/dietpi_userdata/ampache/config/ampache.cfg.phpUntil Debian Buster (Ampache v4):
G_CONFIG_INJECT 'transcode_m4a[[:blank:]]' 'transcode_m4a = allowed' /var/www/ampache/config/ampache.cfg.php
More info: https://github.com/ampache/ampache/wiki/Transcoding
To update Ampache to the current version, execute
dietpi-software reinstall 40
Official website: https://ampache.org/
Official documentation: https://github.com/ampache/ampache/wiki
Source code: ampache/ampache
License: AGPLv3
Emby
A web interface media streaming server. Think Kodi, but using any device with a web browser.
Transcoding performance on SBC
Video transcoding performance on SBC devices is sluggish and may stutter, even on the RPi 3:
https://github.com/MichaIng/DietPi/issues/310#issuecomment-216262850
SBCs should be fine for Music only.
A Virtual Machine is highly recommended for Video transcoding:
https://github.com/MichaIng/DietPi/issues/310#issuecomment-219067830

The web interface is accessible via port 8096:
URL: http://<your.IP>:8096
Using <hostname>.local instead of using <your.IP> (Avahi-Daemon)
By installing Avahi-Daemon, the web interface can be accessed with <hostname>.local (default: dietpi.local) instead of using <your.IP>. See the Avahi-Daemon documentation for details.
Once connected to the web interface, simply follow the on screen instructions.
When you reach Setup your media libraries:
/mnt/dietpi_userdata/Music
/mnt/dietpi_userdata/Video
You can also mount Samba/NFS shares by running dietpi-drive_manager and selecting Mount network drive from the menu.
Make sure you have one of DietPi’s File Servers installed.
Default media directories:
- Audio:
/mnt/dietpi_userdata/Music,/Musicfrom NFS/Samba - Video:
/mnt/dietpi_userdata/Video,/Videofrom NFS/Samba
To view Emby server logs, run the following command from console:
journalctl -u emby-server
To update the Emby Server version simply reinstall Emby Server to update it to newest version. It will preserve any existing data and settings:
dietpi-software reinstall 41
YouTube video tutorial: DietPi Emby Media Server Setup on Raspberry Pi 3 B Plus
Plex Media Server
Plex organizes your video, music, and photo collections and streams them to all of your screens. Also known as a “Web interface media streaming server”.

The web interface uses port 32400:
URL: http://<your.IP>:32400/web
Using <hostname>.local instead of using <your.IP> (Avahi-Daemon)
By installing Avahi-Daemon, the web interface can be accessed with <hostname>.local (default: dietpi.local) instead of using <your.IP>. See the Avahi-Daemon documentation for details.
Please follow the onscreen instructions to complete the setup wizard:
- Create your Plex account by signing up.
- Give your server a name (e.g.:
DietPi-Plex) Click
libraryto setup your media locations:/mnt/dietpi_userdata/Music /mnt/dietpi_userdata/Video
You can also mount Samba/NFS shares by running dietpi-drive_manager and selecting Mount network drive from the menu.
Make sure you have one of DietPi’s File Servers installed.
Default media directories:
- Audio:
/mnt/dietpi_userdata/Music,/Musicfrom NFS/Samba - Video:
/mnt/dietpi_userdata/Video,/Videofrom NFS/Samba
Tutorial: Setup Guide for Plex on Raspberry Pi
YouTube video tutorial (German language): Raspberry Pi 4 - Plex TV Media Server unter DietPi installieren und Zugriff von aussen (FritzBox)
Tautulli
A Python based monitoring and tracking tool for Plex Media Server.

The web interface is accessible via port 8181:
- URL:
http://<your.IP>:8181 - After first run setup, select “SIGN IN WITH TAUTULLI” and enter the username and password you chose before. On our own tests, authentication via
plex.tvaccount did not work, it may however depend on the subscription.
Using <hostname>.local instead of using <your.IP> (Avahi-Daemon)
By installing Avahi-Daemon, the web interface can be accessed with <hostname>.local (default: dietpi.local) instead of using <your.IP>. See the Avahi-Daemon documentation for details.
When accessing to the web interface for the first time, go through the following steps to setup Tautulli:
- Click “Next”
- Enter a username and password for future web interface logins and click “Next”.
- Click “Sign In with Plex” and log in with your
plex.tvaccount in the new window, then click “Next”. - Enter the IP address or hostname of your Plex Media Server, use
127.0.0.1if it runs on the same machine, then click “Next”. - Choose the activity logging ignore interval and click “Next”.
- Click “Next” and “Finish”.
- When logging in to the Tautulli web interface, first select “SIGN IN WITH TAUTULLI” and enter the username and password you chose before. On our own tests, authentication via
plex.tvaccount did not work, it may however depend on the subscription.
Logs can be viewed from the web interface, using the gear button at the top right corner. Log files are stored on the server in the following directory:
/mnt/dietpi_userdata/tautulli/logs/
Official website: https://tautulli.com/
Source code: Tautulli/Tautulli
License: GPLv3
Murmur
Turn your device into a lightweight Mumble VoIP server.

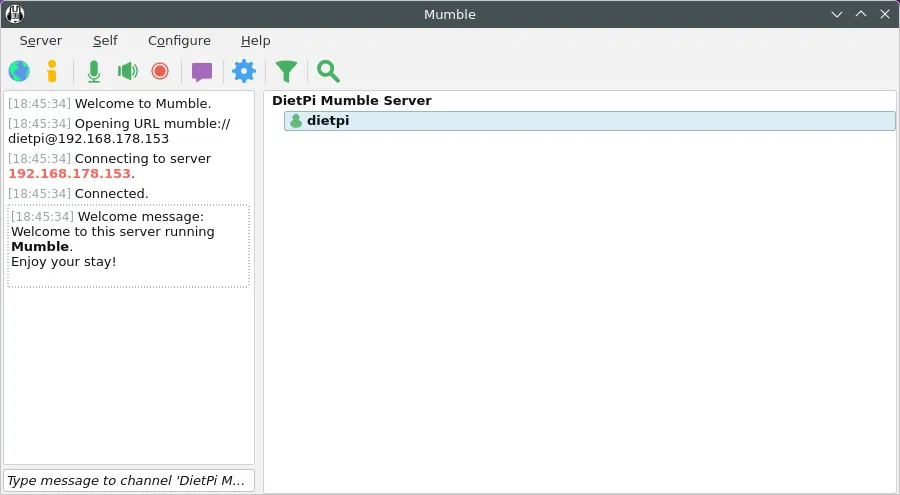
In order to connect to the Mumble server, a Mumble client is needed. They can be downloaded for various operating systems from the Mumble website https://www.mumble.info/downloads/.
In a DietPi system with a graphical desktop, the Mumble client can easily installed via
apt install mumble
The server is accessible via port 64738:
- URL:
http://<your.IP>:64738 - Password: No password required
- Superuser Password:
dietpi
Using <hostname>.local instead of using <your.IP> (Avahi-Daemon)
By installing Avahi-Daemon, the web interface can be accessed with <hostname>.local (default: dietpi.local) instead of using <your.IP>. See the Avahi-Daemon documentation for details.
You will need to edit the Murmur config file:
nano /etc/mumble/mumble-server.ini
systemctl restart mumble-server
On Debian Bookworm systems, the config file is located at /etc/mumble-server.ini.
Official website: https://www.mumble.info/
Source code: mumble-voip/mumble
Roon Bridge
Turns your SBC into a Roon capable audio player. By using the main Roon application on another device, you can stream your music catalogue directly to the Roon Bridge running on your SBC.


- Roon on another system (e.g.: Windows PC) to control the player.
- Roon license (free trial is also available).
The Roon Bridge installation can be found at:
/opt/roonbridge
Its configuration and data can be found at:
/mnt/dietpi_userdata/roonbridge
The Roon Bridge by default is started as systemd service and can hence be controlled with the following commands:
systemctl status roonbridge
systemctl stop roonbridge
systemctl start roonbridge
systemctl restart roonbridge
Service logs can be reviewed with the following command:
journalctl -u roonbridge
More detailed logs from the individual Roon Bridge components can be found at the following location:
/var/log/roonbridge
The Roon Bridge can be updated by reinstalling it, which preserves your data and configs:
dietpi-software reinstall 121
Official website: https://roon.app/
Official forum: https://community.roonlabs.com/
YouTube videos by David Snyder: https://www.youtube.com/c/dsnyder0cnn/search?query=roon
Roon Server
Turns your device into a Roon capable audio player and core server.
The Roon Server installation can be found at:
/opt/roonserver
Its configuration and database can be found at:
/mnt/dietpi_userdata/roonserver
The following music directory is prepared with permissions for Roon access and easy network transfer, as well as some default media to test the setup:
/mnt/dietpi_userdata/Music
When transferring media via NFS or Samba, it may appear as /Music.
dietpi-software allows you to select between stable and early access Roon Server builds.
To install early access builds of Roon Server automatically on first boot, adjust the following settings in dietpi.txt:
AUTO_SETUP_AUTOMATED=1
AUTO_SETUP_INSTALL_SOFTWARE_ID=154
SOFTWARE_ROONSERVER_EARLYACCESS=1
Early access builds have a higher chance to contain bugs, and you may need to restore a database backup when reverting from early access to stable builds.
More information about the Roon Early Access Program can be found here: https://help.roonlabs.com/portal/en/kb/articles/roon-early-access-program
You can use the Roon Remote apps to control and configure the Roon Server: https://roon.app/downloads
The Roon Server is started as systemd service by default and can hence be controlled with the following commands:
systemctl status roonserver
systemctl stop roonserver
systemctl start roonserver
systemctl restart roonserver
Service logs can be viewed with the following command:
journalctl -u roonserver
More detailed logs from the individual Roon Server components can be found at the following location:
/var/log/roonserver
The Roon Server comes with an internal updater which should be used. If the installation is broken in a way, you can repair it with a reinstall:
dietpi-software reinstall 154
Official website: https://roon.app/
Official forum: https://community.roonlabs.com/
YouTube videos from David Snyder: https://www.youtube.com/c/dsnyder0cnn/search?query=roon
Roon Extension Manager
At startup the Roon Extension Manager accesses a repository containing the community developed extensions. Via Settings > Extensions within Roon the repository can be viewed and an extension can be selected to perform a certain action.

Roon Extension Manager data and configs can be found at the following location:
/mnt/dietpi_userdata/roon-extension-manager
Details and usage information: https://community.roonlabs.com/t/roon-extension-manager-v0-11-8/26632
Credits: Many thanks to @JanKoudijs for contributing this into DietPi
NAA Daemon
Signalyst Network Audio Adapter (NAA) daemon allows you to stream music from an HQPlayer source (like Windows) and output directly from your DietPi device. Features DRC, high quality up-sampling (like 192 kHz) and more.
Also works with Roon.

This will allow you to stream audio from your Windows PC, to the NAA Daemon on the DietPi device.
- Download and install HQPlayer Desktop for Windows:
https://www.signalyst.eu/consumer.html - Run the program
- To configure HQPlayer to use the NAA Daemon on the DietPi device:
- Select
FilethenSettings - Under
Backend, selectNetworkAudioAdapter. The DietPi device should be detected automatically. - Click
OKto save changes
- Select
Since NAA Daemon runs as systemd service, it can be controlled with the following commands:
systemctl status networkaudiod
systemctl start networkaudiod
systemctl stop networkaudiod
systemctl restart networkaudiod
Run the following command on a console to view logs for NAA Daemon:
journalctl -u networkaudiod
dietpi-software reinstall 124
Website: https://www.signalyst.eu/consumer.html
Icecast
Shoutcast streaming server, includes DarkIce for audio input, like a microphone.

DietPi will attempt to detect mic input during installation, and apply to DarkIce. If a microphone was not available, or you experience issues, check available microphones with:
arecord -l
- Then edit the device entry in
/etc/darkice.cfg, or Simply copy and paste:
sed -i "/^device[[:blank:]]/c\device = hw:$(arecord -l | mawk -F'[ :]' '/card/{print $2;exit}'),0" /etc/darkice.cfgRestart the DarkIce service:
systemctl restart darkice
We create systemd services for both, Icecast and DarkIce, automatically started by DietPi. You can check their status by running the following command:
systemctl status icecast2
systemctl status darkice
The web interface is accessible via port 8000:
- URL:
http://<your.IP>:8000 - Admin user:
admin - Admin password:
<your global password>(default:dietpi) - Source password:
<your global password>(default:dietpi) - Relay password:
<your global password>(default:dietpi)
Using <hostname>.local instead of using <your.IP> (Avahi-Daemon)
By installing Avahi-Daemon, the web interface can be accessed with <hostname>.local (default: dietpi.local) instead of using <your.IP>. See the Avahi-Daemon documentation for details.
This is disabled by default.
A recording of the stream can be enabled by edit of
/etc/darkice.cfg, then uncommentlocalDumpFile = /mnt/dietpi_userdata/darkice_recording.oggRestart the DarkIce service:
systemctl restart darkiceA recording will then be saved in the following location:
/mnt/dietpi_userdata/darkice_recording.ogg
- Icecast:
/etc/icecast2/icecast.xml - DarkIce:
/etc/darkice.cfg
Run the following commands on a console to view logs for Icecast and DarkIce:
journalctl -u icecast2
journalctl -u darkice
Icecast additionally creates access and error log files at: /var/log/icecast2/
Icecast and DarkIce are installed from the Debian APT repository and hence can be updated by running the following commands:
apt update
apt install icecast2 darkice
Koel
Web interface music streamer.

The web interface is accessible via port 8003:
- URL:
http://<your.IP>:8003 - Email address:
admin@koel.dev - Password:
KoelIsCool
Using <hostname>.local instead of using <your.IP> (Avahi-Daemon)
By installing Avahi-Daemon, the web interface can be accessed with <hostname>.local (default: dietpi.local) instead of using <your.IP>. See the Avahi-Daemon documentation for details.
We strongly recommend to change the admin users email address and password:
- Login to the web interface
- Select “Users” at the bottom of the left-sided navigation panel
- However over the user tile and select “Update Profile”
- Change name and credentials and select “Save”
Make sure you have one of DietPi’s File Servers installed.
Default music directory:
/mnt/dietpi_userdata/Music,/Musicfrom NFS/Samba
To view Koel service logs, run the following command from console:
journalctl -u koel
To update Koel to the recent version, simply reinstall it:
dietpi-software reinstall 143
Official website: https://koel.dev/
Official documentation: https://docs.koel.dev/
Source code: koel/koel
License: MIT
GMediaRender
A DLNA audio render/endpoint. Allows you to stream and play music, from another device, such as BubbleUPnP.

- Edit
/etc/default/gmediarender Restart the service:
systemctl restart gmediarender
Installs on DietPi prior to v8.10
On earlier GMediaRender installs, this config file didn’t exist yet. If you applied command-line options via dietpi-services, you can migrate them to the new config file:
- Assure GMediaRender has been updated to latest version:
dietpi-software reinstall 163
- Migrate options from
/etc/systemd/system/gmediarender.service.d/dietpi-services_edit.confto/etc/default/gmediarender. - Remove obsolete config and restart service:
rm /etc/systemd/system/gmediarender.service.d/dietpi-services_edit.conf
rmdir --ignore-fail-on-non-empty /etc/systemd/system/gmediarender.service.d
systemctl daemon-reload
systemctl restart gmediarender
Logs can be viewed with the following command:
journalctl -u gmediarender
As GMediaRender is installed via APT, it can be update with the following commands:
apt update
apt install gmediarender
Ubooquity
Ubooquity is a free home server for your comics and ebooks library, with remote web interface viewing.

The web interface uses port 2038 resp. 2039:
- Admin page:
http://<your.IP>:2038/admin - Library view page:
http://<your.IP>:2039
Using <hostname>.local instead of using <your.IP> (Avahi-Daemon)
By installing Avahi-Daemon, the web interface can be accessed with <hostname>.local (default: dietpi.local) instead of using <your.IP>. See the Avahi-Daemon documentation for details.
Make sure you have one of DietPi’s File Servers installed.
Default directories:
- ebooks:
/mnt/dietpi_userdata/ebooks,/ebooksfrom NFS/Samba - Comics:
/mnt/dietpi_userdata/comics,/comicsfrom NFS/Samba
Use the admin page to set the above locations for ebook and comic storage, then run a scan to update the database.
dietpi-software reinstall 80
YouTube video tutorial: DietPi Ubooquity Comics and Ebook Reader on Raspberry Pi 3 B Plus
Komga
Free and open source comics/mangas media server with web UI.

The web interface is accessible via port 2037:
- URL:
http://<your.IP>:2037
Using <hostname>.local instead of using <your.IP> (Avahi-Daemon)
By installing Avahi-Daemon, the web interface can be accessed with <hostname>.local (default: dietpi.local) instead of using <your.IP>. See the Avahi-Daemon documentation for details.
Make sure you have one of DietPi’s File Servers installed.
Default directories:
- ebooks:
/mnt/dietpi_userdata/ebooks,/ebooksfrom NFS/Samba - Comics:
/mnt/dietpi_userdata/comics,/comicsfrom NFS/Samba
Variable data and configs are stored in the following directory:
/mnt/dietpi_userdata/komga
The configuration file can be found at the following location:
/mnt/dietpi_userdata/komga/application.yml
You need to restart the service for changes to take effect:
systemctl restart komga
Logs are stored in the system journal and can be viewed by running the following command:
journalctl -u komga
If you require file logging, set a path via config file, e.g.:
logging:
  file:
    name: "/var/log/komga/komga.log"
Assure that the directory exists and the komga user or group has write permissions.
To update Komga to the latest version, simply reinstall it via DietPi-Software:
dietpi-software reinstall 179
Official website: https://komga.org/
Official documentation: https://komga.org/docs/category/guides
Source code: gotson/komga
License: MIT
Raspotify
Spotify Connect client for the Raspberry Pi that Just Works™.
You will need a Spotify Premium account in order to use the Spotify Connect client.

Raspotify should work straight out of the box. However, you can change the available options in:
/etc/raspotify/conf
Then restart the service with:
systemctl restart raspotify
The service is started automatically at boot, but you can control it manually as well:
Manually start the service:
systemctl start raspotifyManually stop the service:
systemctl stop raspotifyManually restart the service:
systemctl restart raspotify
View the service logs via:
journalctl -u raspotify
Official website: https://dtcooper.github.io/raspotify/
Source code: dtcooper/raspotify
Spotifyd
Spotifyd is a lightweight FOSS Spotify client, supporting the Spotify Connect protocol.
You will need a Spotify Premium account in order to use the Spotifyd.
Spotifyd should work straight out of the box. However, you can change the available options in:
/mnt/dietpi_userdata/spotifyd/spotifyd.conf
Then restart the service with:
systemctl restart spotifyd
The service is started automatically at boot, but you can control it manually as well:
Manually start the service:
systemctl start spotifydManually stop the service:
systemctl stop spotifydManually restart the service:
systemctl restart spotifyd
View the service logs via:
journalctl -u spotifyd
Official documentation: https://spotifyd.github.io/spotifyd/
Source code: Spotifyd/spotifyd
License: GPLv3
Jellyfin
A FOSS web interface media streaming server, including live TV, forked from Emby.

The web interface is accessible via port 8097:
- URL:
http://<your.IP>:8097
Using <hostname>.local instead of using <your.IP> (Avahi-Daemon)
By installing Avahi-Daemon, the web interface can be accessed with <hostname>.local (default: dietpi.local) instead of using <your.IP>. See the Avahi-Daemon documentation for details.
Service:
journalctl -u jellyfinBinary:
/var/log/jellyfin/
/mnt/dietpi_userdata/jellyfin
Since Jellyfin is installed as APT packages, it can be updated with these commands:
apt update
apt upgrade
Source code: jellyfin/jellyfin
Beets
A command-line music organizer and manager. Some of the key features are:
- flexible automatic metadata corrector and file renamer
- album art downloader, lyrics fetcher, and genre identifier
- music metadata inspection and modification tool for lots of audio file types

Start by typing beet in the command line. All the options and commands will be made available.
You could start using Beets by importing music with beet import and then query the library with ‘beet list’. For example next command line shows all Tangos in the year 2010
beet ls year:2010 genre:Tango
You can change the Beets configuration, by editing next file: /mnt/dietpi_userdata/beets/config.yaml.
Official website: https://beets.io/
Official documentation: https://beets.readthedocs.io/en/stable/
Source code: beetbox/beets
License: MIT
Snapcast Server
A FOSS multi room audio solution - this part is the server app it sends music to one or more clients to play.
![]()
The Snapcast server needs to have its audio sources manually configured after installation. See the Snapcast documents for more details: badaix/snapcast#server
The Snapcast server provides a web interface on port 1780, which allows you to control volumes for all clients and optionally play audio through your browser:
- URL:
http://<your.IP>:1780
Using <hostname>.local instead of using <your.IP> (Avahi-Daemon)
By installing Avahi-Daemon, the web interface can be accessed with <hostname>.local (default: dietpi.local) instead of using <your.IP>. See the Avahi-Daemon documentation for details.
DietPi-Software installs the Snapcast server nearly with default configs, as shipped with the official package. Only the JSON RPC, which listens by default on port 1705, is disabled. To enable and configure it, check the [tcp] section of the config file (see “Changing options” tab).
/etc/snapserver.conf
Then restart services with:
systemctl restart snapserver
If you have MPD installed you can use it as an input source.
First you need to ensure that MPD outputs to a pipe you can do this in two ways:
- Install CAVA from the DietPi software list.
OR: Add the following to
/etc/mpd.confand restart withsystemctl restart mpdaudio_output { type "fifo" enabled "yes" name "snapcast" path "/tmp/mpd.fifo" format "48000:16:2" }
Once you have done that you then need to add the following to /etc/snapserver.conf under [stream]. The name is the name as it will appear to Snapcast clients here I have called it myMPD. Check the Snapcast server docs for additional parameters you can pass in: https://github.com/badaix/snapcast/blob/master/doc/configuration.md#pipe
source = pipe:///tmp/mpd.fifo?name=myMPD&mode=read
If you have Mopidy installed you can use it as an input source.
First you need to ensure that Mopidy outputs to a pipe. Add the following to /etc/mopidy/mopidy.conf and restart with systemctl restart mopidy
[audio]
output = audioresample ! audioconvert ! audio/x-raw,rate=48000,channels=2,format=S16LE ! wavenc ! filesink location=/tmp/mopidy.fifo
Once you have done that you then need to add the following to /etc/snapserver.conf under [stream]. The name is the name as it will appear to Snapcast clients here I have called it myMopidy. Check the Snapcast server docs for additional parameters you can pass in: https://github.com/badaix/snapcast/blob/master/doc/configuration.md#pipe
source = pipe:///tmp/mopidy.fifo?name=myMopidy&mode=read
If you have Raspotify installed you can use it as an input source.
Add the following config under [stream]. The name is the name as it will appear to Snapcast clients here I have called it mySpotify. The devicename is the name that will be shown when connecting in Spotify. Check the Snapcast server docs for additional parameters you can pass in: https://github.com/badaix/snapcast/blob/master/doc/configuration.md#librespot. I have disabled the audio cache to protect the SD card.
source = librespot:///usr/bin/librespot?name=mySpotify&devicename=SnapcastSpotify&disable_audio_cache=true
First install Shairport Sync:
dietpi-software install 37
Then add the following config to /etc/snapserver.conf under [stream]. The name is the name as it will appear to Snapcast clients here I have called it myAirport. The devicename is the name that will be shown when searching for Airport devices. Check the Snapcast server docs for additional parameters you can pass in: https://github.com/badaix/snapcast/blob/master/doc/configuration.md#airplay
source = airplay:///usr/local/bin/shairport-sync?name=myAirport&devicename=SnapcastAirport¶ms=--configfile=/usr/local/etc/shairport-sync.conf
You will then either need to disable the original Shairport Sync service
systemctl disable --now shairport-sync
or you can try to run one of them on a different port - Snapcast docs shows how to do this here: https://github.com/badaix/snapcast/blob/master/doc/configuration.md#airplay
Source code: badaix/snapcast
Snapcast Client
A FOSS multi room audio solution - this part is a client app it listens to the server and plays the audio it is sent
![]()
The Snapcast client will prompt you for the server’s IP and port when installing and will be setup to start on boot up. This should work for most people but there are additional configuration parameters that can be found in the Snapcast documentation: badaix/snapcast#client
It should just work but, you can change the available options in:
/etc/default/snapclient
Then restart services with:
systemctl restart snapclient
Source code: badaix/snapcast
Navidrome
An open source web-based music collection server and streamer, written in Go.
It is compatible with the Subsonic media player.

The web interface uses port 4533:
- URL:
http://<your.IP>:4533
Using <hostname>.local instead of using <your.IP> (Avahi-Daemon)
By installing Avahi-Daemon, the web interface can be accessed with <hostname>.local (default: dietpi.local) instead of using <your.IP>. See the Avahi-Daemon documentation for details.
The install, config and data directory is located at:
/mnt/dietpi_userdata/navidrome
The default music directory is located at:
/mnt/dietpi_userdata/Music
When transferring via NFS or Samba, it may appear just as /Music.
Navidrome has a Subsonic-compatible server built in, so there should be plenty of clients for different platforms available. See:
Since Navidrome runs as systemd service, it can be controlled with the following commands:
systemctl status navidrome
systemctl start navidrome
systemctl stop navidrome
systemctl restart navidrome
Since Navidrome runs as systemd service, its logs can be viewed via:
journalctl -u navidrome
Navidrome can be updated by simply reinstalling it:
dietpi-software reinstall 204
Website: https://www.navidrome.org/
Source code: navidrome/navidrome
License: GPLv3
Kavita
Kavita is a self-hosted library, for comics, manga or books.

A highlight of some of its key features:
Versatile Content Support: Kavita ensures a comprehensive library experience by serving Manga, Webtoons, Comics (
cbr,cbz,zip/rar/rar5,7zip, raw images), and ebooks (epub,pdf).Efficient Organization with metadata richness: Kavita has a rich metadata support, enhancing user experience with effective filtering and searching. Users can efficiently organize their reading materials through Collections, Reading Lists (CBL Import), and a Want to Read feature, ensuring a well-structured library.
Personalisation and Theming: With support for Dark mode and customizable theming, Kavita allows users to tailor their reading environment according to their preferences for a personalised and visually comfortable experience. It has a responsive interface that works great on any device (phone, tablet, desktop). Dark mode and customizable theming support
The web interface is accessible via port 2036:
- URL:
http://<your.IP>:2036
The first time the user logs in, an admin account with a username and password has to be entered in the initial login dialog.
Using <hostname>.local instead of using <your.IP> (Avahi-Daemon)
By installing Avahi-Daemon, the web interface can be accessed with <hostname>.local (default: dietpi.local) instead of using <your.IP>. See the Avahi-Daemon documentation for details.
The configuration directory is located at:
/opt/kavita/config
For comics and ebooks, the following two directories have been prepared.
/mnt/dietpi_userdata/comics
/mnt/dietpi_userdata/ebooks
Any other directory could be used, as long as kavita or dietpi users have read and write permissions.
Kavita runs as systemd service and it can be controlled with the following commands:
systemctl status kavita
systemctl start kavita
systemctl stop kavita
systemctl restart kavita
Kavita runs as systemd service, its logs can be viewed via:
journalctl -u kavita
Kavita can be updated by simply reinstalling it:
dietpi-software reinstall 212
Website: https://www.kavitareader.com/
Documentation: https://wiki.kavitareader.com/
Source code: Kareadita/Kavita