Hardware Projects
Overview
- PiJuice - PiSupply UPS/battery power system
- RPi.GPIO - GPIO Interface library for RPi (python)
- WiringPi - GPIO Interface library
- WebIOPi - Web interface to control RPi GPIO
- Node-RED - Visual tool for wiring together hardware devices, APIs and online services
- Mosquitto - Message broker that implements MQTT protocol
- Blynk Server - Blynk server with web and MQTT interface for controlling IoT devices, written in Java
- Audiophonics PI-SPC - Power control module for Raspberry Pi, allowing physical button power on/off
- Grafana - The open platform for beautiful analytics and monitoring
How do I run DietPi-Software and install optimised software items?
To install any of the DietPi optimised software items listed below run from the command line:
dietpi-software
Choose Browse Software and select one or more items. Finally select Install.
DietPi will do all the necessary steps to install and start these software items.

To see all the DietPi configurations options, review the DietPi Tools section.
Return to the Optimised Software list
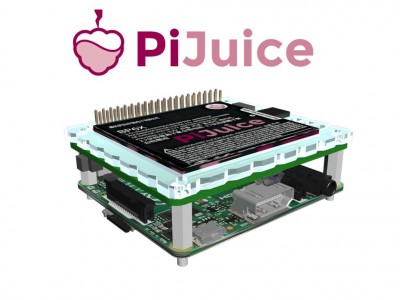
PiJuice
PiJuice is an all in one, battery based power supply HAT for the RPi, featuring UPS capabilities and battery run time.
Our default installation does not include the desktop application. If required, please install a desktop first, then execute the following command to install the GUI afterwards:
apt install pijuice-gui
The PiJuice program can then be launched (LXDE) from LXDE start > Preferences
- SW1 = Power on unit
- SW2 = Power off unit (runs a sample script which can be modified
/var/lib/dietpi/dietpi-software/installed/pijuice/pijuice_func1.sh) Additional configuration can be made via editing the following file (Full list of available config options):
nano /var/lib/pijuice/pijuice_config.JSON
Restart the service to apply any changes:
systemctl restart pijuice
At the time of writing, this will update firmware on the device to V1.1_2018_01_15, however, please replace the firmware link with the latest version:
wget https://github.com/PiSupply/PiJuice/raw/master/Firmware/PiJuice-V1.1_2018_01_15.elf.binary -O package.binary
chmod +x package.binary
pijuiceboot 14 package.binary
RPi.GPIO
The standard, well known GPIO interface library for the RPi (Python). Bring out the engineer in you!
Website: https://pypi.org/project/RPi.GPIO/
WiringPi
Alternative GPIO interface library based on C. Bring out the engineer in you!

cd /root/wiringPi*
ls -l
gpio -v
gpio readall
Website: http://wiringpi.com
WebIOPi
WebIOPi allows you to control your Raspberry Pi’s GPIO hardware using a web interface.
The web interface is accessible via port 8002:
- URL =
http://<your.IP>:8002 - Username =
webiopi - Password =
raspberry
Using <hostname>.local instead of using <your.IP> (Avahi-Daemon)
By installing Avahi-Daemon, the web interface can be accessed with <hostname>.local (default: dietpi.local) instead of using <your.IP>. See the Avahi-Daemon documentation for details.
- Run
webiopi-passwd - Enter the username
webiopi - Enter your new password twice
You must also restart the webiopi service for your new password to take effect:
systemctl restart webiopi
To be able to access your WebIOPi interface over the internet, you may install Remote.it (Weaved).
Website: https://webiopi.trouch.com
Node-RED
Node-RED is a visual tool for wiring together hardware devices, APIs and online services in new and interesting ways. Node-RED uses a standalone web server that can be accessed remotely.

The web interface is accessible via port 1880:
- URL =
http://<your.IP>:1880
Using <hostname>.local instead of using <your.IP> (Avahi-Daemon)
By installing Avahi-Daemon, the web interface can be accessed with <hostname>.local (default: dietpi.local) instead of using <your.IP>. See the Avahi-Daemon documentation for details.
To install the Node-RED dashboard, the user interface of Node-RED, use settings “Manage palette” from programming IDE or run the following command from console:
node-red-admin install node-red-dashboard
Use the following URL to connect to the dashboard from your browser:https://<your.IP>:1880/ui/
Using <hostname>.local instead of using <your.IP> (Avahi-Daemon)
By installing Avahi-Daemon, the web interface can be accessed with <hostname>.local (default: dietpi.local) instead of using <your.IP>. See the Avahi-Daemon documentation for details.
Node-RED, all configs and data is stored in the following location:/mnt/dietpi_userdata/node-red
To view Node-RED service logs, run the following command from console:
journalctl -u node-red
You can update Node-RED modules via programming IDE. To update the “node-red” core module, run the following command from console:
systemctl stop node-red
cd /mnt/dietpi_userdata/node-red
sudo -u nodered npm i --no-audit node-red@latest
systemctl start node-red
The current Node-RED version can be read in the programming IDE in the burger menu at the right upper corner.
Newer Node-RED versions might require a newer Node.js version. If this is the case, to update Node.js as well, easiest is to reinstall Node-RED. Your additional plugins, data and configs are preserved:
dietpi-software reinstall 122
Website: https://nodered.org
Libraries resp. flows: https://flows.nodered.org
Mosquitto
Eclipse Mosquitto™ is an open-source (EPL/EDL-licensed) message broker that implements the MQTT protocol versions 3.1 and 3.1.1.
MQTT provides a lightweight method of carrying out messaging using a publish/subscribe model. This makes it suitable for IoT (Internet of Things) messaging such as with low power sensors or mobile devices such as phones, embedded computers or microcontrollers like the Arduino.

Mosquitto by default listens on network port 1883. Clients need to authenticate with the following credentials:
- Username:
mosquitto - Password:
<your global password>(default:dietpi)
- Config directory:
/etc/mosquitto - Config file:
/etc/mosquitto/mosquitto.conf - Password file:
/etc/mosquitto/passwd
To change the default authentication password for the mosquitto user, run the following command:
mosquitto_passwd /etc/mosquitto/passwd mosquitto
To create a new authentication user, run the following command:
mosquitto_passwd /etc/mosquitto/passwd <new_user_name>
After changes have been done, you need to restart the service:
systemctl restart mosquitto
For further details, see the official documentation, linked below.
To view Mosquitto server logs, run the following command:
journalctl -u mosquitto
Mosquitto is installed via its official APT repository, hence the following commands can be used to update it to the latest version:
apt update
apt install mosquitto
Official website: https://mosquitto.org/
Official documentation: https://mosquitto.org/documentation/
Source code: eclipse/mosquitto
Blynk Server
Platform with iOS and Android apps to control Arduino, ESP8266, Raspberry Pi and similar microcontroller boards over the Internet, written in Java. This is the server component to replace the Blynk Inc. cloud servers.
Also installs:
- Blynk JS library: https://www.npmjs.com/package/blynk-library
The web interface uses port 9443:
- URL:
https://<your.IP>:9443/admin(You may ignore the browser warning, as a self-signed certificate is used by default.) - Email address:
admin@blynk.cc - Password:
<your global password>(default:dietpi)
Using <hostname>.local instead of using <your.IP> (Avahi-Daemon)
By installing Avahi-Daemon, the web interface can be accessed with <hostname>.local (default: dietpi.local) instead of using <your.IP>. See the Avahi-Daemon documentation for details.
DietPi installs Blynk (including user data and config file) to the following location:
/mnt/dietpi_userdata/blynk
Logs can be viewed via:
journalctl -u blynkserver
and more detailed log files in:
/var/log/blynk
We created a systemd service for Blynk, automatically started by DietPi at boot:
systemctl status blynkserver
DietPi will also install the Blynk JS library, along with this installation. Please skip this section when you reach the Blynk user guide.
Config file changes via web UI do not have any effect.
To change settings you need to edit
/mnt/dietpi_userdata/blynk/server.properties
and restart the Blynk server:
systemctl restart blynkserver
The new “Blynk IoT” app does not support a self-hosted Blynk server!
The “legacy” Blynk app will prompt hints about the new “Blynk IoT” app at several places. You need to ignore these since the new app does not support self-hosted Blynk severs, but only the Blynk Inc. cloud.
- Download the Blynk app for Android: https://play.google.com/store/apps/details?id=cc.blynk
- To log into your own server, press
Log In, then the three dots at the bottom and switch the slider toCUSTOM. - There you can enter your own Blynk server’s IP/domain and use the above login credentials.
- Create a new project by following this guide: https://docs.blynk.io/en/getting-started/what-do-i-need-to-blynk
- The authentication token for the new project can be obtained from the app and as well from the web interface at
Users>admin@blynk.ccwithin theProfile DashBoardssection. Use it to connect with your Blynk library Node scripts.
Once you created a project in the iOS/Android app, you may test the connection via /mnt/dietpi_userdata/blynk/client-tcp-local.js. You need to edit the file and replace YOUR_AUTH_TOKEN with the authentication token of your project. Then run it:
/mnt/dietpi_userdata/blynk/client-tcp-local.js
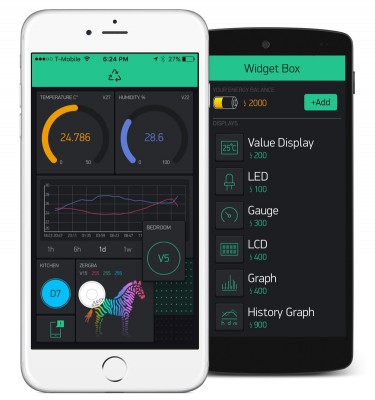
Within the script you can also define event listeners and handlers. By default the value of the virtual pin V1 is printed to console when it changes, and the value of the virtual pin V9 is set to system time seconds whenever the pin is read. For a more interactive test you could hence add the following widgets to your project via app:
- Add a
Buttonand change itsOUTPUTpin toVirtual>V1. Go back and hit the play button. Whenever you push the button in the app, the test script console should print the value changes as defined. - Hit the stop button. Add a
Value Display, change itsINPUTpin toVirtual>V9and theREADING RATEto1 sec. Go back and hit the start button. While the test script is running, the display widget will not show the server’s system time seconds, updated every 1-2 seconds.
Hit Ctrl+C to exit the test script.
Update Blynk with:
dietpi-software reinstall 131
Official website: https://blynk.io/
Official documentation: https://docs.blynk.io/
Source code: Peterkn2001/blynk-server
License: GPLv3
Blynk Android app: https://play.google.com/store/apps/details?id=cc.blynk
Blynk JS library npm page: https://www.npmjs.com/package/blynk-library
Blynk JS library source code: vshymanskyy/blynk-library-js
Blynk JS library license: MIT
Audiophonics PI-SPC
Power control module for Raspberry Pi which allows you to physically power on/off the system, without the need to run poweroff. See https://www.audiophonics.fr/en/raspberry-pi-and-other-sbc-accessories/audiophonics-pi-spc-v2-power-management-module-for-raspberry-pi-p-10912.html for further details.
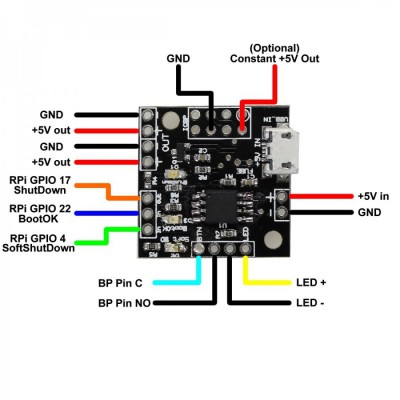
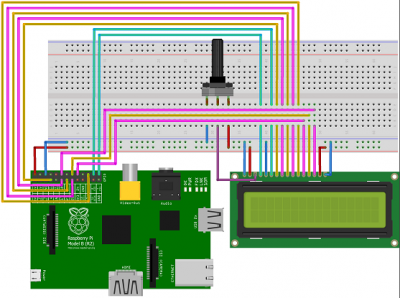
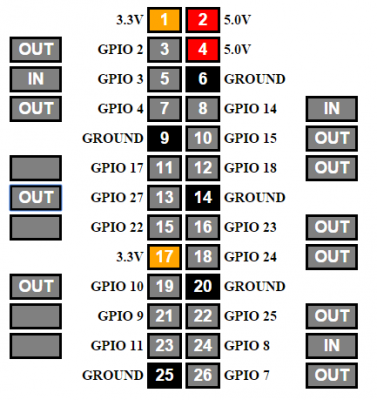
Ensure correct GPIO pins!
Please ensure the correct GPIO pins are used, when connecting Pi-SPC to RPi (see image below).

To power off the system begin the shutdown process: Hold the power button for < 0.5 seconds. If you don’t have a button, you can also close the pins BP PIN C and BP PIN NO, with your favorite electrically conductive metal (e.g.: tweezers).
Remark: Avoid holding the power button for longer than 2 seconds, as this will hard power off the system (same effect as pulling the power cord). Doing so will create file-system corruptions, during shutdown IO operations.
Grafana
The open platform for beautiful analytics and monitoring.
This installation and documentation was possible, thanks to @marcobrianza.
Remark: Grafana binaries are specific to the CPU architecture, therefore, swapping SD cards between RPi 1 <> 2+, is not recommended.

A database server is required for Grafana. As Grafana offers many options (InfluxDB/MySQL), we have not automatically installed either as manual configuration may be preferred.
However, we highly recommend installing InfluxDB.
You can do this using the install steps provided by DietPi-Software tool or running the next command line in the terminal:
dietpi-software install 74
After the InfluxDB is installed, please follow the database creation guide here.
The web interface is accessible via port 3001:
- URL:
http://<your.IP>:3001 - Username:
admin - Password:
<your global password>(default:dietpi)
Using <hostname>.local instead of using <your.IP> (Avahi-Daemon)
By installing Avahi-Daemon, the web interface can be accessed with <hostname>.local (default: dietpi.local) instead of using <your.IP>. See the Avahi-Daemon documentation for details.
If you have created a database as per the InfluxDB online documentation, please follow these instructions:
- From the Home Dashboard click
Add data source, then enter the following information:- Type =
InfluxDB - URL =
http://localhost:8086 - Database =
mydb - Username =
test_user - Password =
test_password01 - Leave the remaining items with the default values.
- Type =
- Click
Save & Test - From the Home Dashboard
- click
New dashboard - click
Graph - click on the example graph
- Press E to edit the Data Source and the custom query
- click
The data location for Grafana is stored resp. linked with symbolic links to the DietPi userdata directory: /mnt/dietpi_userdata/grafana